|
|
|
Steve: Pleae put me down as another interested party. Its nice to see that owners of other models read the PV board as well.
Bob
|
|
|
|
I'm having photo transfer problems at the moment. I'll begin building the website this weekend, and add photos as soon as I resolve my troubles.
Sreve
|
|

|
|
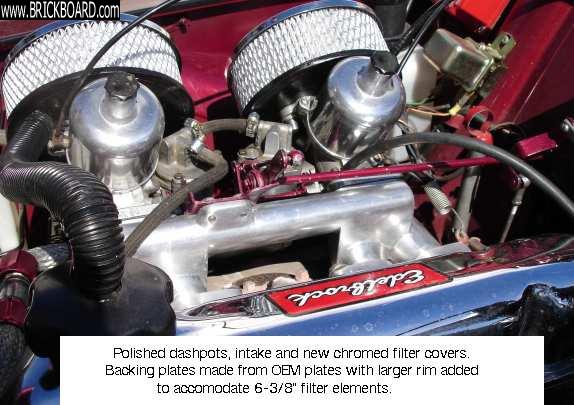
If you write this information up where we (brickboarders) can take advantage of it--You'll make a lot of folks very happy--me included. I have just today finished fitting the new gauges for my soon to be installed and polished instrument panel(544). It REALLy looks great on the bench and should look even better in the car. I would put in a picture, but don't know how to do it.
|
|
|
|
|
I had a lot of trouble getting the photo upload utility to accept photos too.
I found a way around the problem: Go to the Upload page and enter the data requested, but don't click on the final 'Submit' button.
Move your mouse pointer back up to the box where you entered the subject name, then click to put the little typing marker in it at the end of the subject.
Now press ENTER and the utility will upload your picture. this works for me every time.
|
|
|
|
|
Steve,
You probably KNOW I could absolutely benefit from such a guide. I would also love to take this information and post it as a "how to" or FAQ on my 444 site if you are interested.
Thanks in advance,
--
Tony 1958 P444 (44408), ID 187797 : See site for info Visit Scarola's PV Register
|
|
|
|
I'd sure appreciate seeing your techniques. My old 444 has a combination of stainless steel, pot metal and plain old rusty iron. I'm sure there's a better method than using fine steel wool! Please add my name to your list of students.
--
Cam a.k.a. CVOLVO.COM
|
|
|
|
|
id be very interested in having this done. would be a huge help!
|
|
|
|
|
In the next couple of months I'll be starting on the 444 stainless trim. Any tips will be appreciated.
Keith W.
444 Project, Moline, IL
|
|
|
|
|
I'll be turning a twin cam alloy Alfa motor into a coffee table soon, would like to know more, the amazon might get some TLC too!
|
|
|
|
|
Most of the stainless trim on a 444 is basically the same as the 544. I have restored about 20 pieces and depending on condition the result is very good to excellent. It takes a LOT of gentle hammering on the bad spots and then sanding (400 grit) and then polishing. I even made a very small English Wheel to roll the inside of the trim pieces, and that helped a lot on reducing the size of the dents. I do have several pieces I could part with if you are interested.
|
|
|
|
|
I would surely like to see how you fashioned your mini e-wheel. I'm going to a Metal Meet this weekend where the guys attending regularly fashion replacement fenders for things like Jag 120s. There will be some vendors there with bigger examples that what you made, but still would like to see your wheel. I've attempted to restore some of the stainless on my car with mixed results, mostly because my patience can wear thin.
--
Joe in St Louis
|
|
|
|
|
When he mentioned a mini-English Wheel, I immediately got jealous!
I also thought of how I could make a mini hammer mill using tools I have here at the house.
I have several scroll saws - the bench-mounted tools with the long arms that use the tiny blades to cut intricate designs in wood (or in my case, aluminum!)
One is quite a bit larger than normal, an industrial model of some kind. It uses a 1/2hp motor...and the blades are too large for the delicate work I do. It's been sitting on the bench taking a vacation for a couple of years now.
If I make a set of small hammers to replace the blades, I can set up a steel or wood-covered-with-leather anvil and use the up-and-down strokes of the saw arm to tap metal.
With a curved-head hammer I'd get a dished effect...and many others depending on how I set it up.
I know how to make an English wheel, and that may become a project of its own when I finally get some space in my garage. Right now it's bad enough to have to drag my toolbox out into the driveway to get the drawers open!
Steve
|
|
|
|
|
If you also have any plans, ideas, etc. for makeing your own buffing wheel froma spare motor, I'd like to hear 'em.
SecondChanceGarage.com did an article about making a set up using the motor from an old washing machine, or somethng. I have a 1.5 HP inground pool pump motor I'd like to deploy as the basis for a two-wheeled buffer runnning of a belt drive from this motor.
I'd also appreciate any ideas you have about setting up your workspace for buffing. Elbow room, dust catching/collection, materials & tool Storage, lighting, etc.
|
|
|
|
|
I'll certainly cover this in the article. Frankly, I'm a little surprised at the enthusiasm generated by this proposal!
To get you started, you'll want a motor capable of 1780-3640 RPM/ Most electric motors run at one speed or the other. In my opinion, the slower motor will give you more control and have less tendency to rip your item out of your grasp and throw it across the garage.
When you have your motor (1/2 HP or less) make sure you can mount it securely to a worktable or workbench. Having it fastened down securely you can use both hands to manipulate your workpiece. I'm using a motor from a 'swamp cooler' that we use out here in dry country. I mounted it so the end with the polishing wheel on it hangs out over the end of my workbench. This way I'm not restricted to small buffing wheels and I also have more ability to move my workpiece around, even under the wheel, to get the best effect.
If your motor came with a pulley on it, you'll want to remove that. Your goal is to affix a (AAAGHH! Forgot the word!) shaft that accepts a polishing wheel or sanding disk. You need to be able to pass a bolt or screw through the middle of the buffing wheel and into the center of the new shaft piece. (Someone please come up with the word for the fitting!) These fitting are very common and should be available in your local hardware store.
You'll have a wide choice of wheel diameters, which will give you different results. Remember the bigger the buffing wheel, the faster the edge will turn. Also, big wheels cannot get into tight spaces, while small ones take longer to do their polishing job, but can get into areas the bigger wheels can't.
You'll need to buy a selection of buffing wheels; large ones for open areas and high speed buffing, middle-sized ones for medium sized workpieces, and small ones for slower buffing and tight spaces.
Also, when you go shopping, you'll find that buffing wheels come in different widths. I generally use the narrower wheels for more control, but the wider ones have their place too.
Just a quick note on buffing compounds: Wherever you find your linen buffing wheels, you should find cardboard tubes of polishing compound, called ROUGE. There are several grits available, and their use is outlined on the outside of each package.
Regardless of what the packaging says, get a BLUE, a GRAY, and a RED as a minimum. You apply these compounds to the spinning wheel by gently pressing the end of the stick against the linen wheel. You should see a color change where the rouge has adhered. Don't go overboard with the compound. If you use too much, it will melt to your workpiece and you'll have to wash it off.
There are two ways to change grits; you can place a flat piece of metal at 90 degrees to the edge of the wheel and it will cut most of the leftover rouge away. Think of trying to polish the narrow edge of the backside of a knife.
The better method is to change wheels, reserving at least one wheel for each type of rouge.
You can make your wheels look and perform like new by tossing them into a washing machine and running them through a cycle. I generally do this when the rouge is too caked up on the wheels to perform well.
Anyway, I'll go into this a whole lot more in the upcoming article. The only thing holding me up right now is my dead computer that has all the photo card ports on it.
Steve
|
|
|
|
|
Eastwoods in PA is a good source for buffing supplies via mail-order. Once you buy from them you'll get catalogs almost monthly from them as well.
http://www.eastwoodco.com/
Bob
|
|

|
|
If you write up an article, I'd be more than happy to host it (and the requisite large pictures).
--
alex
|
|
|
|
|
The only thing better than a good working part or component is a shiny good working part or component. I have buffed out some parts but nothing like what I see in your pictures. I would appreciate the write up.
Dennis C
|
|
|
|
|
I'm getting ready to start polishing the lips on those steel Ford wheels, and I'd love some instructions/suggestions/pointers.
|
|
|
|
|
Given the number of adolescents now being given 700/900 cars, I am sure there is room for these tips in the 700/900 FAQ.
--
See the 700/900 FAQ under 'Select Link' button on the top right.
|
|
|
|
|
If you've got the time I'd sure be thankfull.
--
Dave Shannon
Spring Valley, California
'63 P-210
'67 1800s
'73 1800ES
'88-240
my pages
|
|
|
|
|
I bought a 69 red 142, it had the same owner for 29 years (a uni-prof, of course..!) and came with just under $30,000.00 CAN in maintenence records.
Not bad for a car that cost $4050.00 brand new.
A lot of the money was things such as regular polishings, seat re-cushioning, etc. Thankfully the BW35 was replaced 30,000 miles ago in 1997. $500.00 for a brand new tranny, then.
I'd like to keep up this guy's basic care and love for the car. Polishing some of the stranger vehicle parts would be a great asset to the value and the karma of that lil'red time machine.
I'm in!
Josh in Saskatchewan
|
|
|
|
|


