|
About the best you will do on AC is the old green manuals.
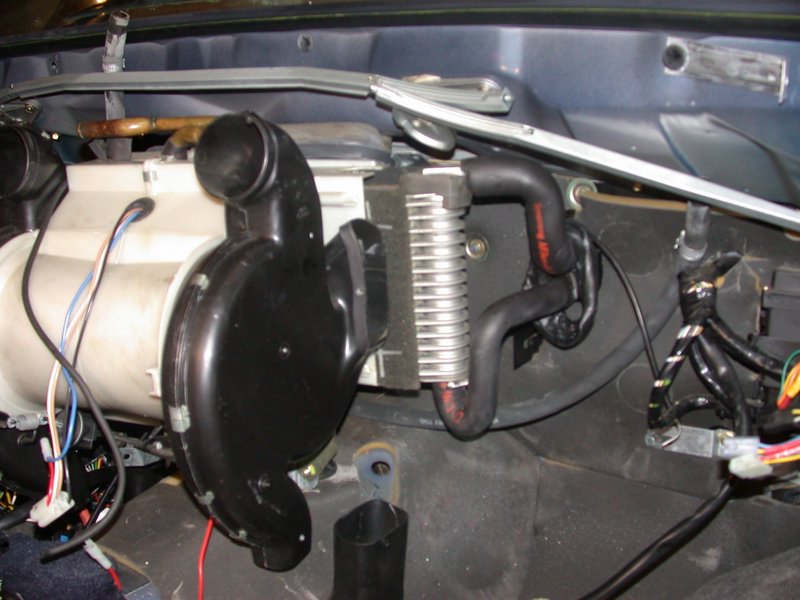
On the expansion valve you remove the front seat and the glove box. Then the side panel of the instrument cluster. You will have to dig out all the butyl to get to the valve, wear glove or you will be wearing it. You will need two good open end wrenches do not remember the size but I had them in the tool box 17mm and 15mm comes to mind, but not sure. There is a place for a wrench to hold the valve in place when you loosen the nut. Hold the evaporator side firmly and loosen the nuts. There is a spring shaped thermocouple that is held onto the line up in the condenser unit. You will need to pop or gently pry that loose. Keep the clip and get ready for reuse. Installation is the opposite of removal. I would pull the dash top to change out the condenser. Reused the old one in my 86 when I did the conversion and new compressor. If you remove the dryer, take the hoses off the compressor and take out the expansion valve you can use cleaner and shop air to clean out all the lines. I was surprised by the brown gunk that came out, used the stuff Auto Zone sells for the cleaner. Came with this stopper that you can use to plug off one end when you spray in the cleaner and blow out the junk. Watch the o rings when you install the new evaporator onto the lines. Add insulation to the lines on and around the evaporator to prevent moisture from accumulating and dripping on the carpet.
Wait until the last minute to put the dryer on, remove the old low pressure switch and add the recommended amount of oil (should tell you on the paperwork, my last one was 1 oz) before you tighten on the switch and add the lines back on. The same size o ring fits the dryer and the expansion valve so get at least four of those. You want the entire system closed before you install the new dryer. That is to keep excess moisture out it.
If you are going with R12/F12 you can leave the compressor oil alone. If you are reusing the old R12 compressor but converting to R134 you want to pull off the compressor and drain the oil. Measure the amount when you do, that is the amount plus maybe a 1/2 oz more you want to add back. I would use PAG 40 for a R134 system unless you do not want to drain the compressor. It works much better than Ester with R134. I would pour in some PAG and rotate the front of the compressor. Then pour all of that out to get as much of the old oil out as possible before adding the new PAG. I had a new compressor so just added the amount of oil called out on the paper work. Too much oil will degrade system performance.
The purpose of the vacuum on R134 is to check for leaks so you do not have to open the system back up and waste coolant. If you are going back with R12 that is really important for both moisture removal and making sure the system is good and tight.
You will need just a touch over 3 cans of 12 oz R12 or R134. You use the 80% rule when you fill a converted system with either of those coolants. Should be 45.8 Oz if you go back with R12.
Doing the fill you will need to jumper the low pressure switch or move the connector down under the AMM so that the switch is bypassed. I go with the little jumper, hate digging around in there under the AMM, hooking up the fill valves is bad enough. Hook up the gauges with the valves closed and crank the car. Crank the knob full CW to the Blue. After a few seconds delay the compressor will start growling at you, the clutch makes a click when it pulls in. Let the compressor run for a minute or so to move oil and build up a little pressure before you open the low side fill valve. You do not want excess pressure in the low side. It is possible to ruin a compressor per what you read. So low and slow, most people say keep your fill pressure under 40 PSI. About 1/2 way into can number two you should feel cool air coming out of the vents. When you get to the end of can three stop and let the system run for a couple of minutes with the valves shut and watch the pressures. R12 runs lower on the high side than F12 or R134. The best pressure setting for my 240 running R134 seems to be at temps around 90F a pressure near 35 on the low and 220 on the high. Reached those numbers by raising and lowering pressure and driving the car with a kitchen thermometer in the middle vent. There is low 40 degree air coming out of the vents at highway speeds. What you do not want to do is get the low side pressure much above 38 PSI, the system performance drops off dramatically when the pressure gets too high.
You will want to road test the AC to see how well it is working. There is just not enough air moving across the evaporator when you are sitting at idle.
I have added a pusher fan off of a 92 model and a Tropical Fan Clutch (AKA the swamp cooler) and both have really helped with performance at lower speeds.
Good Luck, hope this helps, and get your cool on.
Paul
|