|
|
|
Hello all,
This winter my PV is due for some much needed repairs. I am afraid that one thing may lead to another and he will still be in the garage this time next year in a million pieces but anyways.
I need to rebuild the front suspension. Do all suppliers have the same parts or are there various levels of quality available? Is there any part of this job that I will not be able to do myself?
I also need to pull the engine to eliminate the oil leaks. The B20 runs great but leaks more than a BP oil rig. Of course while it's out I will be able to clean and detail under the hood. Would removing the front sheetmetal be worth the trouble while I accomplish all of this?
Thanks
--
Bob, SC, 1965 PV544, 1988 240 wagon
|
|
-
|
|
|
Thanks for all of the responses. I think I will separate the two jobs. The front end will come first. The one question that I had that didn't get anwsered is the parts themselves. Do all venders parts come from the same source or are different quality levels of parts out there? I don't want to spend the time and money only to install inferior parts.
--
Bob, SC, 1965 PV544, 1988 240 wagon
|
|
-
|
|
|
I did a complete front end rebuild on my first Volvo--a '65 544 bought in '74. Everything was totally frozen. The upper control arm pivot is a threaded affair to allow for caster adjustment. It pays to have an oxy-acetyline torch available to get things loosened up (cherry red was the color of choice). It's my firm belief if I hadn't had such a torch but relied on soaking with rust bust (whatever your favorite is) I'd still be looking to get it apart. Have fun but prepare to need sanity breaks now and then. -- Dave
|
|
-

|
|
Just a couple suggestions based upon personal experience.
If you do not already have one installed, I highly recommend going to the IPD Heavy Duty Sway Bar - Front and Rear.
Second, inspect your lower wishbones for cracks while you have the suspension apart. Seemingly a VERY COMMON occurance with age and use. Don't know who (if anyone) makes replacements but they can be welded if not rusted through.
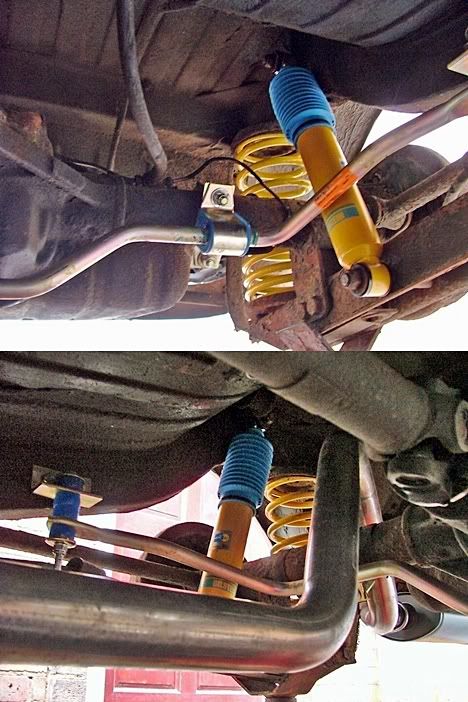
Use Poly bushings wherever you can and get a "decent" set of new shocks - The Bilsteins seem to be overkill unless you intend to Rally or Autocross the car.
If you suspect the Coil Springs are weak, this is the time to install replacements - the specs are:
One end is closed and ground and the other end is closed.
Free length to tip of pigtail = 10 inch
O.D. = 4.35 inch
wire dia = 0.532 inch
total coils = 8
active coils = 6
Calculated spring rate = 345 lb/inch
I agree with the recommendation to have King Pins replaced by "professionals" with the appropriate tools and skill level.
Front clip is held on by nuts and bolts - opportune time to replace fender welt and clean up any rust and repaint - have fun getting the hood to line up when you re-install!
When it comes to making your engine block Oil Tight, the most obvious alternatives are the Poly seals for the front and rear covers, a new Oil Pan Gasket, and one for the fuel pump as well
If your Credit Card/Check Book will allow after all the aforementioned, this would be a good time to have your radiator flushed/inspected/rodded while it is out and easily transported.
Sounds like a great winter project for you! Bust a knuckle on my behalf!
Suppo
'65 PV544
|
|
-
|
|
|
Suppo,
What are your opinions about the rear IPD sway bar? I've installed a front one and it totally transformed the car but I didn't buy a rear one based on what Bernard thought about the one he installed.
The front clip does come off pretty easy if I recall. My Father insisted on pulling it before replacing a motor and it did make the job very easy. I don't recall how hard it was to realign the hood though.
Suppo's right though, about this being the time to do things while you have easy access.... and Bernard's correct too, these things can sometimes lead to a total loss of momentum if you're not careful.
Good luck - Stu
|
|
-

|
|
I've got the front and rear swas on mine, absolutely love the way it handles now. Front bar only does a lot to level the corner lean out, but it makes the original strong understeer even more dominant. Putting the rear bar on makes it lean even less, and dials back the understeer a lot - still understeer - but very close to a neutral balance - which is what you'd generally want in a street car.
When I was installing them way back whe, I initially just put the rear bar on and took it out for a spin with the stock skinny front bar on. Spin was almost what happens - stiff rear bar, wimpy front - made it pretty tail happy.
Reinforcing the rear pans is neccessary - I didn't get the floor reinforcing plates with mine - both ripped out in short order. I welded in braces ruinning diagonally from the subframe to the rear firewall and they've held together fine for a really long time now.
When you get the sways in, the limitations of skinny original sized tires will become pretty evident, I started looking for wheels for mine pretty much right away - make the suspension better and they are the next weak link.
I got a set of Bils for the front of mine - love them. I experimented with some Fox-body Mustang rear shocks (had the correct mounts on both ends, good match on compressed/extended lengths, not incredibly far off in terms of car weights) and put a set of cheaper gas shocks for that on the back of mine - they've worked great for a really long time.
I've had the engines in mine out two times (1st - to swap the B18 with a well used 2.1L B20 my dad built in the 80's, 2nd - when that spun a rod and had to be rebuilt) - not hard to do by just taking the hood and radiator off. If pulling the engine and trans together a load leveling gizmo is really handy. IMHO taking the front sheetmetal off is a case of spending an hour to save 10 minutes. (OK, really, my car is pretty rusty and I think I'd break half the fender bolts off if I tried to take them off and it wouldn't go well).
--
'63 PV544 rat rod, '93 Classic #1141 245 (now w/16V turbo)
|
|
-
|
|
|
I can only offer what I "assume" to be the case in regards to a quantum leap forward in handling after installing both HD swaybars. One compliments the other and presumably the "flex" of the body/suspension is equalized with the installation of both bars.
One additional step that was taken with my rear bar installation was the addition of sheet steel backing plates (on the interior) where it mounts to the floor pan - this precludes any fears I had about the mount tearing out as the bar does not bend/flex as easily, or forgiving, as the stock "skinny" one.
Just my opinion - conservative old man that I am!
|
|
-
|
|
|
I have never met somebody else who has the ipd rear sway bar installed, so allow me to jump on the opportunity to dig a bit deeper into this, if I may.
The rear sway bar is mounted to the rear axle left and right, which has no real world impact on its own. Its function comes from the fact that both end pieces are tied into the body by attaching to the floor pan. Like you, I have reinforced the metal here.
Now . . . although I installed everything without any pre-tension, meaning I had the car sitting with all its weight on the ground while crawling underneath and first marking the holes, then, later when the holes where drilled, installing and tightening the bolts, there is very little movement for the rear end possible. I'm not talking restricting left-to-right side movement here, which is the idea of a sway bar, but up-and-down movement of the rear axle itself. Since it's tied to the floor, it cannot swing down as much as before. Therefore, up-and-down wheel travel is restricted to less than the springs and shocks would allow.
The result is a horrible bouncy ride. Like you have a 1-ton pickup with an empty bed. As you know, these trucks are set up to ride with full load, so when they are empty they are hopelessly over-"springed."
What race car folks do is make sway bars adjustable. Where the bolts attach to the body, there would be a short, adjustable link. It would have pretty much the same effect as installing 2 rubber donuts on each side of each bolt, where there is one right now. However, that would interfere with the triangular shaped rear suspension arms, as when the car is sitting on the ground, there's barely any clearance between the sway bar bolts and the suspension arms.
I'm not a complete idiot when it comes to cars, especially not on the intellectual level (meaning I understand things quite well albeit being a lousy mechanic), but I feel that something is wrong on my car. But what could it be?
Any input?
Thanks,
Bernard
--
My Volvo, now on 6 pages at: http://www.californiaclassix.com/Bernard/PV544-1.html
|
|
-

|
|
With all due respect, I have to agree with JohnMc... you've done something wrong during installation. For starters, there should definitely be a total of 8 "donuts" on the connecting links... two at the bottom of each link, and two at the top of each link - to include one donut inside and one outside, on each of the two floor pan mounting locations.
I'm wondering if you talked yourself into not using the lower donuts at the upper end of the links (floor pan mount), based on a misconception of how the bar works. A rear bar does NOT function by "...restricting left-to-right side movement....", as you've theorized. A rear bar works by adding resistance to body roll, relative to the axle.
Adjustable rear bars (I have one) do not typically involve any adjustment of the downlinks for the purposes of tuning anti-roll characteristics... they "adjust" by physically (or effectively) shortening or lengthening the horizontal "arms", thereby increasing or decreasing roll resistance.
Yes, a stiffer rear (or front) bar will effect ride quality somewhat, but for the most part only on one-wheel bumps. I think you've destroyed ride quality on your car by essentially mounting the upper ends of the links solidly to the body... those links need to have freedom to move through an angle as the axle travels up and down relative to the body, and yours aren't working that way, as installed.
EDIT: Wrong! I just found the IPD 544 rear bar installation instructions online, and sure enough, there are only 6 grommets.
So - maybe the substitution of grommets is affecting function here? The way that bar is mounted to the floor, the compliance properties of the donut (grommet) material could be critical... as well as torquing of the assembly.
One other thing that bothers me though, is comparison of the location of the bar itself - your pics online, vs the IPD instructions. It *appears* (terrible instructions, IMO) that IPD is telling you to mount the bar with the "dip" in front of the axle. Yours is clearly mounted *behind* the axle. It could be though, that yours is a different version than the one currently advertised online?
Gary L - 142E ITB race car, 73 1800ES
BlueBrick Racing Website
YouTube Racing Videos
|
|
-
|
|
|
I looked up the instructions on the IPD site, and yes, perculiarly enough, they do seem to show the bar being bolted directly to the floor pan (seperated only by a doughnut bushing). Which doesn't make any sense at all to me.
I'm slightly struck with doubt now, but I'm about 98% sure that I installed mine with a longer bolt, and a spacer, and 8 doughnuts total, 4 per side. Like the linkages on the front sway bar.
----------
EDIT: The 122 rear sway installation instructions look like how I recall installing mine: http://www.ipdusa.com/uploads/sku_files/977_INS2.PDF
----------
Looking at this pic of Bernard's - it looks as though the arms reach upward sharply to the floor pans, where they presumably bolt on rather snugly.

I can't imagine that is the proper way to install them, regardless of what the instructions say.
I'll look at mine when I get home, but like I said, I'm about 98% sure that they are using a long bolt, spacer, and the bar ends are held about 4 inches down from the floor. I know I can certainly jump up and down on the back end of the car and the suspension has a normal amount of travel and a normal spring rate feel to it - the sway bars don't produce any noticeable resistance to up and down motions of the car as a whole.
--
'63 PV544 rat rod, '93 Classic #1141 245 (now w/16V turbo)
|
|
-
|
|
|
The ipd instructions definitely suck and the fact that my package had some wrongly sized donuts didn't inspire confidence either.
The bar cannot be mounted any other way on the rear axle, as the bend outward, around the diff, makes that impossible. Looking at the drawing when installing it, I actually tried to mount it any other way. Not possible.
I tilted the bar as much forward as possible. (That brings the bar ends forward as well.) To take out any possible pre-tension, I also had the car on the floor with the full weight on it before drilling the holes. If the car is on the hoist, the axle will travel downward (hanging down with the axle limiting straps tight)and with it the sway bar. That brings the end farther away from the floor pan, and drilling the holes this way would locate them farther back than when drilling them while the car is on the ground.
John has a point though, and that is the point I was trying to make with my idea of the adjustable links. Even when the car is sitting on the ground, the end links are slightly tilting upward. This ties the axle somewhat to the floor pans. Logic tells me that the should be about parallel to to the floor pans, in a line that matches the floor. In fact, the sway bar should have no effect on the car if it is traveling in a straight line. Mine does, as it limits full travel of the rear axle downward. The sway bar won't allow it.
Hence, again what John said, if I would add one more donut between the bar and the outside of the floor pan, the angle would get better, more horizontal. This would require longer bolts, of course, but that's an easy fix.
I will take a photo of my end-link mounts to the floor pan on the hoist today. Guys, this is great . . . I'm gaining hope that we will be able to to the bottom of this!
--
P.S.
Oh doubts . . . if I had drilled the holes with the axle hanging down, not with the car sitting on the ground, the holes would have been further back. But it would also allow the axle to travel down farther. Scratching my head right now, the little wheels turning . . . .
|
|
-
|
|
|
"Looking at this pic of Bernard's - it looks as though the arms reach upward sharply to the floor pans, where they presumably bolt on rather snugly."
Yes... and that's one of the reasons I'm questioning the rearward placement of the bar. Here's the illustration in the IPD instruction that caught my eye:

I presume the dotted line in the background is representative of the differential housing: this infers therefore, the position of the transverse portion of the bar itself is in front of (and slightly below) the axle. Also in the instructions is a statement that sort of backs this up:
"In order to reach the drilling points the “U” clamp on the axle will probably have to be tilted forward some."
In any case, I still say the instructions suck. :) For instance, the diagrams that show location of the reinforcement plates inside the car only do so in an extremely generic manner.
For the curious, here's a link to the current rear bar instructions on the IPD website:
544 rear bar
Having said all this, I also still wonder if we may be dealing with 2 or 3 different versions of the 544 rear bar... Bernard's, John's, and the current piece as described online.
--
Gary L - 142E ITB race car, 73 1800ES
BlueBrick Racing Website
YouTube Racing Videos
|
|
-
|
|
|
"Having said all this, I also still wonder if we may be dealing with 2 or 3 different versions of the 544 rear bar... Bernard's, John's, and the current piece as described online."
Or my composite theory - that they changed the bar style once - and perhaps Bernard installed a older style bar using the newer style instructions?
My bars were bought from IPD about 10 years ago - when they just occasionally made up batches when the waiting list got big enough.
I'll take some pictures of mine tonight, but I can guarantee one thing for certain...
...mine won't look anything as nice as Bernards! Mine's all filthy and rusty under there. It might look... unsafe. It might even be unsafe.
--
'63 PV544 rat rod, '93 Classic #1141 245 (now w/16V turbo)
|
|
-
|
|
|
John, Could you post pictures of your subframe-rear firewall diagonal braces?
Bernard, I've checked out your website many times and never noticed before that your sway bar does seem to be at quite an angle. I imagine that if the rod's not close to parallel to the ground and the rods aren't perpendicular to the bar and the mounting points, that it would limit the suspension travel. (BTW great website!)
You guys have inspired me to install mine as soon as I get the chance. - Stu
|
|
-
|
|
|
I realise that mounting methods can be different but this pic shows an IPD rear bar fitted to an Amazon Wagon. It's fitted in front of the axle. If it's fitted to the front on a PV it will allow the front mount to be further forward. This will allow the bar to move through a radius that's much closer to that which the axle normally prosribes. (see my other post) Note that the Wagon also has more pucks at the front to allow some extra movement.
I note that the illustration showing the brake pipe being prised of the axle has an axle layout which is nothing like the PV and would have you fit the U bolt on the wheel side of the sway bar mount. Impossible on the PV. As said, the picture of the floor mount is generic as well.
|
|
-
|
|
|
Derek,
thanks for the photos. The most important thing here is the additional puck (x2). If I added another puck between the body and the top of the sway bar on each side, my bar would be more horizontal as well.
The more I think about it, the more I feel that reducing the tension of the bar (and thus axle) to the body is the key issue.
--
My Volvo, now on 6 pages at: http://www.californiaclassix.com/Bernard/PV544-1.html
|
|
-
|
|
|
People . . . help me, I'm about to lose my mind!
I was just about to see if I can order a couple of the the ipd donuts separately, so I went to their Web site and looked at the swap bar kit.
Here's the ipd photo of the kit showing the whole package:
http://www.ipdusa.com/version.asp?strPageHistory=category&numSearchStartRecord=0&strParents=77,297&P_ID=3064&CAT_ID=297&V_ID=6942
Now . . . I told all of you that my kit came with some donuts that were too big. The are dark blue instead of bright blue, are larger in diameter, and have a bigger hole as well. The ipd photo now shows these same donuts (4) in their photo associated with the front sway bar!!!!
Mine were in the front sway bar package as well, but again, I assumed that was a packaging error! Where in the world would I install too wide donuts with too large a hole at the front bar?
I guess I have to try to get a knowledgeable person at ipd at the phone tomorrow.
--
My Volvo, now on 6 pages at: http://www.californiaclassix.com/Bernard/PV544-1.html
|
|
-
|
|
|
Didn't dig out the camera (I think I'd have to jack the car up to ge a decent picture), but when I looked under the rear of my PV it didn't quite match my memory. I should learn to close my mouth and verify before trying to remember something that I did 10 years ago. Because I'm apparently good at filling in gaps of forgotten details with random other stuff without being aware of it.
But mine was about the same as Bernard's in terms of the forward linkages. No spacers, no long links - just 3 donuts sandwiching the various components. I did have my brackets rotated to hold the bar on the axle farther forward.
Maybe that's the extent of the discrcepancy? The mounts on mine are pushed forward by several inches because of that, which puts them closer to the plane of the forward suspension pivots, and lessens the amount of fore-aft movement the short linkage has to freely allow to not bind the suspension.
--
'63 PV544 rat rod, '93 Classic #1141 245 (now w/16V turbo)
|
|
-
|
|
|
The larger donuts fit at the ends of the front bar as per this pic. (Amazon)
These will have to go through many more degrees of movement than those at the other end of the pushrod where they can be considered as supporting a more or less fixed point. The 2 donuts at the end of the bar might have to cope with 30º+ of bar movement which is why they should only be tightened to a light squeeze.

|
|
-
|
|
|
Yes, I'd be talking to IPD... for starters, the instructions for the front bar do not match what they've photographed for the online catalog (and are apparently shipping). Those instructions state you'll receive 8 grommets of the same part number for the front bar... not 4 each of two different part numbers.
Additionally, the rear bar instruction sheet apparently doesn't even include a parts list?
--
Gary L - 142E ITB race car, 73 1800ES
BlueBrick Racing Website
YouTube Racing Videos
|
|
-
|
|
|
Bernard, I hope this generates some more good discussion. I installed front and rear bars on my 444 and have what both you and John describe. Flat cornering which I love and a horrible bouncy ride which I don't like at all. Leaving for a two week trip in the morning so no chance to follow up now but upon return will be looking more closely at what I have based on the discussion here. Thanks for thoughts!
Keith W.
Milan IL,
444, 740T
|
|
-
|
|
|
"It would have pretty much the same effect as installing 2 rubber donuts on each side of each bolt, where there is one right now."
I think you did something wrong. There are supposed to be rubber doughnut bushings on both sides of the swaybar link - where it goes through the bar, and where the link goes through the car. That allows the link to fairly easily move left, right, backwards, forwards, and still be stiff in an up and down direction. You'd use 8 in all, 4 on eaach side, 2 on each end of the linkage bolts.
The rear bar on mine offers very little upward and downward resistance to movement - just a little light resistance to the sway bar rotating on the bushings bolted to the rear axle, and a slight resistance to the compression of the doughnut bushings.
--
'63 PV544 rat rod, '93 Classic #1141 245 (now w/16V turbo)
|
|
-
|
|
|
"There are supposed to be rubber doughnut bushings on both sides of the swaybar link - where it goes through the bar, and where the link goes through the car. That allows the link to fairly easily move left, right, backwards, forwards, and still be stiff in an up and down direction. You'd use 8 in all, 4 on each side, 2 on each end of the linkage bolts."
Right, John, but it would be only 6 donuts total:
2 under the car on each side, hugging the sway bar on both sides, and 1 inside the car on each side. This way there is no metal-to-metal contact anywhere as only the poly stuff touches metal.
Here's the photo from the inside of my car. One thing I have to mention is that my kit came with some wrongly sized (too large holes) donuts. I had to dig into my parts box and replaced them with correctly sized ones. Thus the red colored donuts inside my car.
http://www.californiaclassix.com/Bernard/PV-rearSway6-remote.jpg
--
My Volvo, now on 6 pages at: http://www.californiaclassix.com/Bernard/PV544-1.html
|
|
-
|
|
|
John. How does your install compare to Bernards? Have you a pic of yours? I'd guess that the forward arms of the ARB should try and mimic the radius made by the triangulated arms, give or take a bush or two, otherwise it will fight the axle movement. You'd have to take off the springs and shocks to check that.
http://www.californiaclassix.com/Bernard/PV-rearFinished-remote.jpg
|
|
-
|
|
|
My rear sway bar will come off within the next few days.
$75 plus shipping buys it.
The hood has to come off and needs to be realigned in any case. Good marking before taking it off helps a lot.
--
My Volvo, now on 6 pages at: http://www.californiaclassix.com/Bernard/PV544-1.html
|
|
-
|
|
|
As a now 52 year-old classic car dealer, I have often bought cars where everything was in pieces, the project delayed, often for years, when an obstacle hit and, years later, everything was sold cheaply. Don't fall into that trap! I don't. I do one thing at a time and start the next one when I have enough time to finish it.
Within the past 27 months, I have spent $9,5K on my 544, which tells you that I did quite a bit, considering that it has only once been out of my own shop which kept labor cost to a minimum. The car has never been out of service for longer than a few weeks. If I don't drive it for a week, I feel withdraw symptoms, and I own quite a few old cars. It gets never wet, which is easy, as we have perfect weather here about 350 days of the year, so I don't have to wash it either.
When I did the motor, I rebuilt another one and kept the ill one in the car until the new one was ready. That also helped comparing things. When I finally switched motors, I did this within a day. Now that the new motor is running like a sewing machine and is pretty much broken in, I'm redoing the original motor to a slightly higher level.
What I'm almost certain you can't do on your own is doing the king pins. You'll need an expensive reaming kit and lots of experience doing this. Check my car's Web page for photos and description.
I can't give you advice on the front clip, as I haven't pulled it while switching engines. Looks fairly simple though.
--
My Volvo, now on 6 pages at: http://www.californiaclassix.com/Bernard/PV544-1.html
|
|
|
|
|


