|
|
|
Okay, I thought I was doing my buddy a favor, and...
We have a broken CPS on our hands with the bottom tip of the sensor still embedded into the bellhousing with no way to remove it. The top plastic part is broken at the base and still wrapped around the two wires. The plastic housing was really brittle despite our best efforts to keep it all intact during removal. Nut came out with no problem so we thought we had it licked.
What would be your reaction to cutting the wires and just pushing the embedded plastic tip into the bellhousing and hopefuly retrieving it through the inspection ports down at the bottom of the bellhousing? Would there be any issues with the torque convertor doing it this way? I would think it would just drop to the bottom for easy retrieval and if not, a few cranks should do it. If pushing it through isn't a GOOD approach how about drilling it from above and driving a small bolt into the remaining plastic and finding a way to pull it out?
I realize these are unorthodox measures but when you get hit with a $800 estimate to drop the tranny, thinking different becomes a serious option.
And why did we even begin mess with this in the first place? Intermittent no start/stall on mostly damp/wet/cold days. No rhyme or reason. There was a break in the outside sheathing but the wires looked intact after inspection so we aren't sure if this is actually the cause of the issue. The car does presently start.
Many thanks in advance and all suggestions appreciated.
|
|
-
|
|
|
My friend and I finally had a chance to work on the car today and below is a list of what did and didn't work...
FIRST ATTEMPT had us tugging at the wires only to snap them off with no effort at all. There wasn't much holding it all together.
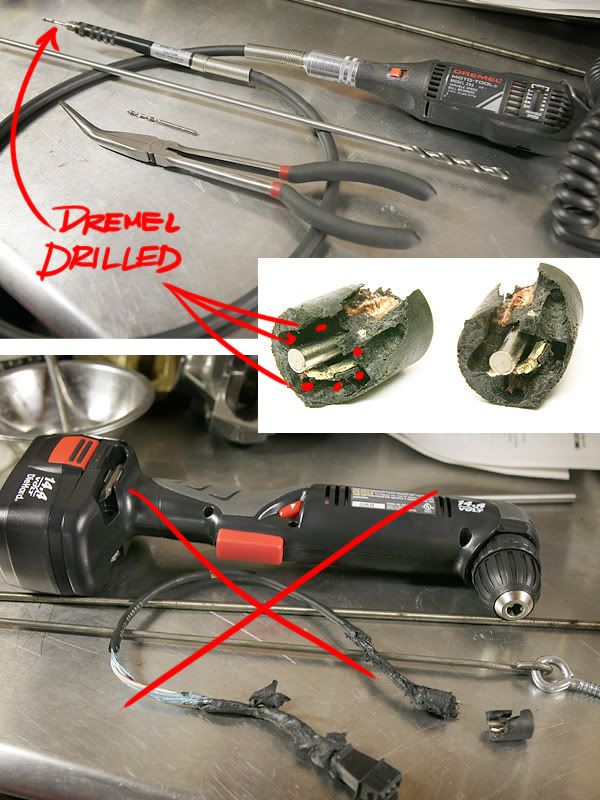
SECOND ATTEMPT we pulled out the right angle drill and 18" bit. Was surprised to find that the bracket wasn't anchored on the center-line of the tranny housing but rather rotated maybe 10-15deg off center. We carefully drilled at the same offset angle and drilled our first hole with little problem. Getting the lag screw screwed wasn't as easy however since there was no way to rotate it into the hole given the crampness factor. Using round bar stock to give us more downward rigidity when screwing, we ballpeened it around the lag screw and the screw went in quite easily this way using vicegrips to twist the bar. Once the screw was fully in, we again locked the vice grips to the bar and gave it a couple of good underhand wacks with a small sledge and out came the screw minus the sensor stub. Evidently, the additional side pressure from the inserted screw prevented the plastic stub from coming out and what gave was the bite of the threads.
THIRD ATTEMPT had us evaluating the process in more detail. The first hole actually didn't go in center-line since the metal probe of the sensor shifted the bit to the side. We decided to drill small holes AROUND this metal probe and take it from there. For this we pulled out the DREMEL with flex shaft and drilled 5 holes nibbling away material between them. We finally had the center metal area free to insert a long needle hose pliers and grab onto something tangeable. Out came the stub just enough to grab it on the sides for the total removal.
LESSONS: Small hands required which thankfully I have. Dremel is your friend. Stay away from friends bearing old gold Volvos with big hands.
Again, my many thanks to all who contributed. This is truly a Volvo family!
Forgot to include a pic of the flex shaft LED light that was just the ticket for illuminating our cramped work area.
|
|
-
|
|
|
Very good.. drill away the plastic surrounding to grab the metal. Very good thinking.
I have one of those flex shaft options for my dremel. It has bailed me out more then once.
What was supposed to be a 30 minute job took a week. I bet you friend isn't too impressed with your Volvo wrenching. LOL
--
'75 Jeep CJ5 345Hp ChevyPwrd, two motorcycles, '85 Pickup: The '89 Volvo is the newest vehicle I own. it wasn't Volvos safety , it was Longevity that sold me http://home.lyse.net/brox/TonyPage4.html
|
|
-

|
|
Great documentation! Superb layout. I'll always remember the image, so when it happens to me, the trial-and-error work will be avoided.
--
Art Benstein near Baltimore
"Baseball is 90 percent mental; the other half is physical."
|
|
-
|
|
|
Thanks Art. Hopefully you'll never need to do this one! One additional notation I should have mentioned that's important...
When we installed the new sensor and tested it by starting the car, it wouldn't fire which left us feeling queezy considering the ordeal of removing the old one. Using the LED light, we noticed the new CPS wasn't fully seated at the bore end despite being bolted in and torqued. We had a rough time removing the new sensor as it was really wedged in the bracket. Here we go again I thought. After wiggling back and forth and carefully twisting we finally got it out. Should it really have to be this tight?? We filed and then used emery cloth to shave down the outer circumference of the stub. Dry fit it a few more times till it slipped into the bore as it should and then applied some silicone grease for good measure in case it needed to come out again. Fired right up afterwards! What a relief. There was maybe a 1/16" gap so the tolerance is obviously critical here. Anyway glad it ended well and praying it fixes my friend's no start issue in damp weather. He's happy regardless. At least we'll know it isn't the CPS now.
|
|
-
|
|
|
Sorry to be raising this thread from the dead, but I missed your reply and question.
Should it really have to be this tight??
Definitely not. Shaved the new sensor? I know that's easier than eyeballing the inner surface of the bracket hole, but scary if the bracket was clean and corrosion free. That makes me concerned Electricfil is not keeping manufacturing tolerances providing these sensors now long out of the OE production stream.
Working a thread on TB where I hope the owner can benefit from your experience.
--
Art Benstein near Baltimore
Whenever I fill out an application, in the part that says “If an emergency, notify:” I put “DOCTOR”. What’s my mother going to do?
|
|
-
|
|
|
It might help to soak with some PB Blaster and gently twist to loosen it up.
Dan
|
|
-
|
|
|
I second this motion !
After being soaked with PB Blaster and the bolt removed I would think grasping the "arm" with pliers and wiggling/twisting it will come right out.
Randy
|
|
-
|
|
|
I'm reading that the CPS is now in two parts with one is stuck in the housing and you have the wires end. Both are plastic. Could the two pieces be glued back together and then the joined CPS twisted/wiggled out? Once the surfaces are properly cleaned and the glue cured, perhaps PB Blaster could be used to loosen the CPS within its housing cavity. This may be a less destructive method. If this fails, then more aggressive methods might be prioritized and attempted.
For the fun of Volvos,
Mike
--
'83 245 GLT, '92 245DL, '90 760 GLT
|
|
-
|
|
|
Let us know how you make out.
I think I would try the drill method before popping it through.
I would try Drilling and running a screw in then pull up on it. If that failed I would drill bigger and bigger until you can something that would pass down through the sensor but has a hook on it so it can grab the sensor as you pull up.
A jack under the Trani Tailshaft might give you abit more room between the firewall and engine
--
'75 Jeep CJ5 345Hp ChevyPwrd, two motorcycles, '85 Pickup: The '89 Volvo is the newest vehicle I own. it wasn't Volvos safety , it was Longevity that sold me http://home.lyse.net/brox/TonyPage4.html
|
|
-

|
|
As someone else mentioned, I don't think the 'pop it through' method will work at all. The bottom end of the sensor is already practically touching the ring on the flex plate. There's simply no room for it to go downward, unless you're bending the sensor ring, which is probably not a good idea.
--
'63 PV544 rat rod, '93 Classic #1141 245 (now w/16V turbo)
|
|
-
|
|
|
Thanks everyone and thanks Art for the reference photos. Extremely helpful! Now we now know what we're dealing with.
My apologies for mirroring the many suggestions offered. I missed all the responses other then Art's somehow before posting my own thoughts but it looks like we're all on the same page.
I'm now leaning towards the drill pilot hole and insert bolt and pull method. Straight shot down the firewall with a long bit after moving engine harness out of the way. Actually threading a screw/bolt/whatever will be a bit more difficult, especially if using an eyelet lag screw. We won't start till after we get the replacement part in hand so possibly this weekend or early next week. Will post updates and conclusion.
Fingers crossed and knuckles bruised. Wish us luck!
|
|
-
|
|
|
I know it's snug there, but maybe try screwing a sheet metal screw into the remnants? Or how about a corkscrew? Maybe use needle nose pliers, and pull little bits out? How about a torch, burn the plastic and pull the metallic bits out with pliers?
At least you didn't break the aluminum mount - that's a guaranteed trans pull there.
--
'63 PV544 rat rod, '93 Classic #1141 245 (now w/16V turbo)
|
|
-
|
|
|
To expand on this, if you have enough room (jack up the transmission to gain more as needed), drill a hole into the leftovers of the sensor. Then run a larger than the hole sheet metal or deck screw into the hole. Then tie a heavy cord, thread, or cable to the head of the screw and give it a hard yank.
Think "slide hammer/dent puller", so if you have some weight in your hand tied to the cable, it might just help.
jorrell
--
92 245 291K miles, IPD'd to the hilt, 06 XC70, 00 Eclipse custom Turbo setup...currently taking names and kicking reputations!
|
|
-
|
|
|
Hopefully, I understand your situation.
If it is just a matter of needing to retreive the sensor out of the access hole, I would clean the top of the sensor with some alcohol to make sure that you can get a clean surface to attach to, and then mix up some epoxy and glue a bolt, head first, to the top of the sensor.
Then, let this cure overnight, and the next day, attempt to pry the sensor out of the housing.
I hope this suggestion helps, and good luck!
--
If it needs to be maintained, repaired or replaced on a 1990 240, I've probably done it. '90 240DL, 292K looking forward to 300K badge (or sticker??). >>You haven't really worked on a car until you draw blood<< :-}
|
|
-
|
|
|
The only contribution I can make is, if you push it through, don't crank the motor until you've retrieved the stub. It is plastic on the outside, but iron inside, so if starter motor power wedges it into the tone ring, you might bend the tone ring. I think I might be able to gently move it by hand-turning the crank bolt, if using a magnet couldn't retrieve it once you've knocked it through. Also, I worry the bracket will be bent some in trying to force it through.
Bottom line - it would seem worth trying to avoid dropping the tranny, but could be made worse than that job, if it tangles with the tone ring.
--
Art Benstein near Baltimore
Mistakes are the portals of discovery. -James Joyce
|
|
-
|
|
|
Hi Art and thanks for responding! My friend is freakin on me so I sent him home till we can figure something out. Thankfully it's still drivable. I wrapped some 3M black putty around the base of the sensor to keep moisture out for now since I'm not sure of the condition of the wires there.
If you feel the punch through method is iffy, how about the pull-out option by drilling a pilot hole in the sensor stub (very accessible using a long drill bit) and then threading an eyelet lag bolt or something similar that I can screw into the stub and extracting it like a corkscrew would do to a bottle of wine. How much bite would there be into the plastic/metal stub to make this a worakable option? The only downside I can see to first trying this method are drill shavings working down into the housing but I suspect it will be minimal.
Speaking of shavings. How do feel about slowly drilling it out completely using larger and larger bits? Doing so will possibly prevent large chunks from dislodging and falling in. Doing so in one shot with a larger dia bit maybe not. Would only attempt this after getting a replacement CPS and measuring the dia of the stub. I assume there is a clear bore under the stub and no metal.
Always appreciate your insight Art.
|
|
-
|
|
|
Yup I think I'd try what John and John suggested, but knowing you don't have the AC accumulator in the way, the channel lock experience Zach reports sounds interesting. Small shavings shouldn't hurt on that side of the flex plate, but if they attach magnetically to the new sensor point, they might interfere with the signal pattern. Compressed air.
--
Art Benstein near Baltimore
The main purpose of holding children's parties is to remind yourself that there are children more awful than your own.
|
|
-
-
|
|
|
If the AC system hasn't been upgraded, you should be able to get some channel-loc pliers in there and be able to wiggle it up, if I'm reading your post correctly and the base of the CPS is still grippable. I know it's possible on my '90, because I've done it before.
|
|
|
|
|