|
|
|
Volvo 240 Charging System Problem
Looking for some suggestions regarding the charging system problems I’m having. This is with a 1992 240 with 187k miles, running really well except for this intermittent charging problem.
Sometimes while driving the Service Engine, Battery, Parking Brake, Brake Failure and Bulb warning light come on dimly. They don’t see to come on around town, rather when on the highway while going >60 miles an hour and after about 5 miles. Today for instance car started fine, no warning lights. After about 5 miles they came on. The brightness fluctuated a little and changed a little as I experimented changing the electrical load (e.g turning lights off, using tuen indicators, turning of radio, fan etc). After about 10 miles I got off the highway and idled at a traffic light for a minute and the warning lights go off and stared off for the rest of the trip (~ 3 miles but not on the highway).
Here’s what I’ve tried so far:
At idle the battery/charging voltage is typically ~ 13.8V. Is this a little low? Shouldn't it be nearer 14.2 V?
The battery is about 1 year old and seems in good shape (although I haven’t had it load tested)
I’ve checked the exciter wire – seems sound and well attached. Disconnecting it and starting or removing while running doesn’t seem to make any difference in battery/charging voltage. Surely this doesn’t make sense and may be a clue?
Check the voltage drop across the alternator/battery cables – negligible voltage drop so seems they are in OK shape.
Checked all of the fuses. In the past I have had fuse problems (e.g taillights) but when I changed to better quality copper fuses all of those problems went way. So fuses seem good.
Removed the instrument cluster and resoldered all of the joints on the circuit board. A couple looked a little questionable (cracked?) although they weren't the ones that the FAQs etc seem to indicate are typically involved in this type of problem. When I reinstalled the cluster after the resoldering the voltage at idle was 14.3V. At this point I thought I had cured the problem. However, this was at cold start-up some maybe the idle was higher and hence the voltage?? Now when I start the car it seems to typically be back in the 13.8V range so what I thought was the fix wasn't!
I replaced the voltage regulator a couple of years ago. The brushes are not excessively worn although I did mess us the housing they fit in a little when I installed it but I think its OK. Doesn't the regulator stop the voltage going too high so being to low is likely not related?
Does the electrical use at higher speed vary that much from idle to make this only occur at higher speed?. Is that because of the fuel pump?
That’s all I recall as being relevant. I’m rather at a loss. Any diagnostic suggestions or ideas?
|
|
-
|
|
|
Hi there!
I have to say this, for me, it seems like you are looking for rabbit in too many holes!
First of all the charging voltage of 13.8 is normal or even less depending on the charge of the battery and the temperature of the system in general.
The 14.2 reference is on the top end past that you would be over charging the battery especially on long trips.
If you had a dash mounted voltmeter you "could see" that the meter will swing up that high just after starting the engine, on a full or normally charged battery but After a bit, it will drop back. A voltage as low as 13.2 is still ok. The regulators job is to maintain approximately 1.0-1.5 voltage above the battery or systems draw down of current loading.
You said you checked for voltage drop across the battery but I don't understand what you expected to see in relation to what?
If you were using the voltmeter for ground checking you would not put the meter across the post but rather parallel to the systems cables and ground points. Anything but zero's to 0.02 means a bad ground.
As far as the alternator, it is rubber mounted and has to have a separate ground wire from its housing to the engine.
You might want to make up a new wire for it as they are troublesome!
You can do a quick check with the voltmeter by running the lead from the alternators aluminum housing and back to the negative post to see if you get only a set of zero's. You can do this while it running as well. Trick is, it just might be fine at the moment and later flake out!
As far as the exciter wire being on or off and it charging the exciter wire is only needed to "tickle" the alternator during it first rotations to start an output. Above certain RPM's it becomes self excited.
It's only when you have absolutely no current output does that the battery idiot light come on! It sucks for giving you a forewarning of the condition of your alternator and battery system.
The trick with the instrument lights appears that it's circuitry is looking and finding a alternative ground route, though what, I don't know. It's not the first time Brickers have had this problem.
All I can say it might be an alternators grounding problem as it seems related to that sometimes.
I might add as well, that people talk about the bulb failure sensor but that's a whole other issue.
I can't help you with it as I have not experienced any problems of that sort.
Keep searching FAQS for instrument cluster issue as a fall back. You have been into that thing so it could be a loose ground or a wire from the plugs to the cars body? That's Just a guess!
Phil
|
|
-
|
|
|
I'm looking for the rabbit in too many holes because I can't find the rabbit in any of the holes I've looked in! And you've given me a few more hole to look in. I was referring to voltage drops across the cables to make sure they're good not across the battery terminals!
I think my next step per Art's recommendation will be to check the ground and brushes/slip rings
|
|
-
|
|
|
Paul,
You could make up a temporary test wire to check the alternator ground with a 3 foot or longer piece of 14 gauge primary wire. Crimp an alligator clamp on each end. Clip one end to a good unpainted ground, say one of the upper strut mounting bolts, and clip the other alligator clamp to one of the alternator through bolts. Check the charging voltage at various times over the next few days. This should tell you if your original alternator ground wire is part of the problem.
Hope this helps.
Andrew
|
|
-
|
|
|
I though of doing something similar. If nothing improves when I swap in my spare partly worn regulator I'll try this since its an easy way to definitively close one of the rabbit holes (possibilities)
|
|
-
|
|
|
I have to agree with your assessment to your next step to follow what Art says to do. I was short with you in circling those rabbit holes as well.
I don't work anymore but I had an appointment, to eat a $3.00 lunch at the senior center! (:) if that counts!
It gets me out of the house/shop for about as much social life as I can handle at one time? (:-)
Art mentioned spring contacts on the regulator housings. They fit up inside the alternator might be a problem let alone the rotors slip rings like Art noted.
The rings should feel relatively smooth when rubbing you finger or a finger nail, turned up side down, because the hole in fairly small. You can use a sharp lead pencil point across them individually to detect excessive grooving from arcing. Just drag or push the pencil with out any pressure.
Sort of like vinyl record playing needle affect.
You should not feel grooves with your finger, any great depth or sharp edges, on the outer edges of the rings. The height of each ring, relation to one or the other should be worn the same.
If not it could mean they are worn through as the base metal for them its not very thick. Those rings are replaceable if you are into rebuilding them.,
I trust my work over an unknown rebuilder. P-n-P have lots to trade-around-with!
I studying the the idea of trying that for fun, once I "lock on" to supplier. Looks like it can cost about $3.00 to replace them since I can turn that area in a lathe. Just have to not eat and talk that day!
(:-)
Phil
|
|
-

|
|
"I trust my work over an unknown rebuilder."
Amen. It isn't that hard to do either; at least you don't need that lathe you figure on using. Big vise will do, although an arbor press is better. 60-watt or heftier soldering iron. And the parts are cheap, but the labor is guaranteed to be better than the sweat shop chain autoparts rebuild spray and pray core recyclers, I think. No single flaw in a 240 has caused me more tow truck calls than lack of charging.

--
Art Benstein near Baltimore
A husband
in his back yard
is trying to fly a kite.
He throws the kite up
in the air,
the wind catches it
for a few seconds,
then it comes crashing
back down to earth.
He tries this
a few more times
with no success.
All the while,
his wife is watching
from the kitchen window,
muttering
to herself
how men need
to be told
how to do everything.
She opens the window
and yells to her husband,
"You need a piece of tail."
The man turns
with a confused look on his face
and says,
"Make up your mind.
Last night,
you told me
to go fly a kite."
|
|
-
|
|
|
Hi Art!
I should have known that you have already been down and back on the rebuilding road.
I have three extra alternators on the bench. Two I have replaced brushes in already but the third one has slip rings that are worn out.
Now, Just when I am crossing the intersection of that road to go down, you are standing there smiling again!
I don't think there is anything you have not dissected electrically on these cars!
Like I say, I was studying the possibilities and thought I would just shave the rings thinner until I found out how they are held on. I have nothing to lose as it will always be good for a core at the PnP.
I was eyeballing this outfit for parts for both alternators and starters. http://www.aspwholesale.com/slip-ring-bo.html
Do you have a good web source or do you use some specialized auto electric place locally?
I have one that I get my brushes from but I see he could do better on the price. Trick is, I don't have to wait for his parts, they are in stock and so common.
Since I now have a personal stash, I can afford to share in "his" rebuilder wealth (:) and learn at the same time. His rework is fair to good most of the time but the bill stays the same in a sense labor is out the door.
I have two,or three extra starters that I snagged from PnP's over the years.
I am going to jinx myself, but I have never had to work on any starters in my cars yet.
I suspect the brushes should be getting short, after this long of time, even though they spin over far less than the alternators.
On domestic cars, I surely would be on my second or third starter, put into each car by now!
Of the five cars in my fleet, I expect to have a problem, one of these days. A couple cars are over the 300k mark, another two with over 250k and the '84 is rolling past the 180k mark.
Hey I stayed on topic pretty nicely this time.
Good day
Phil
|
|
-
|
|
|
"Do you have a good web source or do you use some specialized auto electric place locally?"
Same place you quoted. ASP.

--
Art Benstein near Baltimore
Experience is something you don't get until just after you need it.
|
|
-
|
|
|
Here's the latest
After a couple of days of 30 mile round trips with no problems, this time on the way home after about 5 miles the cluster lights came on. This time brighter than before. When I got home, before turning the car off I got to measure a few voltages.
At idle with the cluster lights on the battery was a 14V so the battery appeared to be charging well. The alternator ground was also good.
So does this still suggest bad brushes. Unless someone says otherwise I'll be changing the regulator this weekend.
|
|
-
|
|
|
Yes, it does reek of brushes.
But when you got your meter out, the voltage was good, and I will bet the warning lights were not on while you measured 14V. That's the nature of an intermittent trouble and the reason your voltmeter should be on your dash instead of under the hood.
Pull the brush assembly and take a picture.
--
Art Benstein near Baltimore
"Doc, I can't stop singing 'The Green, Green Grass of Home.'" "That sounds like Tom Jones Syndrome." "Is it common?" Well, "It's Not Unusual."
|
|
-
|
|
|
hi artben- your picture of the armature and this message were very instructive. two questions for you on charging engineering realities: the slots on the armature end show one notch clearly ripped up.surely this would damage the brushes each time they pass the rotating mass. can that be repaired? smoothing the rough spot with some fine emory paper would appear useful, but you really cant level the notch so it is precisely in line with the others. this would lead to nicking the brush on each pass. with that problem seems the only fix would be a rebuilt alternator swap. am i right? also like the idea of a dash voltmeter. think you can still get small round stewart warner or other good dash meters which could mount neatly in one of those push in covers next to the radio in my 92 245. recall there are 2 wires one ground and one hot to attach. where would be the best connection points for the gauge? btw if i ever see you in a tobacco road ravine at 2 am in sc, md with smoke pouring from under the hood of your 240 i will stop and render assistance so you can rest easy. thanks tons oldduke
|
|
-
|
|
|
Oldduke: that picture of the armature with the loose section is of a freshly Bosch-rebuilt starter. The new replacement armature is an example of a part I sourced at the mentioned vendor. I didn't take a picture of the new one; you can see one in the catalog. :-)
--
Art Benstein near Baltimore
A man walks into a bar with a slab of asphalt under his arm and says: "A beer please, and one for the road."
|
|
-
|
|
|
Ok?
Since you just drove the car for 15 miles the system voltage and a good battery should have stabilized at less than 14 volts. We are talking tenths here, so I hope you are using a digital meter.
The car is cranking over like it's got a good battery in it, I assume?
If you had lights on or other current draws the voltage should be down a bit lower. A .5 lower or like 13.2 being the lowest while idling.
If the regulator is seeing more of a voltage drop of the system it will want to and should try to kick it up higher. Trick is, its dependent upon the engine revs! Idle usually gives you a lower reading, just because!
If you rev the engine it should vary a few tenths but all below that 14.2 volt high tide line.
A heavy steady 14 volt reading is not what I call normal. It should be fluctuating under system loading or alternator speeds.
The regulator is either malfunctioning or is not getting a good reading of the entire system, i.e. Connections.
You did not actually say you got 0.000 on the ground side to the alternator housing, engine block and body of the car with all this back to the negative battery post. This can make it not a ground issue but a internal regulator suppling issue.
You should also get the same 0.000 reading on the B+ (Big Red Wire) back to the positive post.
This helps rule out bad wiring back to the battery via the starter connection way down there below.
Pulling that alternator and giving it a good eyeball all inside where the regulator goes, has to be done IMHO.
There is the questionable regulator housing, contacts and brush lengths. Deep grooved or overheated (bluish tinted) slip rings can cause intermittents.
Since one of the grounds, from the exciter wiring, is from the instrument clusters bank of diode light circuitry, you have keep it in play. The repeated 14 volt output reading keeps the regulator in play, for me!
It uses an instrument light in its conversation to you.
The regulators internals, that are not repairable you the way, could have been damaged from brush arcings or a previous bad battery cell.
Even cable jumping another car system with a "questionable electrical condition" can damage yours!
Ever crossed the leads, even a momentary flash?
From my stand point, inspect or inject a total replacement spare alternator into this act!
These things are like toilet paper, you are bound to have to change the roll, if you drive or live long enough!
To quote General George S. Patton. "Make your plans to fit your circumstances."
I am no way a Mormon but I do store lots of toilet paper!
(:-)
Phil
|
|
-
|
|
|
Replace the brush pack again. While it is out, get a mirror and light on the slip rings, as well as a finger. Make sure your blue ground wire is doing its job.
--
Art Benstein near Baltimore
Children seldom misquote you. In fact, they usually repeat word for word what you shouldn't have said.
|
|
-
|
|
|
Thanks Art
What should I be looking for on the slip rings? Roughness, damage, burning, wear, all of the above?
You're also suggesting the ground wire/connection may be bad? Where does the other end of the ground to the alternator attach - the engine block ?(I'm at work and can't look at the car right now) Is this a dedicated ground for the alternator alone are are things using this same ground?
|
|
-
|
|
|
Happy New Year 1970,
While you were at work did you go out and touch the alternator's ground? Because on your drive home it seems to have been fixed? If you did touch/move the ground that may be you issue?
|
|
-
|
|
|
No nothing touched are changed between morning and evening commute. The 30 mile morning commute this morning was also uneventful also (no dim cluster lights). In fact there have been cases where the lights were on, I pulled of the highway in order to be able to turn off and restart and upon restart the lights were off for the rest of the drive so frustratingly inconsistent. If I had to pick it seems to be more common in the mornings but I haven't been able to discern a pattern related to weather, humidity, temperature or anything.
In any case, after doing more research and listening to Art and you all I'm going to try the voltage regulator. I think I have an old one that is not 100% worn out so may try to swap that out and see if that makes any difference. Hate to throw parts at it but since its a no cost experiment, can't hurt. I'll try this weekend and report back.
Last time I swapped out the voltage regulator I remember having a struggle getting the new one in. Something awkward about angling it in with the much longer spring loaded brushes with the alternator still mounted on the car. Any tips on the technique based on similar experience?
|
|
-
|
|
|
"Something awkward about angling it in with the much longer spring loaded brushes with the alternator still mounted on the car. Any tips on the technique based on similar experience? "
Good thing you asked. My knee-jerk response is "practice." It fun to accomplish this without the mundane work of removing the alternator.
In other words, I've managed to do this umpteen times and seemingly not discover any useful methodology. The last time was less than 2 weeks ago. I recommend letting the car cool off some, so you don't burn the back of your hand on the preheat stove if your car still has one. My daughter's new 93 does.
Tip #1: Use a new #2 Phillips, if the regulator screws are Phillips. I prefer the slotted screws in this location, like the old ones had. The Phillips will cam out unless the bit is pristine and high quality. If they do, bring small vise-grip pliers to the screw head to get it started out.
Tip #2: Use a flashlight and mirror to STUDY the target area. You already have it out to check the slip rings, so MEMORIZE where the screws go and be sure the area under the screws is clean, as well as the diode plate contact Phil mentioned. It needs a good ground and a good D+ connection. The new brushes will provide the good connection to the rotor through the slip rings.
Tip #3: Forgo your instinct to put the back screw in first, saving the front one to find by sliding the regulator assembly in an arc around the back mounting screw. Start the front screw and between thumb and forefinger (yes this is all blind work based on your memorization) turn it in until it is as tight as you can make it without a screwdriver. Then rotate the brushes (against their springs) until the back screw drops into the tapped hole in the housing. I cheat and have a supply of new screws for these. I only wish they were Torx instead of Phillips. Or slotted.
Your brushes should look like this, but they won't after three years.

--
Art Benstein near Baltimore
Subj: How To Diaper A Baby
"Spread the diaper in the position of the diamond with you at bat. Then fold second base down to home and set the baby on the pitcher's mound. Put first base and third together, bring up home plate and pin the three together.
Of course, in case of rain, you gotta call the game and start all over again." -- Jimmy Piersal, on how to diaper a baby, 1968
|
|
-
|
|
|
Well that was awkward/frustrating for something that should be so easy - getting to the voltage regulator from the top with the alternator still on the car.
In any case, unfortunately the result is a voltage/regulator with brushes that look fine.
From what I can see (not much even with mirror) and feel, the slip rings seem smooth.
So I'm still at a loss. Should I swapin the other regulator I have just for kicks?
What else should I try while I have it apart?
Not sure if this image uplaod has/will work - sorry
https://www.brickboard.com/GALLERY/volvopic.htm?js_link=&id=12438

|
|
-

|
|
Use the URL to the image. I dunno if brickboard.com serves up images as an object reference by ID. Here's your image:
Brushes 1

Brushes 2

Slip Rings

The brushes you show here are of well more than adequate length. The ends appear well seated to the slip rings and are a smooth contact surface in that arc. Slip ring surface looks ok. Art has replied.
So, to a cause, you may have. I'll guess all's tight behind that alternator of yours?
Another of Art's Volvo 240 technical artistry images from his website www.cleanflametrap.com. I had alternator issues mid-last year. See how Art B. connects the ground wire separately from the wire harness insulated cable-stay? The nuts (factory is a flange, serrated locking nut) securing the alternator to engine block ground wire and the big red B+ wire can come loose over time. (Was told to use a 1/4" torque wrench or a 1/4" nut driver to tighten a long time ago. Dunno the torque value.):
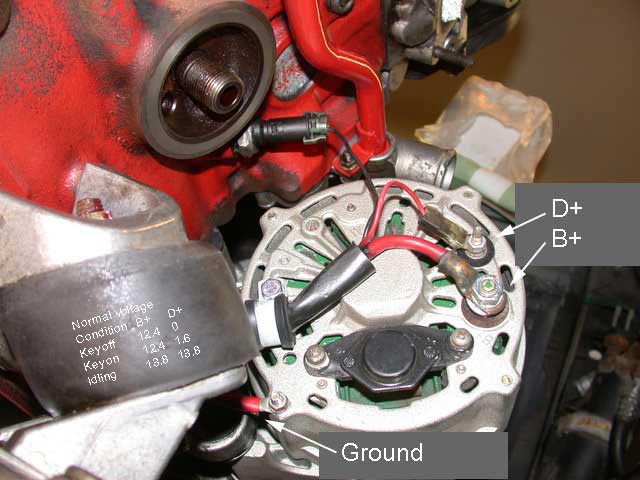
Though, on this mess at the aft of a 240 alternator, the cable stay and the (blue) ground wire are secured on the same threaded post and nut as on newer (1982 or 1986+) 240. When arranged thusly, the nut securing both can come loose.

The the blue ground wire is beneath the insulated cable stay.
Though the cause is not too short brushes or butched up slip rings. Do you have a multimeter?
You may want to see here:
https://www.brickboard.com/FAQ/700-900/ElectricalStarting.htm
How's the wire harness appearance as it travels under the engine at the front it, behind the harmonic balancer crank pulley? Two flat springy pieces of metal retain that section of the sheathed wire harness. That section of the wire harness contains the oil pressure switch wire, the D+ from the alternator, and B+ power from the starter.
If leaking oil and basting that section of the wire harness, if the section is stiff, the outer sheath broken to expose the three wires to the elements, you may have a conductor failure. Yet unlikely.
Art will have specific info for you.
On the page that result after you upload the image:
https://www.brickboard.com/GALLERY/volvopic.htm?js_link=&id=12438
See the field titled HTML.
Merely copy the editable text that is in the HTML field and paste into the message of the IMAGE URL.
Though I like absolute, not relative, URLs, like (as to your image):
https://www.brickboard.com/GALLERY/images/12438.jpg
Art's instructions on posting images here:

Hope that helps.
cheers.
Dud.
--
Caturday
|
|
-
|
|
|
What's peoples opinion of the slips rings based on this picture?
https://www.brickboard.com/IMAGELIB/volvopic.htm?js_link=1&id=12440

|
|
-
|
|
|
I imagine them to be OK. But I really have to exercise the imagination with that pic.
Photo tips: Put your camera in the macro setting. The flower. If it is your phone, use a magnifier app. Resize the photo before uploading.
Here are some which look about 1/2 worn:

--
Art Benstein near Baltimore
A jumper cable walks into a bar. The bartender says, "I'll serve you, but don't start anything."
|
|
-
|
|
|
I ended up cleaning up any connections I could and swapping in the other regulator I had. When I started her up (with nothing on) the battery was at 14.4V. I drove round for a bit, came home. let her idle, turned on everything I could find and the battery voltage was 13.5V. So all seems notmal. I guess I'll drive it until the dash light come on...
By the way, the Brickboard image posting process is almost as archaic as a Volvo 240. And taking photos with a cell phone in the bowels of an engine bay takes some practice...!
|
|
-
|
|
|
Drove my daily commute today (30m round trip) with no dim cluster lights. Of course this may be the typical tease of an intermittent problem so won't count my chickens just yet
|
|
-
|
|
|
The picture is good enough to see the brush length. They are indeed looking longer than I expected to see them, and given they have a couple years(?) experience on them, I would not be expecting to see damage to the slip rings.
What I cannot see very well is if the connections look clean. However, the act of swapping, whether you re-use the existing or choose a new regulator/brush pack may just fix a dirty connection. It is up to you, which way you go.
--
Art Benstein near Baltimore
Two fish swim into a concrete wall. The one turns to the other and says "Dam!".
|
|
-
|
|
|
What brand replacement alternator brushes for your Volvo 240 Bosch alternator? Should the regulator check out as worthy?
I'd used Bosch when replacing, the brush kit Bosch PN 11011 (Volvo PN 1362710). Brushes and insulators. YI'd reused the brush springs. (Though can the springs fatigue on a 24-year old 1992 Volvo 240 Bosch alternator, if original to the 1992 Volvo 240?)
https://www.fcpeuro.com/products/volvo-alternator-brush-set-11011
The after-market brushes I'd used were not as good. Insulators (green, woven and coated cloth) were really stiff and the springs that came with the kit were both very long and exceptionally stiff. I forget the brand right now.
Dunno the replacement Bosch alternator brush springs PN. Volvo is PN 986649 (or 941904?).

--
Jonathan Harshman Winters III: The Mightiest, Greatest, & Most Powerful North American Comedian & Comedic Actor in Perpetuity
|
|
-
|
|
|
The spare partly worn regulator I have is all Bosch and I believe the one in the car now is the same. I've have problems with after-market brushes before also and don't think its worth the few $'s saved given all of the potential aggravation avoided.
|
|
-
|
|
|
Dear iamhives,
Indeed, the Bosch brush set for the 80-AMP Bosch alternator in your mighty, if relentless (with care) Volvo 240 is probably under 12$ for the set.
I've reused the springs. Use a proper solder and a hot enough soldering gun, iron, pencil and use a higher temperature tin-led solder.
Also, there is a procedure somewheres to use the continuity / resistance feature of your quality multimeter to test the voltage regulator itself.
As Uncle Art says here, please pull the voltage regulator / brush carrier and provide an image. I'd suggest using the BrickPix feature of the brickboard.com to upload and link your images in your response post to Art's directive. The image size as big as you want, so long as the file size is under one megabyte. (In spite of the directions on the BrickPix unloader page. Click BrickPix at the top of the page. Open in a new browser tab or window, enter info, and upload. In your response post, enter the HTML URL into the image URL of the mesage post, or, if you can html use the img src tag, so you can post multiple images in one message. Check the [IMAGE LIBRARY (UPLOAD/SELECT)] feature on your response post.
Also, inspect and as needed, some extremely fine emery cloth to clean up them slip ring on which the brushes make contact, unless not too bad. I've not done so.
Give the alternator axial action an inspect for end-float and how they freely spin. The rear axial bearings fail from the heat load delivered from the exhaust port (manifold - we call them air intake or exhaust ports on fuel inject autos, apparently).
Also, take care with the wire harness, as you'll read in posts, the wire harness for the B+ power, D+ from the dash, and the oil pressure sensor are all in a sheathed part of teh harness that wraps around between the block and distributor, down to the front of the engine behind the harmonic balancer crank pulley, retained by two flat steel malleable spring clip things. If you have chronic oil and / or coolant seepage, the outer sheath becomes brittle, forms cracks, and the and delicious brine of engine fluids can enter that portion, getting at the insulation of the conductors inside the sheath. So, take care when getting at the works.
On Art's website cleanflametrap.com, Art has posted images of getting at the aft side of the alternator from under the vehicle.
Some will remove water pump belts, water pulley and water pump fan, and the water pump fan cowl, secured to the radiator (uneless you have an electric fan).
Barring that, you remove the exhaust manifold heat shield, probably the oil filter (watch them drips!), and remove the three conductors from the aft side of the alternator (B+, D+, and the Ground). Some will mechanically disconnect the alternator tensioner, and the alternator pulley.
Though, from underneath, or nimble gyration with the oil filter out of the way (I use the Fram PH-8A, not the teeny one, yet not a Fram, so I have to), you can merely remove the two machine screws with a standard slotted screwdriver, releasing the voltage regulator / brush carrier, pretty easily.
If you do remove the wire harness works from the rear of the alternator, you will want to use a 1/4" nut driver to reassembly do gear of over-torquing the wire harness termination. Yet the D+ wire secure via a spade terminal. The ring terms for the ground and B+ are secured with nuts. Factory nuts were flange-serrated to provide a locking function. These buts can come loose. Certainly the insulated cable retainer as that post on newer 240 serves also as ground connection.
You may only need to disconnect belts, release from the tensioner, pivot down the alternator body to get at the voltage regulator / brush carrier screws.
I have to do some 02 sensor testing stuff for Dr. Porter. My multimeters all blow, yet I repaired the oldest one yesterday, finally, after a decade. Them Harbor 7$ Freight multimeters are not so good.
Good luck. Plan on some hours work.
Questions?
Hope that helps.
Friday Happy MacDuffed.
--
Jonathan Harshman Winters III: The Mightiest, Greatest, & Most Powerful North American Comedian & Comedic Actor in Perpetuity
|
|
-
|
|
|
I'm at work also. That's why I give short answers and refrain from enumerating all the possible reasons your observations are leading you into Phil's rabbit holes.
The symptoms match short brushes. The remark you made about changing them a year ago doesn't rule them out, nor do I feel comfortable about your comment about messing up the holder. But there are other reasons you could have those symptoms, yes, but lets not do the what-if scenario before checking out the basics.
When you get home, measure the voltage drop between ground at the cam cover braided radio noise strap to the firewall and the alternator housing while the motor is running. Like Phil says, look for zero, although you will get some jumpy millivolts due to the practicality of using a digital meter with long test probe wires in the midst of spark plug wire electric fields.
If it looks like your ground is effective, then pull the brush pack. Get a look at the slip rings. Obviously, a set of worn slip rings will wear out new brushes much sooner than the originals did. If you still are scratching your head, there are many other possible intermittent and heat-induced failures that can occur -- mostly inside the alternator itself, such as shorted stator turns, but these are exceptions to the rule. Lets get the common troubles ruled out first.
--
Art Benstein near Baltimore
Three engineers and three accountants were traveling by train to a conference. At the station, the three accountants each bought tickets and watched as the three engineers bought only one ticket.
"How are three people going to travel on only one ticket?" asked an accountant.
"Watch and you'll see", answered an engineer.
They all boarded the train. The accountants took their respective seats, but the three engineers all crammed into a rest room and closed the door behind them. Shortly after the train departed, the conductor came around collecting tickets. He knocked on the restroom door and said, "Ticket, please".
The door opened just a crack and a single arm emerged with a ticket in hand.
The conductor took it and moved on.
The accountants saw this and agreed it was a quite clever idea. So, after the conference, the accountants decide to copy the engineers on the return trip and save some money (being clever with money, and all that). When they got to the station, they bought a single ticket for the return trip. To their astonishment, the engineers didn't buy a ticket at all.
"How are you going to ride without a ticket"? said one perplexed accountant.
"Watch and you'll see", answered an engineer.
When they boarded the train, the three accountants crammed into a restroom and the three engineers crammed into another one nearby. The train departed. Shortly afterward, one of the engineers left his restroom and walked over to the restroom where the accountants were hiding. He knocked on the door and said, "Ticket, please."
|
|
-
|
|
|
Just got home after a 30 mile highway drive and as is always the case when trying to diagnose intermittent issues, had no problems; whereas the reverse drive this morning the warning lights came on dimly after about 5 miles
In any case, since it was dark I only did very limited exploration. The voltage drop between ground at the cam cover braided radio noise strap to the firewall and the alternator housing while the motor is running was 80-100mv. Too much?
The battery voltage when idling after this run was 13.7V. The battery voltage with the car off after letting it settle for a couple of minutes was 12.9V
All of this was with the car not showing any dim warming lights...
|
|
-
|
|
|
Yes, intermittent troubles are the toughest. The worst of them validate the parts cannon approach.
Your voltage drop reading is not a red flag. When the ground wire fails, the voltage dropped across that "circuit" is about 14000 millivolts. :-)
But, the wire fails because of a poor connection, and most poor connections are sensitive to mechanical disturbances to become intermittently poor.
Just revisit the brush pack when you have a fine warm bright day to mess with the car. Meanwhile, get a cheap cigar-lighter voltmeter so you at least have 30 miles or so warning when it quits again.
--
Art Benstein near Baltimore
A Stranger is just a friend you haven't met yet.
|
|
|
|
|
