Volvo RWD 200 Forum

INDEX FOR 10/2025(CURRENT) INDEX FOR 5/2010 200 INDEX

[<<]  [>>]


THREADED THREADED EXPANDED FLAT PRINT ALL
MESSAGES IN THIS THREAD


  REPLY TO THIS MESSAGE Replies to this message will be emailed.    PRINT   SAVE 

Throttle position sensor wiring 200 1988

Hi all,

Been posting a bunch about my stalling volvo 240. I just found that one of the three wires on the cable connecting to the throttle position sensor is disconnected (in picture; the middle; number 2). Can anyone point me to something describing rewiring something like this?

https://imgur.com/eirQvoo


  •   REPLY TO THIS MESSAGE    PRINT   SAVE 

    Throttle position sensor wiring 200 1988

    Hi,

    I used to have have a bookmark set for 240 wiring schematics but it's now gone defunct.

    This one is for 2.2 LH and has corrections to it for its components compliments of Art Benstein and the BB!
    https://www.brickboard.com/RWD/volvo/1636835/220/240/260/280/now_issue_fuel_injection.html

    I suspect it will work as the harnesses may have not changed in that area for a long time.
    That is for only Some and luckily only a few of the late nineties cars with 3.1.
    They use a totally different (variable) throttle switch.

    The throttle switch should not be as critical as the AMM for color codes back to the ECU's.

    Give it a look-see and if the same colors in there, it should work.

    For all's Information to put between the ears!

    Just look at how the terminals of a switch is closed at idle and what colors close together at full throttle. Component "H" is pretty clear.
    The "in between" as shown in the diagram is the same on all non-energized components.
    If you notice the system relay the contacts are not closed so it "stands to reason" (unless otherwise noted).
    The throttle switch is parked mid throttle. No clicks as its not "being" cocked, triggered or influenced.
    The standard is: A switch or component that sits without any "activation pressure or energy applied upon it" is considered "in" its "normal position." This is either Normally Open or Normally Closed.

    Phil


    •   REPLY TO THIS MESSAGE Replies to this message will be emailed.    PRINT   SAVE 

      Throttle position sensor wiring 200 1988

      Thank you so much for this! I am also having a hard time tracking down the connectors themselves in the US. I assume I can't just rewire the old one?


      •   REPLY TO THIS MESSAGE    PRINT   SAVE 

        Throttle position sensor wiring 200 1988


        The pictures below are from Dave Barton's website, 240turbo.com. Here's a link to the page where these products are found should you wish to purchase them from Dave. No doubt they are available elsewhere and the choice is yours but this is pretty straightforward and Dave has an excellent reputation. The guy at your local auto parts store may or may not know what he's talking about.

        https://www.240turbo.com/blackvinyl.html#3poleEFI

        Assume that the plug is reusable. Pull the rubber boot back off of the plug and push it back over the black tubing. That way it will be there when you need it later.

        Look in the open end of the plug. It should look like the pic below except yours will still have the terminals in place.


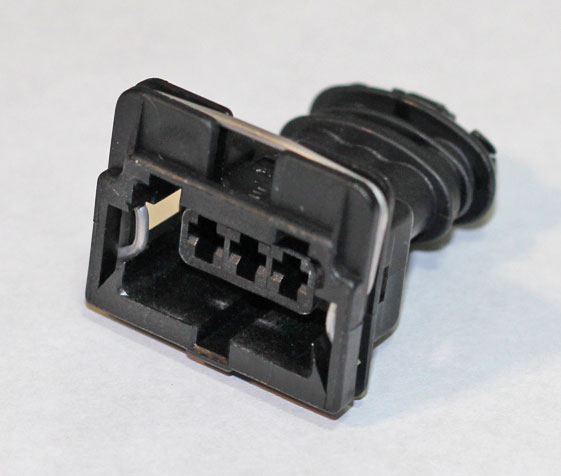
        You need to extract the terminals. I would pull them all, first taking note of which wire is which in relation to the plug because, as you no doubt know, it only fits one way and you don't want to reverse the two outer wires when you insert the terminals back into the plug. Why pull them all? In your place I would want to cut them to the same length and use new terminals for all three wires. Otherwise if you reuse the the two unbroken outer wires they are going to buckle.

        Back the open end of the plug. You will see the three terminals. In one of the arms of that cross shaped recess there will be a tang that keeps the terminal in place. Into this you can insert a small flat bladed screwdriver or something similar to depress the tang and then you can pull the terminal out the other side of the plug.

        Time for another pic. The terminal should look like this. You can see the tang.


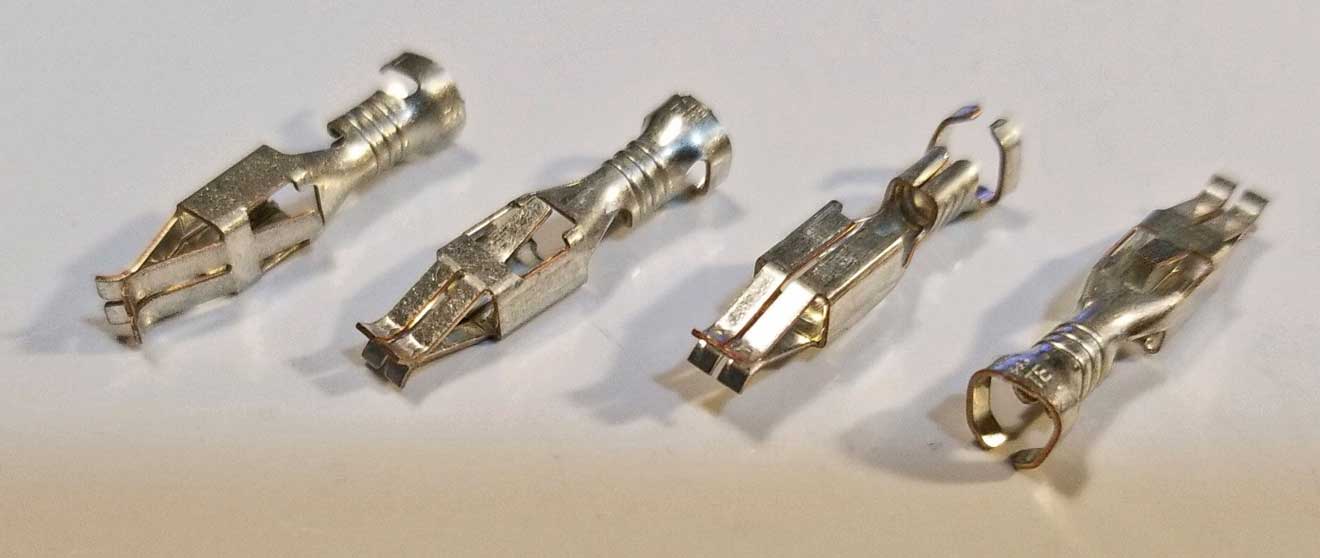
        If you use the link at the top of the page and scroll down to where the individual terminals are shown you will see a link to crimping instructions.

        Inserting the terminals into the plug is just a matter of getting them properly oriented and in the correct space.


        --
        '80 DL 2 door, '89 DL Wagon, '15 XC70 T6


<< < > >>


©Jarrod Stenberg 1997-2022. All material except where indicated.


All participants agree to these terms.

Brickboard.com is not affiliated with nor sponsored by AB Volvo, Volvo Car Corporation, Volvo Cars of North America, Inc. or Ford Motor Company. Brickboard.com is a Volvo owner/enthusiast site, similar to a club, and does not intend to pose as an official Volvo site. The official Volvo site can be found here.