|
|
|
1992 740 238K
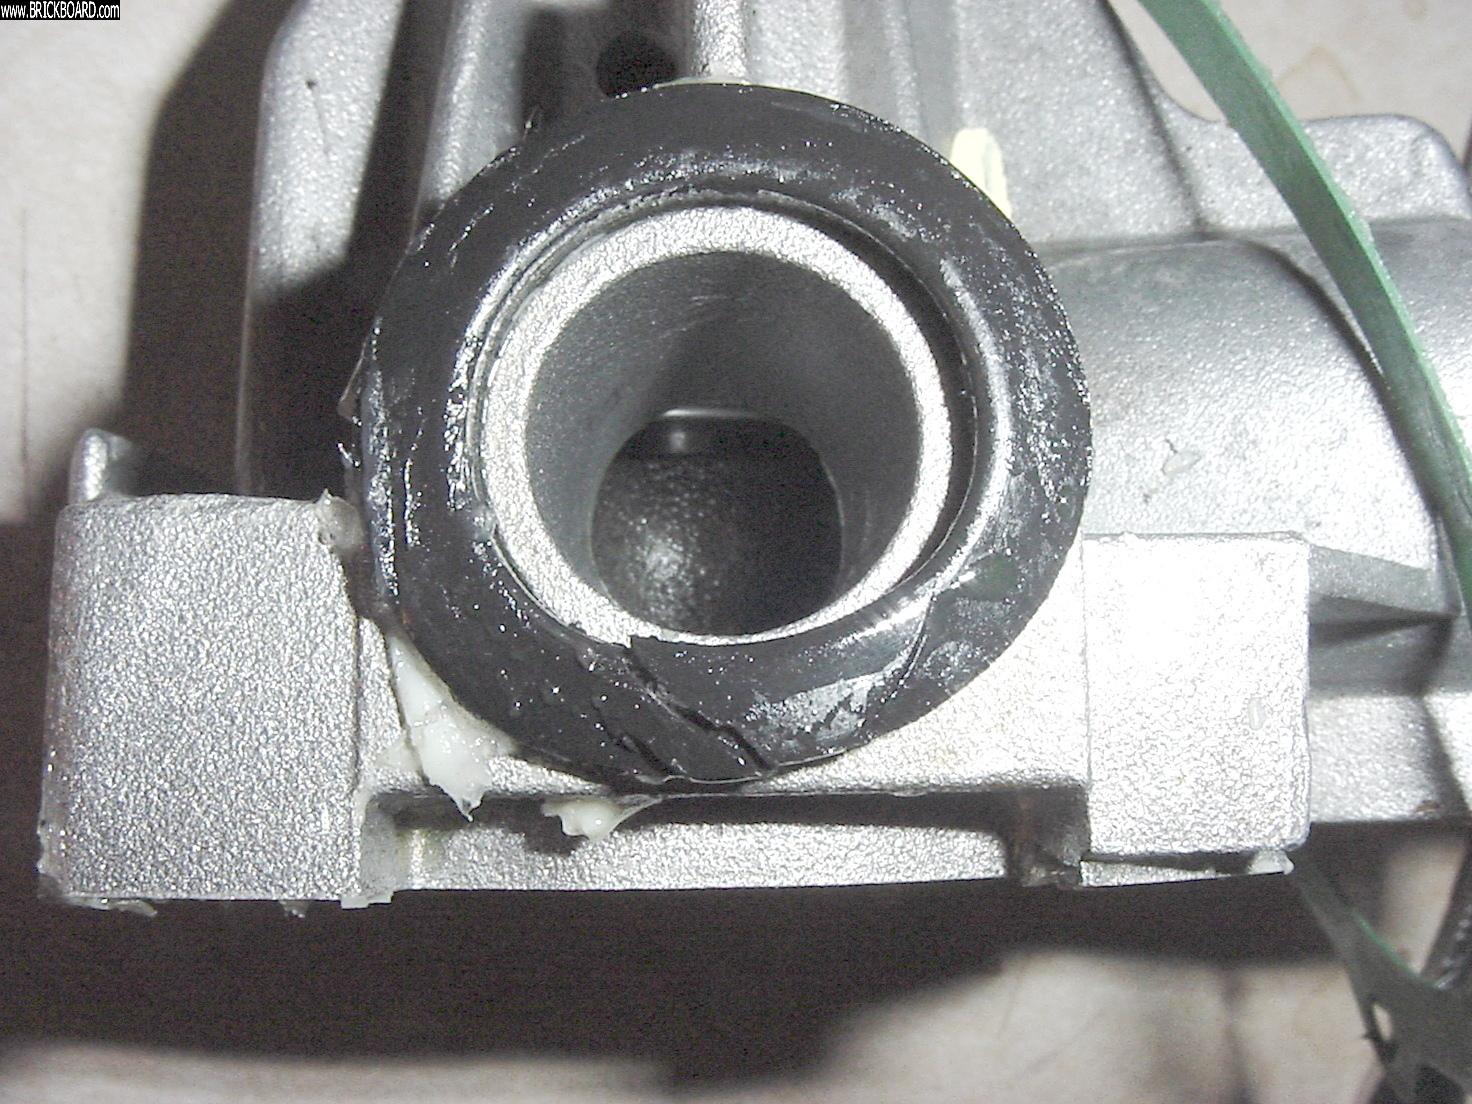
We purchased this car six years ago. During a major freshening up (4/16) I replaced the water pump with a HEPU pump. The top seal against the head started leaking so I replaced the gasket and seals (1/18). That was good until it started leaking again (9/18) and I again replaced the gasket and seals. It has once again started leaking (always from the seal against the head) and needs my attention.
This is the same water pump I installed in April of 2016. The car has covered 70K since that time. The odd twist on this particular car is that when installing the pump it requires very little upward force to get it into a position to install the bolts that hold it to the block face. Normally as many of you know this can be a real wrestling match to compress that top seal enough to get those bolts started after hanging the pump on the studs.
I am going to install a new HEPU pump this time. I am hoping this solves the problem indicating the cause for this poor fit is because of the current pump. I doubt this is the case, but if it is the problem will be solved.
Does anyone have any suggestions on how to solve this problem if I find that the new pump fits as loose as the previous one? The only thing I have come up with is to put a layer of silicone evenly around the bottom of the groove where this top seal sits and allowing it to cure before moving ahead with the pump installation.
Thanks for any suggestions.
Randy
--
Any twenty minute job is just a broken bolt away from a three day ordeal
|
|
|
|
|
I ve done 2water pumps on 2 2.3engines&had no leaks,,I bet the pumpis defective/mal cast.
|
|
|
|
|
Thanks everyone for the tips and encouragement.
I plan on examining the quality of the casting job on the pump and clean up any questionable areas. I will be dry fitting the pump and checking what the spacing is between the pump and head.
I have ordered a couple of the seals from Tasca and will do a critical comparison to the aftermarket ones I have on hand. The heater pipe seals are shown as discontinued. I did notice that the pump to head seals on FCP is listed as being from Reinz. This was not the case the last time I purchased from them.
I will also look into raising the pump to compress the seal by inserting a phillips head driver in the bottom hole. Honestly it seems inadequate for the task, but I'm keeping an open mind.
Unfortunately this repair has to be put off because of a full schedule, but I will be posting back when I get to it.
Again, thanks
Randy
--
Any twenty minute job is just a broken bolt away from a three day ordeal
|
|
|
|
|
Hello rstarkie,
I'm with Spook, in recommending using Volvo seal for the waterpump as it has thicker flange to compress against the head. Alternatively, a thin O ring (with proper diameter) placed on underside of the aftermarket seal (the flange part) could also make it overall thicker.
Amarin.
|
|
|
|
|
Dear rstarkie,
Hope you're well. Within the past two weeks I bought water pump coolant pipe seals (#418411) from a Volvo dealer. These seals have "sharp" edges, unlike the radiused edges that used to be present on Volvo-supplied seals. I infer that these seals are made by an aftermarket supplier. I paid over $4 each for these seals, which may be the same as those sold by www.fcpgroton.com for $0.29 each.
The Volvo brand water pump-to-head seal (#1336255) has a flange that seems thicker than that on the aftermarket version. These seals cost $6 each. That's a small price to pay for not having to replaced a prematurely-failed seal.
Hope this helps.
Yours faithfully,
Spook
|
|
|
|
|
After my initial post about the problematic waterpump on this car I purchased seals from both Tasca and FCP.
On Tasca's site the coolant pipe seals were listed as no longer available so I just ordered two of the waterpump to head seals from them and several of the pipe and head seals from FCP.
I also had the seals that came with the HEPU pump that had been on my shelf for some time. The head seal seemed harder and therefore less pliable, but I think that may have been due to the fact it was sitting on the shelf for several years.
The head seals that came from Tasca were embossed with "Volvo" and 1336255. As you mentioned the outer edge had a radius of additional material.
The head seals that came from FCP were listed on their site as being from Reinz. They were identical to the one that came with the HEPU pump but were as pliable as the Volvo ones.
I decided to install a new pump and I used one of the Volvo head seals. Rather than using silicone sealer on the top surface of the seal I elected to try the suggestion of using grease. I had a tube of synthetic plumbers grease and gave the seal a bit of a coating. I still used the black silicone sealer on the pipe seal.
I also tried the suggestion of using a phillips screwdriver to lift the pump into position to install the bolts. That worked out well, but I never really had any trouble getting the bolts started on this car for some reason. The acid test for me will be when I have to install a pump on one of the other b230 cars.
Thanks again for everyone's help and suggestions. The car has remained dry in the seal area and time will be the true test.
Randy
--
Any twenty minute job is just a broken bolt away from a three day ordeal
|
|
|
|
|
Dear rstarkie,
Hope you're well. I have some aftermarket under-head water pump seals. Their flanges are thinner than are those of the Volvo brand product. When I once usedsuch a lighter-weight seal, it failed pretty quickly.
I replaced it with a Volvo brand seal and have had no problems 50K miles on. If I recall correctly, the Volvo brand seal had a flat underside, so there was more rubber against the pump's mating surface.
The problem with the aftermarket seals - at least those I have - is that their underside (that mates with the top of the pump) is "hollow". When the seal is emplaced in the water pump's groove, there's "air" - i.e., a gap - between the underside of the seal and the pump housing. While the seal's outer edge touches the pump body's outer edge, there's an airspace between that edge and the edge of the seal that goes into the pump's opening, through which coolant flows.
So, even when a "light-weight" seal is fully compressed, there may still be an "air space" between the underside of the seal and the pump housing. That's what I think may have led to seal failure.
Volvo brand seals are not "hollow" on the underside. So, it takes more force to lift the pump enough to compress the seal to the point, that the bolts can be emplaced.
To save wear-and-tear on me, I use a bottle jack and a short-length of furring strip, to raise and hold the pump, while I tighten the bolts and nuts. The bottle jack allows me to control the lift precisely.
As to the coolant pipe, Volvo brand seals have slightly-radiused edges. Aftermarket seals have "sharp" (90-degree) edges. I find Volvo seals seat more easily into the pump's opening, perhaps because the ever-so-slightly radiused edge is less likely to catch on the aperture's wall, skewing the seal.
Hope this helps.
Yours faithfully,
Spook
|
|
|
|
|
Take a flat file and square.the water pump mating flange. A least check it with the file.Just take your time and go around the flange. On the gasket, smear just enough blue silicon to barely coat the gasket and let it dry for 15 - 20 mins. Never put excessive silicon on a water pump gasket.
|
|
|
|
|
I would tend to think this consistent leaking is more of an installation issue. Even if you are able to install the mounting bolts without struggle, you still need to compress the seal. My method has worked for me countless times -- Give the top of the seal a thin smear of grease, insert all of the mounting bolts except for the very bottom one and get them started in the threads and gently drawn up to pull the pump in towards the block but not so tight as to lock it in place. Now insert a phillips screwdriver or other rod (punch or drift) into the bottom hole and use the tool as a lever to lift the pump while you tighten the other bolts. That's all the pressure you need - no jacking the pump into place or any other creative way to apply pressure. A very thin coat of grease on the gasket is something I also do. -- Dave
|
|

|
|
Hi Messrs. Starkie, Benstein, and Zipkin,
+++++ 1 on using grease and verifying contact surfaces.
I use the SuperLube NLGI 2 silicon grease. Less harmful to the seal rubber-like material.
Same for the gasket. Use the Volvo seals and gasket. Through what Hepu includes seems OK if a little thin on the water pump to block gasket (unless that has improved). I'd not gotten a new Hepu in at least a half decade.
And then there is the practicum the user / repairer employs during the repair instance. A water pump gasket top seal effort with a used yunkyard pull yet very new Hepu pump (filthy engine, bright new wasserpumpen, FPR, and other bits).
The seal was made in India. The seal felt off in the hand. Yet my lack of mindfulness was the cause.
https://www.brickboard.com/GALLERY/volvopic.htm?id=12485
That seal lost seal a few miles up the road. Returned with an AAA tow (second in 30 years). Reinstalled using the Volvo seals and gasket. Proper levering up of the pump to compress the top seals. 6k miles later, all remains well.
Mr. Starkie, you know the upward levering to compress the top seal without distressing the paper gasket. So like Mr. Benstein indicates, examine the under the cylinder head seal contact surface.
People appear to miss the lever upward step properly while applying proper torque to the retaining hardware. They then smother the top pump seal in Ultra Grey or other sealant.
--
7 240s total since 1984. 3 240s today and rotting away.
|
|

|
|

--
Art Benstein near Baltimore
|
|
|
|
|
Dave, Art, Kitty, et all,
Thanks for your responses.
It would appear that your experiences are different than mine. Other than this car my procedure has always been as follows:
1. Clean all the mating surfaces
2. Lightly coat the heater pipe, the heater pipe seal (sliding the seal back against the ridge), and the interior surface where the heater pipe lives with silicone sealer.
3. Put the paper gasket in place on the studs, insert the top seal in its groove, and coat the surface of the top seal with silicone sealer
4. Hang the water pump on the studs, push the heater pipe into the back of the pump and partially tighten the nut/bolt combination.
5. Install the nuts on the studs and tighten the nuts enough that the pump can still move up but eliminating the front to back movement.
6. Use whatever I can find room for to lever up the bottom of the pump. A length of sledge hammer handle is the most common, but if the belly pan is off I have been known to use a small bottle jack and a length of 2x4.
7. After the pump is raised enough to start the bolts I install them; tightening those and the nuts on the studs
8. Tighten the heater pipe bolt.
The suggestion of installing all but the bottom bolt baffles me. I have never been able to install any of those bolts without applying a significant effort at raising the pump with a lever under it. I make every effort to maintain that force while I am tightening the bolts, but I can't imagine being able to raise it any more than I already have to get the bolts started.
On this car it is very easy to get the bolts started by simply pulling up on it by hand. The seal is not compressing very much at all. When I (once again) reinstall this pump I will make every effort to lever the pump as much as possible to compress the seal.
As to the condition of the bottom of the head where the seal rides I will pay particular attention this time. However in cleaning the surfaces up and checking that surface by feel and with a small mirror I don't recall any concern on my part in the past. It did not appear that someone had taken a grinding disk to it or in any way distorted it.
I will admit to using after market reseal components. I can't find aftermarket gaskets any longer but have a Volvo gasket that I use as a pattern and then cut my own from a sheet of gasket material of the correct thickness.
If I install a new HEPU pump I will use the components that came with it. When I was going to try to work with this pump "one more time" I had contemplated applying an even 1/16" layer of silicone in the bottom of the groove to effectively raise the seal by that amount.
Randy
--
Any twenty minute job is just a broken bolt away from a three day ordeal
|
|
|
|
|
Randy, as long as I've known you I'd bet you've changed more of these pumps than I have. And I thought maybe I've made every coolant pump mistake possible, but then again, I know better than that. Learn something, however tiny a thing, every time.
Because of this learning process over 20 years (for me) I've not done any procedure "always".
"Other than this car my procedure has always been as follows:"
I'll take each point to comment.
"1. Clean all the mating surfaces"
This is by far the most time consuming part of the job.
"2. Lightly coat the heater pipe, the heater pipe seal (sliding the seal back against the ridge), and the interior surface where the heater pipe lives with silicone sealer."
I used to do this. RTV. Switched to Sil-Glyde (silicone grease, not RTV) but still have some old pictures showing the RTV and what it looks like the next time. Have a picture of an errant strand of it lodged in the thermostat too.
"3. Put the paper gasket in place on the studs, insert the top seal in its groove, and coat the surface of the top seal with silicone sealer"
I've been back and forth about using the paper gasket dry or smeared with grease. I rationalize the grease as preventing the paper from tearing as the pump is slid upward in the slotted holes, but then decided dry was better -- just make sure the fasteners were loose enough to allow it to move without digging into the paper.
"4. Hang the water pump on the studs, push the heater pipe into the back of the pump and partially tighten the nut/bolt combination."
I really like the flanged bolts, because a nutdriver gives so much better control at getting them started. Same with the nuts. Putting the greased square o-ring on the pipe (instead of into the pump) was the very first tragic lesson I learned on these things in '99.
"5. Install the nuts on the studs and tighten the nuts enough that the pump can still move up but eliminating the front to back movement."
Yes, this is the key, I think. Just loose enough to keep from mangling the paper gasket.
"6. Use whatever I can find room for to lever up the bottom of the pump. A length of sledge hammer handle is the most common, but if the belly pan is off I have been known to use a small bottle jack and a length of 2x4."
This, I never did understand. Why would a jack or sledge hammer be necessary to squeeze a soft rubber seal. I gave up on this many years ago, using a #1 Phillips or better, a Craftsman T-27 Torx driver in one hole as a lever. Right hand on the handle of the lever and left hand on the nutdriver to start the bolts in the remaining holes.
"7. After the pump is raised enough to start the bolts I install them; tightening those and the nuts on the studs"
Yup
"8. Tighten the heater pipe bolt."
I've forgotten to do this.
http://cleanflametrap.com/wasserpumpen.html
--
Art Benstein near Baltimore
"If you can't fix it with a hammer, you have an electrical problem." -vwbusman66
|
|
|
|
|
I have found in the past that it’s good practice, particularly on the aftermarket pumps, to first fit it up to the engine with no gasket or seal on place. Run the fasteners down finger snug and then back them out a couple turns. Then slide the pump upward as far as it will go and, using a feeler gauge, make sure it completely closes the gap between the pump and the head. I’ve seen at least one pump where the casting was so bad that I had to clean out the holes with a rat tail file in order for it to slide all the way up.
|
|
|
|
|


