|
|
|
Hi all, Big mystery on my 240 wagon. Suddenly every day the recovery tank ends up basically empty. There's no sign of wetness on anything under the hood or on the ground. The oil looks fine, and no clouds of smoke out the tailpipe. I top up the coolant every time and it always goes away. As long as I keep up with it the temperature stays the same as ever; no problems. Can someone give me some advice on what to investigate? Thanks, Chris
|
|
-
|
|
|
Thanks, I'll do a compression check and look at the plugs. How do you do a pressure check without a radiator cap location? Chris
|
|
-
-
|
|
|
Hi Art!
I’m enjoying your pictures, of late, even more than in the usual post you do!
You are giving up little secrets to me, not that you are doing it on purpose but, I see that you’re more clever than you talk about.
This borrowing the garden sprayer to make your own “Motive” brake bleeder and cooling system tester by using old cap for each system is right up there to being the dual purpose guy that you are!
In an earlier post about cutting open an IAC valve from China I noticed it had a nice straight cut around the body end! Not done by someone with a “hacking saw.”
There was a nice true ring laying beside the unit that appears to be about one half inch long.
I assume that your friend that made some speedometer gears out of acetal for you, May, have done this for you? You have never mentioned have greater skills?
I know how it is about tying up someone else’s time, when asking favors, especially, on such an experimental adventure!
It looks to me you didn’t plan on putting it back together with that ring because it’s now too short. This of course means the valve is ruined that only cost $15.00 to begin with.
Curiosity does comes with a price tag, but on failing parts that’s not not hard to live with either of us!
I always figure that the item has some worth left in it and that to teach me how it works and the reason for failure.
You warned me about opening up one on my own from the way their built and now I see why!
Like we thought, there are fewer wearing parts inside with the elimination of commutator, slip ring and brush design.
For sure they have went for to be “cheaper made” right out of the gate!
I imagine that the preceding engineering prototypes were all caught up with having the ECU giving out two opposing polarity pluses because they wanted a precise control FROM their perspective.
I personally, would have thought a little further, in steps, to how much effort on my part to reuse the item? One step is to except the CHALLENGES involved and then is it worth it, overall?
I admit, Back in the day, getting paid had lots of a greater incentive to it!
Today, I have done things for myself and a few others, as my labor charges for me are less than those of Chinese labor.
The older I get, it becomes, that the need or desire has to reach a little higher up to be more on a priority list against routine living chores. The Brickboard just slips in between things! (:-)
I would have turned back the outside diameter of the valve, to any diameter I felt like, to get a nice smooth and round clean up, while it was chucked up in that lathe.
This would have made that diameter square with the cutoff face.
This way I could have made another longer ring cap with an internal shoulder and pressed it back on the body of the valve.
I know that the body is made of cast aluminum and not billet material and can present a problem with tack welding it to the body.
I have gotten around situations like this by using using an adhesive like “bearing retainer” that comes in small tube. It’s very similar to a thread locker product.
This can suffice it one did not think a press fit would do the trick.
There shouldn’t be any lateral strain put on that end cap so I think a press fit would just as good as crimping.
I still wonder about that substitution thing, we talked about, to make them compatible with the earlier IAC connections and LH systems?
Again, where are the priorities, when only two cars out of six I have, will use a brush type IAC and I have junkyard spares?
To get back on topic more, that water is someplace “locally,” if it didn’t go out the tailpipe.
When it goes through the combustion process, the cylinders involved will have their sparks plugs steamed cleaned. There will be no deposits, except some white antifreeze deposits mentioned in another post.
I imagine he is adding only plain water at this point of the summer and getting by until the problem gets worse!
Not a good practice!
Phil
|
|
-

|
|
Hi Phil,
I don't see you posting that much lately, but today you decided to make up for it, no?
There are so many comments I need to make in response, I'm going to quote your post and insert my comments in bold:
Hi Art!
I’m enjoying your pictures, of late, even more than in the usual post you do!
You are giving up little secrets to me, not that you are doing it on purpose but, I see that you’re more clever than you talk about.
This borrowing the garden sprayer to make your own “Motive” brake bleeder and cooling system tester by using old cap for each system is right up there to being the dual purpose guy that you are!
The garden sprayer was my first brake bleeder. The Motive replaced it as it has the much smaller volume and dip tube to allow brake fluid to be pumped instead of just air. Much improved method, in that you won't accidentally run the master dry.
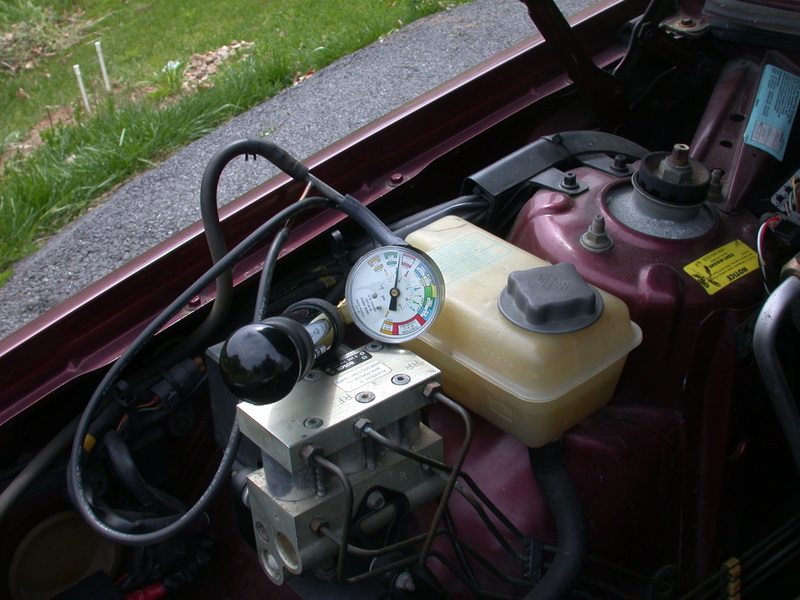
I still use it to pressure test the cooling system after doing things like replacing a coolant pump. I run it up to 10 psi and walk away. If it holds half that after an hour I'm happy. The Stant tester I show in the other picture, being used on a 940, is what most folks probably recognize as a cooling system pressure tester. Comes with an assortment of rad caps that are useless to me, having nothing but 240's.
In an earlier post about cutting open an IAC valve from China I noticed it had a nice straight cut around the body end! Not done by someone with a “hacking saw.”
There was a nice true ring laying beside the unit that appears to be about one half inch long.
I assume that your friend that made some speedometer gears out of acetal for you, May, have done this for you? You have never mentioned have greater skills?
I know how it is about tying up someone else’s time, when asking favors, especially, on such an experimental adventure!
I don't have a friend making odometer gears from acetal. The machined-from-Delrin gears I've used were Ebay purchases coincidentally mailed from the same state I live in. They were accurately made.
Now that ring you see taken from the idle valve casting was done by me with a hacksaw and the bench vise. Shows how photography can make something look better than it does. It was my first attempt opening one of these. The second attempt was done on the aftermarket unit. Don't know that it was made in China, but it certainly could have been. Obviously, after opening the first one, I learned, and passed on what I needed to do to open the second one without using a hacksaw!
It looks to me you didn’t plan on putting it back together with that ring because it’s now too short. This of course means the valve is ruined that only cost $15.00 to begin with.
No, the aftermarket unit wasn't hacked so it couldn't be re-assembled. The original Bosch was. It was a unit that was sluggish in testing, for which the reason became apparent after opening it. Sludge in the valve part. Nothing at all wrong with the bearings.
Curiosity does comes with a price tag, but on failing parts that’s not not hard to live with either of us!
I always figure that the item has some worth left in it and that to teach me how it works and the reason for failure.
You are so correct.
You warned me about opening up one on my own from the way their built and now I see why!
Like we thought, there are fewer wearing parts inside with the elimination of commutator, slip ring and brush design.
For sure they have went for to be “cheaper made” right out of the gate!
I imagine that the preceding engineering prototypes were all caught up with having the ECU giving out two opposing polarity pluses because they wanted a precise control FROM their perspective.
I personally, would have thought a little further, in steps, to how much effort on my part to reuse the item? One step is to except the CHALLENGES involved and then is it worth it, overall?
I admit, Back in the day, getting paid had lots of a greater incentive to it!
Today, I have done things for myself and a few others, as my labor charges for me are less than those of Chinese labor.
The older I get, it becomes, that the need or desire has to reach a little higher up to be more on a priority list against routine living chores. The Brickboard just slips in between things! (:-)
I made a mistake by not testing the aftermarket unit in the system. System testing, meaning put it in a car and see how it controls idle over the range of warm-up. Now I plan to put it back together and do that test, which means it still occupies the bench where you saw it last until I do.
I would have turned back the outside diameter of the valve, to any diameter I felt like, to get a nice smooth and round clean up, while it was chucked up in that lathe.
This would have made that diameter square with the cutoff face.
This way I could have made another longer ring cap with an internal shoulder and pressed it back on the body of the valve.
No need. The valve can be disassembled by simply grinding away the three places where the end cap is staked. Even the bulkhead can be removed without drilling out the stakings there.
I know that the body is made of cast aluminum and not billet material and can present a problem with tack welding it to the body.
I have gotten around situations like this by using using an adhesive like “bearing retainer” that comes in small tube. It’s very similar to a thread locker product.
I have a bottle of Loctite 609 Retaining Compound that might have come over with Columbus. Seriously, I've had it over 30 years and a drop still locks in the outer race of a slip-fit bearing.
This can suffice it one did not think a press fit would do the trick.
There shouldn’t be any lateral strain put on that end cap so I think a press fit would just as good as crimping.
I still wonder about that substitution thing, we talked about, to make them compatible with the earlier IAC connections and LH systems?
As I mentioned before, I'll leave that test to you. If MacGyver did it, I wouldn't laugh and say "that won't work." Return on investment of time doesn't work for me, not having any LH2.0 or LH2.2 cars.
Again, where are the priorities, when only two cars out of six I have, will use a brush type IAC and I have junkyard spares?
To get back on topic more, that water is someplace “locally,” if it didn’t go out the tailpipe.
When it goes through the combustion process, the cylinders involved will have their sparks plugs steamed cleaned. There will be no deposits, except some white antifreeze deposits mentioned in another post.
We've all had learning moments tracing cooling system leaks. The responses in this thread cover most of those I can think of. OP will find it one way or another.
I imagine he is adding only plain water at this point of the summer and getting by until the problem gets worse!
Not a good practice!
Phil
--
Art Benstein near Baltimore
|
|
-
|
|
|
Hi Art!
Yes, you’re right, I made up fo it!
Thanks for giving me a read!
Phil
|
|
-
-
|
|
|
I did a compression test and all cylinders are right up close to spec, and the plugs look great! Had a local garage do a pressure test, and they finally found that a heater hose was dripping where it goes around the back of the block. No doubt original 1990 vintage. Looks like a horrible job to accomplish. Can someone give me a link to or advise me with a tutorial on changing heater hoses? I want to do it as painlessly as possible!
The garage says you have to get the preformed hoses to do it right, so I guess I'll shop for some.
Later, Chris
|
|
-
|
|
|
Chris, by saying "around the back of the block" you are referring to the heater return hose which extends to the steel pipe leading to the coolant pump. The hotter S-shaped heater feed hose between the head and the firewall is even more prone to fail.
I advise you replace both and use genuine Volvo hoses. Some of the aftermarket replacements are not formed correctly. If you remove the air plumbing for the intake, booster, and PCV system, you can get to these hose clamps. Take care when cutting the hoses loose not to score the fittings.
Also check the booster hose near its connection with the intake manifold as it tends to soften with blow-by and can result in sudden loss of brake assist. All these hoses, and the radiator hoses are stressed by worn or oil-soaked motor mounts. In the end analysis, oil leaks ruin coolant hoses.
--
Art Benstein near Baltimore
|
|
-
|
|
|
The good news is you're replacing them (if one is leaking and you're keeping the car - have a hose changing party) -- so, removal is usually pretty easy - just cut them off. Do the best job you can cleaning up the flared fittings they're going over. I always use a bit of NeverSeize on the inside of the hose and on the fitting. Helps things slide into place. Don't over tighten clamps. Drain radiator AFTER you've opened the heater valve - that will usually get fluid level low enough that you won't make a huge mess. But some mess is to be expected.
Working at the back of the motor in tight confines is always a PITA. Just get in there and git 'r done.
|
|
-
|
|
|
I'll just add to what Michael wrote along with some specifics. There are pre-formed hoses that should be used--they make the job much easier. If possible use Volvo brand hoses. They are of top quality-I can't vouch for any aftermarket hoses. I just used a set on my Oldsmobile V8 engined '93 245. I was able to utilize all Volvo parts (including two fixed pipe sections-one from a 240 and one from a 140). The Volvo hose clamps are the best--they do not have serrations squeezing into the rubber. They are driven by a screw that has a flat screwdriver slot and a 7mm hex--if you have them, use a 1/4 drive ratchet, extension and 7mm socket (sometimes a universal joint or universal socket make it easier. If you don't have them, borrow some. They make the job that much easier. Access to the hose that comes from a pipe that wraps around the head can be difficult. Remove the hood along with the hinges (mark the bracket to body location). That way you can lean over and see the hose & clamp by looking straight down--the same for the connections at the heater valve. The upper pipe for the heater goes to the hose running under the intake manifold to the outlet on the block (that's the pressure side feeding the heater). The lower heater valve pipe's hose goes to the hard pipe which returns coolant to the water pump. It's kind of crowded under there but you should be able to see the block outlet looking straight down through the intake runners. With the clamps loosened slice the hoses length wise at the pipes to release them. Unless they are completely rusted the originals should all be re-usable. Volvo brand heater hoses usually come with new clamps. When you re-fill the cooling system leave the heater valve open. If the engine reaches operating temp and you don't have heat yet -- just hold the throttle open at maybe 2k or 2.5k rpm and coolant should start circulating through the heater core. - have fun - Dave
|
|
-
|
|
|
I failed to mention -- have an assistant when removing the hood. - Dave
|
|
-
|
|
|
Won't the hood raise to 90 degrees like most Volvos?
--
Post Back. That's whats makes this forum work.
|
|
-
|
|
|
Not the 200 series. They have regular old-school hinges.
The vertical "service position" is one of the coolest features of the newer models!
--
XC60 / Odyssey
|
|
-
|
|
|
Newer? My 85 740 has it. lol
--
Post Back. That's whats makes this forum work.
|
|
-
|
|
|
I probably should have said "newer designs" rather than "newer models". I may have if I had known the 7/900 cars had the feature. In my journey of Volvo ownership I managed to skip over them, going from 240 to 850.
--
XC60 / Odyssey
|
|
-
|
|
|
I can't speak for Will but if you started your Volvo ownership with 544 and 122 models as I have, a 740 is the definition of "modern". :-) Dave
|
|
-
-
|
|
|
The same Motive brake bleeder cap that fits the brake fluid reservoir will screw onto the coolant reservoir.....easy peasy pressure test.
|
|
-
|
|
|
One of the causes of disappearing coolant which re-discovered every few years is a pinhole-sized leak at a hose clamp or hose which produces a fine stream once the system is up to temp and pressurized. The fluid might hit the exhaust manifold and not leave much trace, or be blown by the radiator fan with little evidence.
I'd suggest getting some fluorescent dye and a UV light, if closer inspection and pressure testing fails to disclose the leak. I assume you aren't getting antifreeze inside at the heater core.
--
Art Benstein near Baltimore
|
|
-
|
|
|
+1 for Art. I've had these pinhole leaks on all 3 of my Volvos at one time or another. Likely candidate is the expansion tank hose to the radiator. If the leak is down low you may only notice a wet spot after the car is parked after running.
Brian Mee
91 240
92 945T
|
|
-
|
|
|
Some places to look for a coolant leak in addition to hoses are the coolant tank and the mushroom seal at the water pump. My 90 had a slow leak for years at the mushroom seal. Never could find it since the heat caused rapid evaporation! Finally found it when I checked when the engine was not fully warmed up...:)
--
Will I buy another Volvo??? We'll see....
|
|
-
|
|
|
Small amounts of coolant loss to the cylinders (or cylinder) may not show up as "clouds of smoke". There are at least two paths coolant can take. I would do a compression test right away. By removing the spark plugs for a compression test you'll be able to examine them. Look for white crusty deposits on a plug with coolant contamination. Take the compression test with the motor both cold and warmed up. A blown head gasket will cause the crust.
Another path for coolant is through the radiator to the auto transmission (if your car is so equipped). Check your transmission dip stick for discoloration (light pink foamy fluid). The trans cooler section of the radiator is a known trouble spot with the later aluminum/plastic radiators. If you do find such contamination a new radiator is required and a thorough flushing of the transmission is needed. Antifreeze in the transmission oil will kill a transmission in short order. -- Dave
|
|
-
|
|
|
Small amounts of coolant loss to the cylinders (or cylinder) may not show up as "clouds of smoke". There are at least two paths coolant can take. I would do a compression test right away. By removing the spark plugs for a compression test you'll be able to examine them. Look for white crusty deposits on a plug with coolant contamination. Take the compression test with the motor both cold and warmed up. A blown head gasket will cause the crust. Another path for coolant is through the radiator to the auto transmission (if your car is so equipped). Check your transmission dip stick for discoloration (light pink foamy fluid). The trans cooler section of the radiator is a known trouble spot with the later aluminum/plastic radiators. If you do find such contamination a new radiator is required and a thorough flushing of the transmission is needed. Antifreeze in the transmission oil will kill a transmission in short order. -- Dave
|
|
|
|
|