|
|
|
Hi Dave,
I agree that it is time to move the discussion onto a new start point. I will begin by pasting your last commentary here. BUT to begin with I have another baffling development to report. After my last post to you I had my wife check the other two brake lights to see if they were still working and the answer was yes. And then I realized I had not replaced the bulb sensor when I was doing the check, i.e., the two main brake lights were working without the sensor even being in place. A mystery wrapped in an enigma, etc.
You're not going wrong at all, in fact this is slowly starting to come together. Your earlier testing showed the brake light circuit of the new bulb sensor seems to work and the old sensor may well be faulty.
Your testing is now showing you're not getting power from the brake light switch to the realy tray. That indicates a faulty brake switch exactly as I alluded to in my last reply. Dealing with two problems at the same time may well have been confounding the issue for you in amongst trying to master new electrical testing techniques.
If you can confirm that you're not seeing a reliable 12 volts in the socket for pin 54 then that now moves your attention to a faulty brake switch, as I alluded to in my last post. I'd suggest using a wire wrapped around pin 54 for testing so you don't have to worry about making sure the tip of your meter probe is contacting properly in the socket as it can be a bit awkward to see what you're doing in there. Try the pedal a number of times slow and fast as worn/dirty internal contacts may make for an intermittent signal or less than full battery voltage (compared to the direct from battery voltage you can see at fuse 3). Use an ohms setting, not a continuity beep setting. Now if you somehow do happen to see 12 volts then I'll be shocked if you're not also seeing some brake lights at the same time, hopefully even the 3rd brake light.
Post back once you confirm it's now at the brake light switch. I would suggest starting a new thread at this stage as this one is getting horridly long and off the original 940 radio removal issue. I'll pick up your problem there and try to help you through brake switch replacement if needed as the new style switches are indeed a bit tricky to deal with.
--
|
|
-
|
|
|
Oh my. That helps explain some of this bizarre testing. I’d likely have found that with a meter in the first 20 minutes, but at least we eventually got there. Someone’s clearly bypassed the brake light circuit in the bulb sensor relay, but didn’t bother to do the 3rd brake light (because it was broken and wasn't working anyway). As you now know you seemingly had a bad sensor and you also know how expensive they are, so you can perhaps understand why. Many of us would try to do the bypass inside the bulb sensor as it’s easier to do on the bench, keeps the original car wiring intact in case you trip across a cheap working sensor and doesn’t require pulling half the dash apart to get at the wiring. Would also have saved you and me a bit of time. Of course just re-soldering the bulb sensor would likely have restored functionality, but seemingly didn’t with yours. You may well find the bypass has been done under the relay tray and won't be at the brake light switch on the pedal.
You've got a few choices. You can finish the bypass doing the 3rd brake light Yellow-Black wire. That would be the simplest. Now that you've gone to all this effort and have a bulb sensor we now know works, you could undo the bypass and restore the connection between the brake switch and pin 54. Also restoring the connection to 54R and 54L. Odds are extremely high everything would now work as Volvo intended. Depending on the extent of the butchery it may not require additional lengths of wire to accomplish. Likely it’s just been done with three cut wires and a single bullet crimp. If they cut the wires off too close to the pins then you may not have enough wire length to restore the wiring. You can usually open up the crimp with a little effort and possibly a sharp pointy tool, which will give you maximum wire lengths. If they'd used a crimped tap it would have left power going to pin 54 and you never would have noticed. You may or may not now want to pull the radio for better access, which funnily enough takes us right back to the start of the last thread. If you'd had the tray out and flipped over you’d likely have spotted the cut wires and smelled the problem at the beginning, laugh.
Most people would use crimp bullet or sleeve connectors and they’ll certainly suffice, but my preference for such a job is usually solder to ensure optimum conductivity, strength and protection against corrosion. You should have some heat shrink tubing on hand to do a proper job of protecting any solder joints you do. Looks a lot more professional than black tape.
Because your working in tight quarters and if it wasn't my car, I'd be sorely tempted to just finish the bypass, cutting the Yellow-Black wire and splicing it in with others. You could also keep using the old sensor and try selling the new working one.
--
Dave -still with 940's, prev 740/240/140/120 You'd think I'd have learned by now
|
|
-
|
|
|
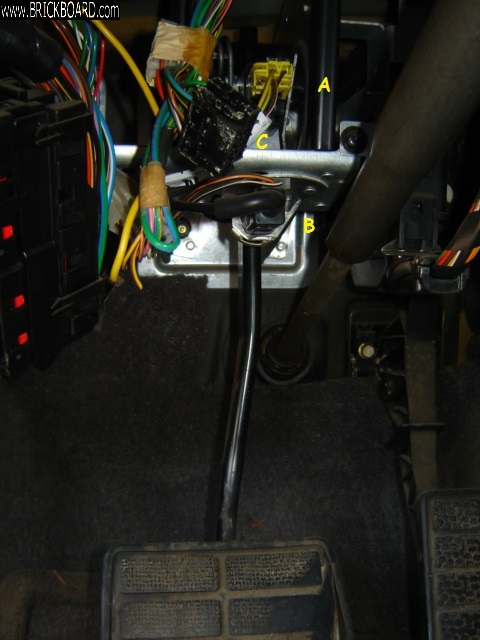
I have uploaded a rather dark picture of the brake light switch. I have three possibles:
A is a yellow connector that exudes four wires with the following colours: BK/YE, GR/YE,BN, and BN/WH. It looks a bit like a modifier plug and has a wrapper around the wires that is identified as T 354 4789 - 4.
B is the lower switch and has two wires emanating from it: Brown/orange and Black/white.
C is disconnected and did have an old masking tape cover on it. The wiring colours to it are green, grey/white, yellow/black, pink/brown, blue/green, and brown/orange. I wondered if it might have been disconnected and replaced by A. It might have nothing to do with the brake light circuit.
I am guessing that B is the brake light switch. Depressingly it all looks quite kosher. I cannot see any sign of modifications at this end of the wire. I will start doing some checks tomorrow.
|
|
-
|
|
|
The upper switch is the brake light switch:
o It's a two sided switch, one circuit for the brake lights and one as a cutout for the cruise control.
o The Yellow-Brown wire is the one that goes to bulb sensor pin 54 (relay tray socket contact 9), it does not go through a connector block, it will go directly into the big fat relay tray harness.
o Somewhere you will find that Yellow-Brown wire cut or disconnected and spliced directly to the brake light wires, a Yellow wire (right lamp) and a Yellow-Red wire (left lamp).
o Both those Yellow and Yellow-Red wires go from the bulb sensor socket of the relay tray to a large connector block up under the dash close to the column (likely very close to the brake light switch).
o From that large connector block, the wiring continues in the left side harness to the rear that goes under the door sills and up over the wheel well, again as a Yellow and Yellow-Red wire.
o A total novice barely qualified to change a light bulb and do trailer wiring might try running a new wire from the brake light switch all the way to the rear of the car directly to the brake lights.
o Your average mechanic unfamiliar with Volvo wiring and console disassembly would likely go looking for the brake light wiring and do the bypass splicing between the brake light switch and the connector block up under the dash.
o A mechanic more familiar with Volvos who already has the relay tray exposed in order to diagnose a bulb sensor problem might tend to do the splicing under the relay tray as working up under the dash can be a bit of a nuisance.
o A professional Volvo mechanic would only ever replace the bulb sensor with either new or used.
o Only shadetree machanics like us would take the time to do the ultimate bypass inside the bulb sensor rather than pay for an expensive sensor that may be difficult to find locally, especially when they know other circuits like the headlights might soon also fail.
If the car has a trailer hitch, be extra suspicious that this might be the reason a splice was being done to bypass the bulb sensor and indeed your original bulb sensor may still be fine. Without running a new separate wire all the way from the front of the car to the rear or purchasing a more expensive 5-way trailer adapter, whenever you apply the brakes with the turn signal on it would illuminate the bulb out warning. Bypassing the bulb sensor at the front is one very common way to avoid this trailer wiring issue in cars that have a bulb sensor. Normally the 3rd brake light could have been left working through the bulb sensor, but if the 3rd brake light was broken and not working anyway (as in your case) then someone may not have cared.
Keep looking for evidence of that splice. I guarantee you will eventually find it otherwise what you have found during inspection and testing wouldn't make sense.
--
Dave -still with 940's, prev 740/240/140/120 You'd think I'd have learned by now
|
|
-
|
|
|
Hi Dave,
I have been out of commission for about ten days with some kind of cold. But today the sun came out and I got back on the job. And with some success!
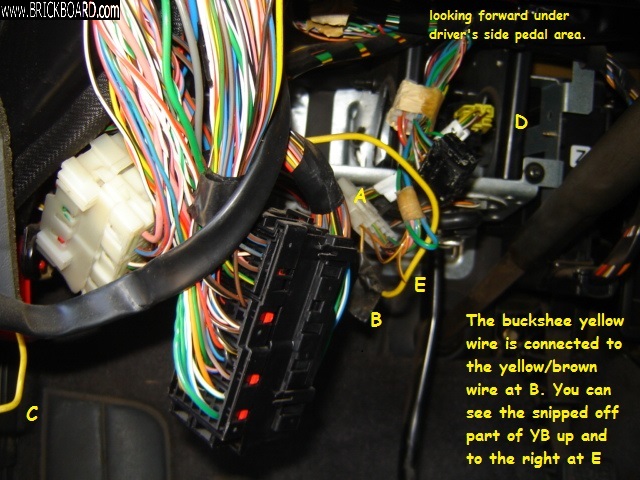
I have a picture of the wiring taken from just in front of the driver's seat. The LH 'wall' of the car corresponds to the LH side of the picture.
There is a buckshee yellow wire that has been connected to the yellow/brown wire [YB] emanating from some kind of connector block. That white connector block is not mentioned in the schematic wiring diagram I am using but you can see it clearly at point A in the picture. This is where the YB wire was cut and the buckshee yellow wire put into place. The remnant YB wire can be seen at point E. You can also see the buckshee wire going in behind a panel at point C. I plan to remove this panel tomorrow and see if I can find where the buckshee wire is heading.
You can see the brake switch at point D
My hope is that I can simply disconnect the buckshee wire and hook the YB wire together and then see what happens. Let there be light!
A note: this car was sold originally in Morrow, Georgia and later brought into Canada. It features a speedometer in miles per hour instead of kilometres per hour. Perhaps American destination cars were fitted slightly different to Canadian destination cars. It was assembled in Halifax.
|
|
-
|
|
|
Finally! Mending the cut Yellow-Brown wire should restore functionality through the bulb sensor, *however* I smell further complications. That Yellow wire is more than likely the one I noted that goes to the right brake light. You will need to find where it has been cut up under there and mend it as well. Furthermore, somewhere there will likely be a splice joining the right side Yellow wire to the left side Yellow-Red wire, either done up by that connector block or done at the rear, quite possibly where the right side harness breaks away from the main harness near the left tail light assembly. The cut Yellow-Red wire will then also need mending. It is always possible the Yellow wire is an add-on for some other functionality, but I highly suspect it's exactly as I'm telling you.
For doing the mends, bare a little wire on both sides of the cut and temporarily twist them together with a little protective tape to prevent accidental shorting. Once you've got it working, go back and use crimp sleeve or bullet connectors to properly complete the mend (if you're a purist you will use a drop of deoxit electrical paste or dielectric grease and protective heatshrink tubing to weatherproof)
Car is from Georgia?, laugh, well that explains a lot. (just kidding, Georgians, I have some fine relatives and acquaintances there, also where we got our dogs, pups came with a southern drawl in their barks).
"Buckshee" wiring, well I agree it's worthless, but I'd call it POS wiring (as in "piece of" or "previous owner", you're choice).
As for Canada vs USA market cars, the wiring is basically identical for 940s and 740s. The few differences there are between markets are all noted in the green electrical manuals. If you dig around hard enough there is a 1994 940 green electrical manual somewhere you can download as a PDF, possibly in the OzVolvo archive, I forget. 1994 & 1995 models are almost identical, but any 940 or even 740 green manual is probably more useful than many of the schematics you'll find elsewhere. As Spook alluded to, the original DRL headlight switches were slightly different internally due to Canada bringing in DRL earlier with slightly different constraints, but the wiring connector on the switch is the same. Over the years, Canadian cars, like California market cars, also differed in requirements and effective dates for safety and pollution control, such as 3rd brake lights, EGR and cat converters. In the 240/740 years, Canadian models sometimes had options like heated seats/mirrors/defrost as standard (called the winter package) a year or two before they became standard in the USA, but by the time you get to the 940s there are precious few differences other than metric speedometers (a perpetual pain when you want to import a car, when are those people ever going to join the entire rest of the planet?... I guess about the same time we finally stop using inches and pounds for lumber, groceries and bodies, lol). A number of differences were also due to switching various aspects of production and assembly back and forth between Halifax, Sweden and USA as 240 production slowed.
And as for your recent absence, I was wondering where you were. I'm sure you're thankful it was just a bad cold. I have to run an errand up past your neck of the woods tomorrow (sorry can't stop) so if you hear a 940 honk (okay beep) from up on the Inland Hwy it's me flying by.
--
Dave -still with 940's, prev 740/240/140/120 You'd think I'd have learned by now
|
|
-
|
|
|
Dave,
I now know that I have a functioning brake light system. All three lights go on when the brake pedal is pushed. BUT
I also now have a dead short that is running the battery down. I have started pulling the fuses and am now up to fuse eleven. Will continue over the next day or so but I am wondering if this is an old snag that might have returned once I rewired everything back to standard.
I will keep pulling fuses until I get no measurement between the battery post and its clamp.
But at least I have the brake light setup figured. Car has no end of challenges it would seem.
Bob
|
|
-
|
|
|
When tracing battery drains, pulling fuses until you see no voltage across to the battery won't work. Nor would removing the battery and trying to see if there was zero resistance across the battery cables. There are devices that need to consume power even when the ignition switch is off and some of those circuits may not be on a fuse. Plus there will always be minor leakage at connections or at dirty switches, so you will always see voltage across to a disconnected battery cable. If it's an out and out short on a fused circuit then the fuse should blow unless the short is prior to the fuse panel, so removing the fuse won't change that.
I'll start by reminding you it takes a certain amount of current to keep things like the injection/ignition/power seat/SRS controller and radio memories alive and the clocks running. These all add up to what's called the parasitic load and depending on the vehicle can often be in the order of 15-85 milliamps (closer to 25-40 mA for a 940). Many cheap multimeters can't handle more than 150-250 milliamps without blowing an internal fuse (if they even have one), so trying to trace significant drains or shorts that are above the parasitic load using an amps setting is problematic unless you have a suitable meter.
Obvious drains are of course things like dome lights, glove box light(!!!), door marker lights(!!!), park lights, headlights, power seats, even 4-way hazards and brake lights as well as things like "buckshee" radio and trailer wiring. A strong battery can survive many of those things for a few hours or overnight, but a weak battery may not.
Do be sure that it's not just a weak or faulty battery, most especially if it's anything close to five or more years old. An older battery may have been working semi-reliably until something as simple as moving it in and out of the car or driving over a speed bump caused the plates to collapse and a cell to short. When fully charged and disconnected, a nominal 12 volt lead acid battery in perfect shape should actually read 12.6 volts (depending on the accuracy of your meter). After an overnight charge, with the battery now re-connected you will typcially see closer to 12.25 volts for a healthy battery. Turning the headlights on for the count of 30 and then off should still leave you with close to that 12.25 volts. How long can it hold a full charge, like just a couple of hours? overnight? a few days? If there's any doubt then have the battery load tested at a shop, any decent shop should have that capability.
Now if you suspect an out and out short then it's likely related to some area you've been working on, so definitely doing things like inspecting your handiwork, wiggling wires looking for a loose wire, seeing sparks, looking for an arc in the pitch black, looking for pinched wires, removing the bulb sensor relay and lifting up the relay tray can help isolate it. If you're not blowing fuses and the ignition is off with the key removed then that helps limit the possibilities to where there may be 12 volts directly from the battery. Obvious locations for things like that are wiring under the dash, inside the console area, under the relay tray, in addition to under the hood, paying particular attention to any non-factory wiring. One way to find shorts before the fuse panel is to disconnect the battery, remove all fuses and look for continuity between the hot side of each fuse socket and chassis ground. The factory wiring diagrams are most helpful for seeing how the fuse panel is wired and the fuses connect to each other. I'll ask again, did this car ever have a trailer hitch?
Now isolating minor battery drains that don't blow fuses can get a bit trickier if you don't have an appropriate ammeter. Sometimes intelligent trial and error disconnecting devices and circuits to see if the battery can now hold it's charge overnight is needed to point you to the errant circuit. Start with everything totally off, even all fuses removed, and re-introduce circuits until the battery no longer holds a suitable charge. Worst case I ever had was trying to find an intermittent drain that turned out to be an aftermarket CD changer that would sometimes get endlessly stuck trying to change a jammed or dirty CD, trying to complete the change, spin up and re-track even after the key was turned off as the CD changer was connected to unswitched battery power in order to keep its memory alive.
--
Dave -still with 940's, prev 740/240/140/120 You'd think I'd have learned by now
|
|
-
|
|
|
Hi Dave,
The battery was eight years old. So I bought another one at Canadian Tire. $160! To me a battery is worth about fifty bucks. But I come from another era it would seem.
Bob
|
|
-
|
|
|
After looking again at your information I was thinking about the fact that I have to continually hook up a battery tender to the Jaguar or the battery will run flat. It looks like I will have to do that with the Volvo when I get everything back together.
I will take out the battery and let Canadian Tire do a check on it to see if it is still viable. This car has always been such a good starter that it does not put a lot of pressure on its battery.
I have decided to put the brake light parts back together right now. Looks like I might have another snag in the bag.
|
|
-
|
|
|
I had one of my overnight revelations and remembered that I had not been giving the cigarette lighter any attention in some time and its power lead could be shorting out on something. I did not wrap the end with tape---guess I didn't know how long this whole thing would take to resolve!
In the interim thanks for your plan of action. If the cigarette lighter thought does not work out I will follow it.
I can say that the brake lights are all working properly and that is a bit of a relief.
Nice to see the weather changing. I will make for more comfortable fault tracing.
|
|
-
|
|
|
Hi Dave,
That should have been a shunt from the yellow/brown lead from the brake light switch around the bulb malfunction sensor and hooking up with a three wire connection between the YR and yellow wire and the shunt wire. This brought power from one side of the sensor and bypassed it to the LH and RH brake wires.
I went out to start reassembly today and the battery was dead flat again. This car always has another trick up its sleeve!
|
|
-
|
|
|
Hi Dave,
So today I pulled the buckshee yellow wire out completely and reconnected the yellow and yellow-red wires together with their mates. But when I gave it a try the centre mount light went on again without pressing the brake pedal. Because I have this light partially pulled and facing the front of the car I could see it was on.
After my usual turmoil, looking at the schematic, etc., I went and checked the other brake lights. And they were on as well!
This looked like a brake light switch problem so I pushed the brake light assembly forward and it moved about a half inch or so. I had noted that it tended to move around a bit when I was trying to disconnect it.
And everything dropped into place. The light went out. I pushed the pedal. The light went on. I let go of the pedal. The light went out. I could have spent the rest of the afternoon pushing that pedal! Such are the joys!
I might have a future problem with that brake light switch but for now I will go with what I have.
So, as you previously analyzed, the modifying tech had snipped the wires to the yellow-brown and yellow lower brake lights and he had fed them power from the yellow-black wire directly through his yellow wire shunt.
I will report back what happens when I go for a drive. But in the interim a tip of the hat to you for your brilliant analyis.
Bob
|
|
-
|
|
|
Hi Dave,
I reconnected the YB wire yesterday. Result: centre high brake light goes on immediately WITHOUT pressing the brake pedal. This was a surprise.
No LH/RH brake lights. This is probably because the power source was cut off when I disconnected the buckshee yellow wire.
I will try to follow the buckshee wire today by removing the LH plastic cover. Hoping the chap who did the modification was inclined to keep to one part of the car.
Not sure what to make of the brake light being on without the pedal being pressed. I will take a second look at the soldering job and ensure that I did indeed reconnect the proper wires.
The battery had run down before I started yesterday. Totally flat. I am now disconnecting it when I leave the car.
Bpb
|
|
-
|
|
|
Hello Dave,
Right now I suspect the yellow wire to not be the original wire that goes to the RH brake light. It is slightly thicker than the original wiring and was probably introduced by the mechanic doing the modification. But I will keep your caution in mind going forward. I have printed out your last message.
I was considering using solder to join the two ends of the cut wire. I do have heatshrink tubing at hand but if the soldering is too difficult to do in that location I will turn to your solutions.
Buckshee is a term that was widely used by RCAF techs and I have never excised it from my vocabulary. In my world it just means not original and somewhat unorthodox. Not necessarily crappy.
I will start by simply joining the YB wire together and see what happens. After that I will try to follow the yellow brick wire to its join with the other wires. Hope I don't meet the cowardly lion along the way.
It has been an amusing if somewhat frustrating journey. Hope the end is in sight. I have a horn to fix!
|
|
-
|
|
|
Dear muskox37,
Glad you're feeling better. What do you mean by "buckshee"? In UK English, "buckshee" means "free-of-charge", or "gratis".
The headlight switch on cars made for the Canadian market are different from those used in cars sold in the U.S. So, it is possible that there are other wiring differences.
Hope this helps.
Yours faithfully,
Spook
|
|
-
|
|
|
Good morning Spook,
Buckshee. This is old RAF/RCAF terminology for something that is not quite kosher. It means the item is not original technology and could be suspect in a problem. It was probably installed improperly.
Somebody cutting original wiring and installing something else of their own devising would fit the term.
It is slightly offensive but is not meant to be in this case. I respect the original intention of the owner and for him/her it was a good solution to what was probably an ongoing problem.
Just very pleased that I was able to locate the join. If I get a host of bulb malfunction warnings when I put the old wiring back in place I just might get a little 'buckshee' myself!
muskox37
|
|
-
|
|
|
Hi Dave,
It strikes me if I can find that connector block I have a decent chance of finding the splice. I will try doing a search this afternoon.
Thanks again for all of your help.
Bob
|
|
-
|
|
|
So far I have not seen any evidence of, excuse the term, buckshee wiring, at least with regards to the relay tray. Everything looked kosher. I will investigate further however before I turn to the brake pedal switch.
If you are correct in your analysis I should have a bypass wire running from connector 2 of the brake light switch to some point on the other side of the sensor.
My plan ΐ? 32?] for now is to check the brake light switch. If there is a buckshee wire in place there I will disconnect it and, fingers crossed, the original brown/yellow wire will be available for me to reconnect it. Then I will install the new sensor, push the brake, and the centre brake light and both LH and RH lights will come on. Right?
Supporting your analysis is the fact that I have never seen a bulb malfunction light show on the dashboard since I began this marathon.
I will start by finding the brake light switch.
|
|
|
|
|


