|
|
|
I finally finished the installation of the gas lifts for the trunk to my satisfaction. I would like to thank Sil for his original post here on Brickboard and for finding the NAPA part numbers, and Michael, who came up with the solution in the first place.
I went about mounting the base of the struts in a slightly different method than Sil (and at first it seemed simpler, but then I realized that my mounts needed additional reinforcement and it got more complicated). I mounted a support beam of angled aluminum (1/8"x1.5"x~4') that spanned the width of the trunk, and then made brackets that mounted to the beam. This worked relatively well, but the beam would torque slightly when shutting the trunk, so I reinforced it with carriage bolts that drop down from the package tray and hold the top of the beam in place. I was still getting a tiny amount of flex though, so I made a couple additional angled pieces that brace the back of the beam against the back seat wall. It all works quite well now, thankfully.
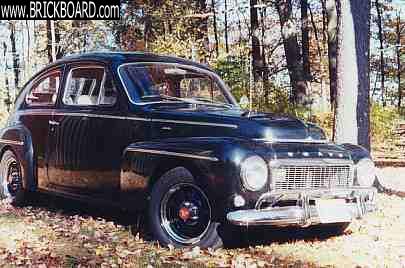
Before - Before the lifts were installed. You can see how nicely my trunk door was warped. I had a nice leak from an approximate 1/4" gap between the driver-side top of the door and the weather stripping. I was able to bend the door back into pretty much the correct shape, and it appears to seal quite well, but I haven't had the chance to water-test it yet.
Mounting Beam - Here you can sort of see the beam that I made and where the lifts mount to it. The beam is bolted to both sides of the trunk and also to the spare tire mount.
Extra Support - Here you can see the carriage bolt extending down from the package tray, and also the brace against the rear wall for the back seat.
Finished Product - They seem to work quite well, and I was still able to fit the spare tire (not pictured) in place with a little bit of work and a few washers.
And to those of you who were wondering, yes, I do have a spare star wheel detention mechanism now. I may be willing to give it away to someone who wants to install it on their passenger side trunk arm and even things out, but for the moment I am hanging on to it until I am a little more certain that I won't have any use for it again any time soon.
|
|
|
|
|
I'm having trouble viewing the photo's, is there something i'm missing?
|
|
|
|
|
I'm not sure. They seem to load just fine when I click on the links.
If the website is just not responding, then my server might have been down when you tried to view it, so it might work now if you tried again.
Sometimes the .htaccess file on my website acts up a little bit and will redirect people to an image about "stealing bandwidth" instead of actually showing the image. If that is the case for you, then highlight and copy the following address:
http://ljpics.somethingsquare.com/temp/volvo
Then exit out of your browser. Next, open it up again and paste the address into the location bar and hit "go".
If that doesn't work, send me a message on AOL Instant Messenger (if you have it) and I will try and solve the problem. My screen name is "andy message bot".
|
|
|
|
|
thanks for the help. the photo links are working now. must have been server trouble as i kept getting the "stealing bandwidth" page. i like the spare tire solution, the battery in the trunk, the tailights, and the 3rd stoplight. have you posted other photos?
|
|
|
|
|
I think that I posted some other pictures a while back after the body work was mostly finished and the paint was on, but before the car was really re-assembled. I am hoping to take some new photos soon though, now that I have installed my Cibié headlights and redone a bunch of the wiring to get rid of shorts and other quirks in the system. I will hopefully post some photos on this forum soon, so that other members can get a better look at just what all we have done.
|
|
|
|
|
Nice job on those struts.
For those of you with 444 and 544s, there is an easy way, that we learned years ago, to eliminate the gap at the top driver side of the trunk (boot) lid.
Open the trunk, Grab the lid by the bottom edge. Lift up like you were going to close it, then lift a little farther. Close the trunk and the lid should fit closer. Repeat if necessary. This should get you a closed boot lid that fits like it should.
Bob
|
|
|
|
Bob,
I tried that after I read, I believe was, your ealier post on this subject, but I couldn't make it work for me. Maybe I wasn't forceful enough, and I'll give it another try. Before I do, however, are you, or is anyone else, aware of a change to a stiffer construction of the upper part of the lid in later model 544s as compared with the earlier ones and 444s? I have no indication this might be so, but I'm hunting for a reason, other than timidity and lack of muscle power, to explain why others have been able to bend their lids back into shape, and I have not.:-( Mmmmm, the word "muscle" is derived from "mus", and hence means "little mouse." Could be that the subliminal message there is that I should be braver and put more oomph into the exercise.
Bob S.
|
|
|
|
|
Bob
Since its been since about 1976 since i had my last 544, recollections are a bit fuzzy. I don't recall any heavier construction on any of the later cars, but i do recall that there are several different varieties of bonnets (hood) and mountings over the years. I had been thinking about getting a second hood for my 210 and punching it full of louvres. Lately that is on the back burner.
I think the technique to refit the boot lid may take some getting used to. I m sure it would be best to start out gingerly and work your way up to giving it a good shove. You'll probably find the correct amount of force required that way. Its one of those things that you have to just do, instructions can't quite fill in the details.
Bob
|
|
|
|
|
I don't know if this will help, but it took two people and a spare tire to effectively get mine back into shape. I placed the spare tire in an upright position towards the back of the vehicle (and mostly on the passenger side) to hold up the door a little bit. I then had my dad pull up on the door at the top of it right near the hinge on the passenger side, while I carefully (but using most of my weight) pushed down on the driver side at the top near where the hinge is. It took a few careful repetitions of this, but seems to have worked well.
|
|
|
|
|
You guys are making this much more complicated than it needs to be.
Open the trunk all the way. Then lift more...against the hinges. Then close the trunk. Should be better. If not do it again.
Bob
|
|
|
|
|
Okay, I'll give that a shot.
Thanks,
Bob S.
|
|
|
|
|
Andrew,
Thanks for the great pictures of a task I have been contemplating. I have an extra star wheel from the parts car I'm using and plan to see how "duals" work before trying the strut approach. I had picked up the NAPA numbers from a post of Bob's but had not seen pictures of his result.
Also, thanks for the instructions on the suspension thread about making links for pictures. I'm going to try it when the next picture situation comes up.
As to spare tire wells, mine was by far the rustiest part of the car. I considered going to a flat floor, but wound up fabricating a new well which is functional but will look a lot better with a generous dose of undercoating.
My 444 came from the barn with one of those a space saver spare tires. I think would be an option for limping home and would be easy to stash in trunk without the well.
Keith W.
444 Project, Moline, IL
|
|
|
|
|
Andrew,
Congratulaions! A logical solution and nice installation. Since you carry your spare wheel the way you do, it doesn't rob you of any extra trunk space, which was one of the reasons why I liked Michael Krarup's approach, and did it his way, but this should work just as well. Were you able to use the same struts I did? When I first saw the way you had your spare, I assumed it was because you eliminated the spare wheel well so you could hang your muffler in that space and run your exhaust pipe below the axle; but your tail pipe still comes out on the left, so that couldn't have been the reason. Fess up man, I'm curious ;-) The taller gas tank is certainly an improvement, particularly if you move through wide open spaces where gas stations are far apart not so much of a problem here in N.E. - just a minor nuisance.
My trunk lid also was considerably distorted, and although tried as best I could to bend it back into shape, I still wasn't able to get it quite right. By shimming the left hinge with a bunch of washers I managed to improve the situation, but it's still not the way it should be, and I still have about an 1/8" gap there that lets in some water if I train a hose at it. Need to do some more work there.
Cheers,
Bob
|
|
|
|
|
All right. Since we are on the subject of trunk lid gas struts and posting links to pictures, something I have never managed to do before, I'm going to take a crack at it. If luck is with me, you'll get to see how I did mine. Bear with me.
left strut
right strut
trunk lid position open
Bob S.
PS: No Sh*t!!!! It actually worked! :-)
|
|
posted by
someone claiming to be Barongrey
on
Tue Jul 19 10:28 CST 2005 [ RELATED]
|
|
Looking at your pix, it looks easy enough, no special tools needed. I'm really impressed with the height of the lid when it's open! I don't have a problem with my star wheels (2 of them) right now, but this is a simple project that would give me more headroom when I'm trying to get my wheelchair out of the trunk.
|
|
|
|
|
I did end up using the same struts that you did. After installing them, I felt that I might do better with a couple more pounds of pressure (due to the point on the arm where I mounted them, which gives me slightly less leverage than you probably have), but it is actually very well balanced and I do not anticipate any problems with them at all until they get very old.
The spare wheel well was rusted out very badly, when we started doing the body work. I had wanted to replace it, since that seemed like the most out-of-the-way place for the spare to go, but my father and some others finally convinced me that it would not be worth it. It was easier and cheaper to just flatten it out, and it would give us space for a muffler on that side. Originally, we had planned to have a dual exhaust coming from the V6 engine and just going down both sides, but we were unable to clear the passenger side rear suspension due to the positioning of everything (particularly the panhard bar), and so we ended up making a Y-pipe after the manifolds and just running a single exhaust down the driver's side.
The gas tank from the Ranger was too big to fit in the car in any practical way, so we ended up using a tank from a fuel-injected Volkswagen. I believe that it only holds 13 gallons, so it isn't all that large unfortunately. I am actually trying to run the car completely out of fuel (for purposes of testing MPG and the accuracy of my fuel level gauge) to see just how many average miles I can go on a full tank. I've got a small 1.4 gallon portable fuel container that I plan to keep in the trunk on long high way trips, just in case. :-D
I'm still working on a ton of small projects with the vehicle, but once I get most of the little stuff taken care of, I will probably make a post that shows off some of the changes that we made in our Frankenstein-ing of this car.
|
|
|
|
|

%20-%202086.JPG)