|
Once again, with the help of the Brickboard, I was able to do another job that I would otherwise not have felt comfortable tackling. I used the Bentley manual and the Brickboard 700-900 FAQ as the starting point. The information in this post isn�t a full written-out procedure; just pointers that might be helpful to other novices like me, in addition to the already existing procedures.
Parts
1) strut cartridges. Lots of info in the archives. I used Sachs Advantage (Boge Turbo Gas)
2) upper strut mounts (bearings). Unless you know yours are good (ie. no cracking in rubber; good bearings), there�s no point in doing all this work and not replacing these while you�re in there. Most recommend staying away from the Scan Tech units; FCP Groton sells the SKF (OEM) unit. Read the archives.
3) boots. While you can probably use the old ones here, mine had rips in them, and again, while I was in there, I didn�t want to skimp on $20 worth of parts
Tools
1) use of an impact wrench for loosening upper strut shaft nut. Make an arrangement with a friendly mechanic
2) tie rod end puller. Pickle forks can ruin the boots, and squeeze the grease out. Hammering the bolt out can damage the nut or bolt threads. Tool options:
2a) USA: www.jcwhitney.com SCREW-TYPE BALL JOINT REMOVER 88ZX1770B $11 (800-529-4486)
2b) Canada: www.princessauto.com UNIVERSAL REMOVER TIE ROD END 8000947 $20 CDN (800-665-8685)
3) various sizes of pipe wrenches, for strut cartridge retainer nut
4) spring compressor
5) custom wrench for tightening upper strut shaft nut. I�ve read varying opinions as to whether using a torque wrench to tighten the shaft nut can damage the seals in the new strut, but I played it safe. Options:
5a) make your own tool (welding required). Cut the end off of a 15/16� deep socket, and weld a thin strap onto it. This tool might bend if used to remove the existing nut (not to mention trying to hold the upper strut shaft double-D flats with a 10mm or adjustable wrench!). This is why I relied on an impact wrench for that job. Specified torque for tightening however is only 15 ft-lbs., which is no problem. 
5b) USA: www.ipdusa.comwww.ipdusa.com Strut Nut Tool WST5036 $19 (800-444-6473)
5c) USA: www.lislecorp.com Universal Strut Nut Remover 63400 list: $50 (712-542-5101); Retail: www.northernautoparts.com $39 (800-831-0884)
6) heavy guage wire/rod to hang strut outside wheel well
6a) 18� long piece of 3/16� threaded rod, described in 700-900 FAQ. I left the described 1� tail (that gets fed through the eyelet in the swaybar) longer than that, in case I wanted to lengthen it a bit 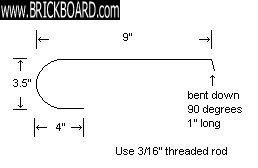
Pointers
1) before starting, drive to your friendly mechanic and ask him if he�d use his impact wrench to back off the upper strut shaft nut a turn or two (15/16� deep socket). Make sure he doesn�t back it right off! Snug it back up a bit afterwards, using the custom wrench, and an adjustable wrench to hold the strut shaft, so the shaft doesn�t pop out while you�re driving back home.
2) when the car is on jackstands, just before removing the 3 nuts that hold the upper strut mount to tower:
2a) loosen strut cartridge retainer nut (or cap nut, gland nut) a few turns, using pipe wrench through the coil openings. It�s much easier to apply force to this nut when it�s held stably in the tower. On one side I was able to get a large wrench in and torque it loose by just pulling. On the other side, I could only get a smaller wrench in, which I had to hammer on the handle to loosen the nut
2b) have the bent rod tool ready, before releasing the upper strut mount. When the assembly comes out of the strut tower, you need to make sure it isn�t allowed to extend out too far, or it will stress the flexible brake lines
2c) if your control arm bushings are good, they will prevent the strut assembly from falling out of the tower and wheel well when the upper strut mount nuts are removed. In case they�re not however, it�s best to have a jack under the control arm before removing the nuts. (If the control arm bushings are shot, you should be replacing them as part of this job).
3) I actually installed the spring compressors immediately after removing the 3 upper strut mount nuts, but before forcing the top of the strut out of the tower. At this point, the strut assembly was still quite stable up in the tower. When hanging outside the wheel well, it�s a little less stable for torquing
4) Here�s where I had trouble that wasn�t mentioned in any of the procedures I�d read. The hinging of the strut at the ball joint did not allow enough of a bend such that the control arm could be forced down allowing the top of the strut assembly to clear the tower. As the control arm was pushed down, the upper strut mount and its bolts would simply push into the side of the strut tower, instead of down and out.
4a) on one side, I loosened the front control arm bolt, and disconnected the rear control arm bracket from the body. This allowed enough play for me to get the upper strut out of the tower, but it was a pain to get the bracket lined up to re-bolt it at the end
4b) on the other side, I tried Aye Roll�s suggestion to remove the inner ball joint bolt, and loosen the 2 outer ones. This seemed to help for getting the strut out, but I still had problems getting it back in. Eventually I removed the outer ball joint bolts completely, to give more clearance for the lower strut tube to bend at the ball joint.
4c) in hindsight, I think the approach is to simply apply brute force to the problem. I used a pry bar to get the strut mount back into the tower on re-assembly; I�m assuming that I could have done the same to get it out for this step. I�m thinking that I could have avoided messing with either the control arm bolts or the ball joint bolts, if had just used a pry bar. If so, it would have saved me a lot of time.
5) having pried the strut mount down and out of the tower, tilt the strut assembly out away from wheel opening then hook the loop in the bent rod around the strut tube, just above where the brake lines attach. Now feed the other end through the eyelet in the sway bar. Ensure that it is positively preventing the strut from bending too far out and stressing the brake lines, before letting it go.
6) once the spring has been compressed and removed, use two pipe wrenches to remove the strut cartridge retainer nut
7) Bentley manual states: �gas-charged cartridges should include rubber bellows with metal washer inside at top, tapered side up. Rubber bump stop over strut inside coil spring is only for non-gas-charged cartridges�
7a) I thought that I might have the option of removing the bump stop when I did the job. I found however that the boot had to attach to the bump stop, so I had no option but to use it. I�m not sure why keeping the bump stop with my gas shocks would be an issue; I wouldn�t think that the strut would compress farther than with the original units.
8) don�t forget to put anti-seize on the strut cartridge retainer nut before refitting
9) to get the refitted strut assembly back into the strut tower, I found it necessary to use a bit of force with a pry bar
10) to re-install strut assembly into tower, put a jack under the control arm, and slowly raise it, first making sure that the link rod feeds through sway bar eyelet. Then make sure that upper mount bolts align with the holes in the top of the strut tower. I found that with jack handle extending out in front of the car, I could operate it with my foot, while using my hands to make sure the bolts aligned correctly.
Good luck. Thanks to Brickboard, I�ve now done heater fan, trailing arm bushings, and struts (among other things).
|
