|
|
|
Okay. Looks like I have a blown head gasket on the xc70. Can a shadetree mechanic replace a head gasket on these cars or should I just scrap the car. My local mechanic is talking three to five thousand to do it and he personally won't touch it.
|
|
|
|
|
I replaced the head gasket on my 2004 V70 AWD, had warped head planed, replaced all 20 valves & all pcv system. Total cost was around $1500. I did it in my garage. Had cam cover tool & cam holder left over from 960 work. Not impossible just time consuming. I set up 3 tables, covered them with white sheets then labeled EVERYTHING with blue painter's tape (even on the table where I placed the items). I used a bamboo chopstick to scrape the sealant off the head halves.
Marlin
|
|
|
|
|
Hello Martin,
My main concern about the job is the setting of the camshafts. Klaus sent me some disturbing videos about the difficulties with this variable valve timing arrangement.
I have been going through a set of instructions from the Volvo Owners Club website by a chap with the handle DSM [think that is right] and he did the job without using a cam holder. He made paint marks instead.
I don't know what a cam cover tool is.
I have been suitably impressed by everybody's warnings about how long the job takes and to keep everything labelled and set in order. I would like to take the job on myself and would like to keep this rather impressive piece of Swedish technology on the road. . . for at least the length of time left to internal combustion vehicles left to us all!
Bob
|
|
|
|
|
https://www.amazon.com/MOSTPLUS-Camshaft-Crankshaft-Alignment-Construction-13/dp/B07WFZP89F/ref=asc_df_B07WFZP89F/?tag=hyprod-20&linkCode=df0&hvadid=390627094791&hvpos=&hvnetw=g&hvrand=8210685458684949550&hvpone=&hvptwo=&hvqmt=&hvdev=c&hvdvcmdl=&hvlocint=&hvlocphy=9019622&hvtargid=pla-834816477000&psc=1&tag=&ref=&adgrpid=79773693493&hvpone=&hvptwo=&hvadid=390627094791&hvpos=&hvnetw=g&hvrand=8210685458684949550&hvqmt=&hvdev=c&hvdvcmdl=&hvlocint=&hvlocphy=9019622&hvtargid=pla-834816477000
--
Keeping it running is better than buying new
|
|
|
|
|
Hi Klaus
I bought this tool but it came with no directions on its use. Do you know if there is some kind of video showing it put into use?
Bob
|
|
|
|
|
There are YouTube videos. Look at this one first:
https://www.youtube.com/watch?v=Ynx7AMs5Uhk
--
Keeping it running is better than buying new
|
|
|
|
|
Good morning Klaus,
I ordered the tool this morning so I am committed to replacing the head gasket and the car is off the market. Thanks for the referral.
Bob
|
|
|
|
|
The "pliers" for separating the head from the block are also good to have.
Robert (DIY) is currently working on a head on YouTube. Useful info there. Obviously he has already posted about the removal.
|
|
|
|
|
Morning Derek,
I will try to find Robert's videos on removing the head but I am interested in seeing what these 'pliers' look like. DMS's guide calls for whacking the head with soft nosed mallets but he does say it is hard to get a good strike given the locations of the tabs projecting from the head.
He strongly warns against using any tool to separate the head from the block that involves forcing between the two. Such as putty knives, etc.
I ordered the cam locking tool that Klaus advised and am currently clearing my workbench so I can assemble the parts as they are removed in an orderly manner.
DMS does the job without a cam locking tool but I will spend a little to be on the safe side.
Bob
|
|
|
|
|
There is a tab on the block and a recess on the head (or vice versa) for these pliers. I've posted on Roberts recent head video for a link to him using it. I will post it. It is a simple tool but heavy duty. shouldn't be too expensive.
There are videos about using the cam locking tools.
|
|
|
|
|
Good morning Derek
Good video. I watched it this morning and I have been looking for the tool but they are all in the one hundred to two hundred dollar range and I would probably only use it once. Still, probably worth it given the options.
Bob
|
|
|
|
|
Good tools like these can always be resold. You could text Robert and ask if he has a spare pair. https://robertdiy.com/ His number is on the site.
|
|
|
|
|
Link to the pliers. https://www.youtube.com/watch?v=Hus0VPtzqYk
|
|
|
|
|
Your mechanic is nuts! While it is not fun, the engine does not have to come out - just build a platform on the fenders to sit on. The hard part is the exhaust header - easier to just disconnect header from turbo and then remove the header once the head is out. Or remove e the turbo at the same time.
The charge used to be around $1200 for labor, $800 for head work.
--
Keeping it running is better than buying new
|
|
|
|
|
Hi Klaus,
That is still two thousand dollars, which is not all that far from three.
My mechanic, who is not a Volvo specialist, told me that he ended up paying four thousand to a customer when he attempted to do a job this complex and ended up causing valves to be bent, etc.
He replaced the front left suspension coil on this car for a little over three hundred dollars total but after his experience he shied away from taking on the head gasket job on my car. I couldn't blame him.
I bought the car with the coil broken and I thought this was why it was on the market for fifteen hundred dollars. I gave the PO a thousand and figured that I could get the windshield [cracked] replaced for a total of about a thousand for the two repairs, leaving me with a two thousand dollar car that I could run for the winter and sell in the spring for about three. It has four good winter tires as well as a complete set of summers.
Then I found out what was really ailing the car! I am considering doing the work myself when the weather improves in the spring. But I can see that I would still have some major money outlays to do it properly. I did look through a fairly detailed procedure with good pictures laid out by DWM on the VOC website on how to change the head on a B4204S engine and I am considering following that to get to whatever problem is causing the constant coolant loss.
Engine oil is actually pretty good [not milky] and the car usually runs well but it does go through a lot of coolant on every trip.
My engine is a B5254T2 and I hope it is not too far off the engine worked on by DWM.
Regardless, thanks very much for your commentary.
Bob
|
|
|
|
|
As I read that you aren't 100% positive that it's the head gasket. A compression test would be good and a VERY thorough inspection of all of the hoses and the water pump would be a good idea. You can get a UV dye that goes in the coolant which can then be tracked with a UV torch.
|
|
|
|
|
Hello Derek,
Yesterday I got some pretty serious white exhaust cloud when it was sitting idling and warmed up. And it is going through about a litre of coolant per day just running about town doing shopping, etc. I continually get the 'low coolant' warning message even after I have just topped up the container.
Despite that it ran well with good power, etc. I am fairly certain that I am not getting coolant in the oil because it looks clean on the dipstick.
I will do an inspection of hoses and water pump to check for leaks regardless.
I have been reading about a tester that can tell you if there are exhaust gases in the coolant and am consdering buying one to confirm once and for all that I have a blown head gasket.
Thanks again for your input. Much appreciated.
Bob
|
|
|
|
|
"I have been reading about a tester that can tell you if there are exhaust gases in the coolant and am consdering buying one to confirm once and for all that I have a blown head gasket."
A persistant white exhaust cloud AND mysterious disappearance of a lot coolant - a litre per day will not leak away unnoticed UNLESS it's going into a cylinder.
By all means buy the head gasket leak detector kit, it should set you back only about 50 USD and give you the final confirmation. Doesn't your mechanic friend own one?
It shows by pulling air from the coolant reservoir through a fluid if there's CO2 present in the coolant. If there is, then the fluid changes colour and the head gasket is leaking into the coolant system.
|
|
|
|
|
This is a written how to do for a non-turbo:
https://www.matthewsvolvosite.com/how-to-replace-the-head-gasket-on-a-volvo-850/
And of course there is always Robert:
https://www.youtube.com/watch?v=b_XOdjgxn9A
While it is difficult as a DIY project, it is not impossible. You will need a cam locking/hold down tool because of the VVT's.
----------------------------------------
Please, please, look for a coolant loss other than the exhaust. A pin hole in the radiator, a pin hole in the line to the turbo, a leaking connector in the firewall, etc. BEFORE attempting a head gasket.
--
Keeping it running is better than buying new
|
|
|
|
|
Good afternoon, Klaus,
I have now managed to get the exhaust manifold unbolted from the head. I used mirrors, quarter inch drive sockets and a host of other tools. I sometimes took an hour to remove one of the nuts. But I persevered.
I am now looking at the turbo disconnect possibilities. And I am worrying about when to install the cam lock tool.
The turbo connects to the exhaust manifold with four nuts, three of which can be seen. The other is almost impossible to reach or see. The turbo has another connector point, further along its 'tree' and it has three fasteners all of which are visible and available for disconnect. I am thinking of going there to do the disconnect. I hope to install the exhaust manifold to the head before installation.
Turning to the cam situation I cannot mark the cam gears with paint because, unlike the engine of my source instructor, I cannot get anything behind the gears to do the marking. They are too close to the head. So I think I need to install the cam lock tool at this stage in the job. Am I right?
Maybe I need somebody to hold my hand. The mechanic I hired to change out the suspension coil, replace the radiator and change the brakes, has offered to give me some helpful advice. I think I will take him up on it.
Bob
|
|
|
|
|
Sorry, but we cannot hand hold here, as much as we would like to.
Good work getting the exhaust bolts off.
Removing the turbo at the down pipe is OK, but it might be a bit heavy when putting it back together again. Once the header and turbo are out, figure out a way to remove the turbo from the head so that you can easily re-install the exhaust manifold.
The can lock tool only works when putting the cam cover back on. And when adjusting the VVT.
Use whiteout or paint to mark the sprockets. You could even mark them at 12:00 if you like, because when you put the cam cover back on, the cam locking tool will have the cams in the proper alignment. Just make sure you do not forget which is the exhaust and which is the intake. You might want to put a zip tie around one of them - through the sprocket holes.
Buy 4 cam seals, before I forget. Good time to replace them. All 4 are the same size.
--
Keeping it running is better than buying new
|
|
|
|
|
Hi Klaus,
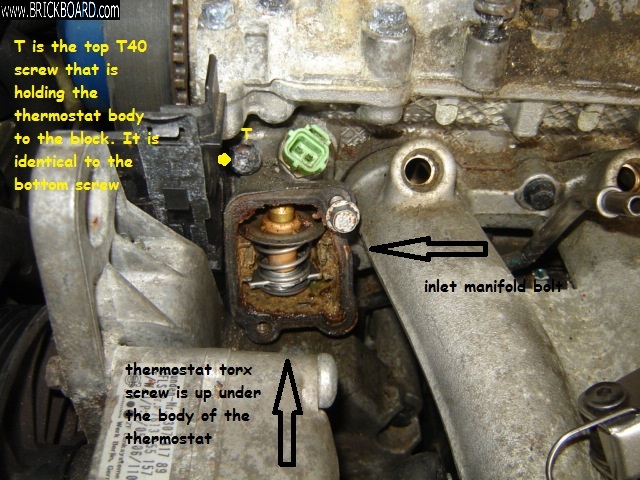
I cannot get a socket on the inlet manifold bolt furthest to the RH side of the engine because the thermostat housing is in the way. I tried to remove the thermostat but instead I accidentally dismantled the housing and that is what is showing in the picture.
Removing the housing should be simple. It seems to be held in place by two Torx t40 screws but I cannot see the lower screw head and I don't have a good tool to get at it. I have ordered a set of torx L shaped tools but in the interim this blockade has stopped any further progress.
I can fit the 10mm socket, 3/8 drive, partially onto the manifold bolt but cannot get it straight on because of the housing and I know I will need to exert considerable torque to get it off.
Was this an issue for you on your car?
Bob
|
|
|
|
|
While the 10mm bolt is not visible, a swivel and 6 inch extension attachment will get the job done. Not a lot of torque on the manifold bolts - 15lbs.
The thermostat housing does not need to come off. You are making extra work.
--
Keeping it running is better than buying new
|
|
|
|
|
Morning Klaus,
I took your advice, bought some high temperature gasket cement and put the thermostat back together.
I wanted to ask you about the exhaust manifold removal and replacement. It is pretty hard to see anything back there without a mirror and some kind of light source and I have to admit I am a little nervous about trying to hook all of this back up when the time comes.
Right now I haven't figured out a good way to get some penetrating fluid onto the nuts holding the manifold in place and in discussion with my mechanic friend he suggested it might be easier to disconnect at the turbo and lift the head up with the manifold stil fastened to the head. What is your opinion on that?
In the interim I am looking for some kind of syringe that I can use to spread penetrating fluid onto the manifold fasteners.
You did say it would only get worse!
Bob
|
|
|
|
|
Actually, I concur with your mechanic. Much easier to disconnect turbo from the exhaust and leave the manifold connected to the head. Once the head is out, you could spray the bolts and remove the manifold from the head. Much easier on your back that way.
The coolant line to the turbo needs to be disconnected at the manifold anyway.
Just remember: If at anytime you think you are drowning, stop. Have a beer, take a break, and reassess. You can always put things back together and find a mechanic to do the job. Once you remove the cam cover, the rest of the job is up to you because you are quite able to finish it your self.
--
Keeping it running is better than buying new
|
|
|
|
|
Hello Klaus,
I could not get that manifold bolt completely out. The 'skirt' of the bolt ran afoul of the thermostat housing.
At this moment in time my mechanic friend, who was helping me, pointed out that the bolt did not need to be completely removed because the manifold had a 'fork' and it could be lifted out once all of the other bolts were loosened on the bottom and removed on the top.
Bingo, your comment came to me and I remarked that you had told me this in one of your posts. I should have been paying closer attention.
Thanks again for your help.
Bob
|
|
|
|
|
Hello again Klaus,
I will follow your advice and take a good look for pinhole leaks in the radiator the turbo and connectors to the firewall. I assume I should see some coolant or dried traces of coolant. So far neither my mechanic friend or I have noticed any evidence of coolant in the engine compartment. But I will make an inspection today. I am more eager than you to avoid this job!
I would like your reaction to this quote from the DWM tutorial on a cylinder head transplant.
80.Replace the camshafts.
There is no need, I think, to go through the Haynes rigmarole of putting them in the cam cover, and lowering it and them on to the head (having first made a tool out of welding rod to stop them falling off when you hold it upside down). I imagine that what they are trying to achieve, by this method, is to protect the cover, and especially the shell bearings for the camshafts in it, from being damaged as the carrier is bolted down – if you don't press it down straight, things can get slightly wedged/stuck and then suddenly jump/snap into place.
So, instead, just do what the Vida instructions say and put the camshafts on the head and install the carrier/cover on top. The camshafts won't sit neatly until the cover is tightened down, because however you lay them, some of the cams will want to be exerting pressure on their valves, so the cover needs to be pressed down against the force of the relevant valve springs.
Haynes (and Volvo) make a lot of fuss about putting the camshafts in the 'right' orientation. They go on about having the slot on the inboard end of the inlet camshaft above the centreline, and the slot on the exhaust camshaft below the centreline. This is sound advice if you are going to use the camshaft locking tool, but quite unnecessary if you are doing without it. All that really matters is that you don't mix up which camshaft is which. My inlet one had an orange-painted section on it, which is how I told it apart from the other. Obviously, also, it makes sense to lay the camshafts in an orientation such that you can see the paint marks that you are going to use when re-attaching the sprockets. So just put them back approximately as they were when you made those marks. They will then be in approximately the right orientation for when you fit the timing belt – which is when their being in the right positions becomes a critical matter.
Is this sound advice? He did not use the camshaft locking tool when he did the job. He made some paint marks on the camshaft before disassembly and he is referring to this at this point [step 80] in the assembly.
And pardon my ignorance, what are the VVTs?
Bob
|
|
|
|
|
Watch this closely!
https://www.youtube.com/watch?v=cqvItAiS4_0
--
Keeping it running is better than buying new
|
|
|
|
|
Good morning Klaus
I watched the video this morning and I am not sure I am up to that level of mechanical expertise and dexterity. And my car sits outside, not in a comfortable heated garage.
Definitely giving me pause.
Bob
|
|
|
|
|
That was my intent. This is not an 'easy' job for the typical DIY'er, and you will need a cam lockdown tool. The Torx 55 to tighten down the screw at 80lbs will turn the cam without a hold down.
A mechanic not familiar with Volvos will have a difficult time and may end up bending a valve. There are NO shortcuts to these modern engines.
--
Keeping it running is better than buying new
|
|
|
|
|
Hello again, Klaus,
Once I had the head out I was intending to take it for an overhaul to a local machinist who has done work on the 940 for me in the past.
But I guess I would still be facing the issue of the cams when I went to put it back on the engine.
Have to think on it.
Bob
|
|
|
|
|
Big difference between an iron block and aluminum block. In most cases the head will not need machining, just the gasket replaced and making sure the oil passages are clear.
This is only a "hard" job because of leaning over the engine bay for so long and being 'precise' when putting back together. There are no corners to cut.
--
Keeping it running is better than buying new
|
|
|
|
|
Hi Klaus,
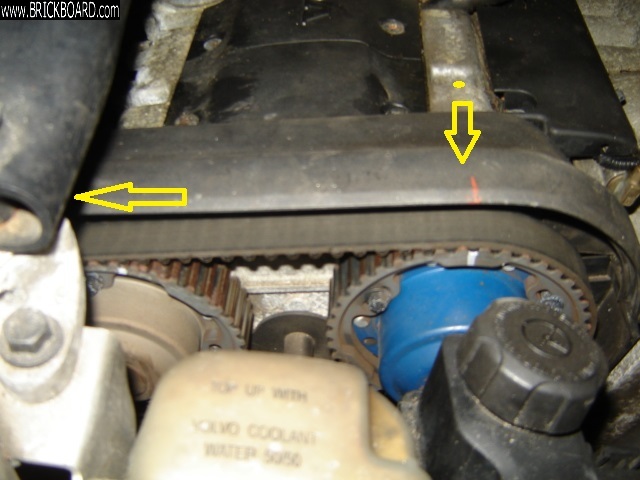
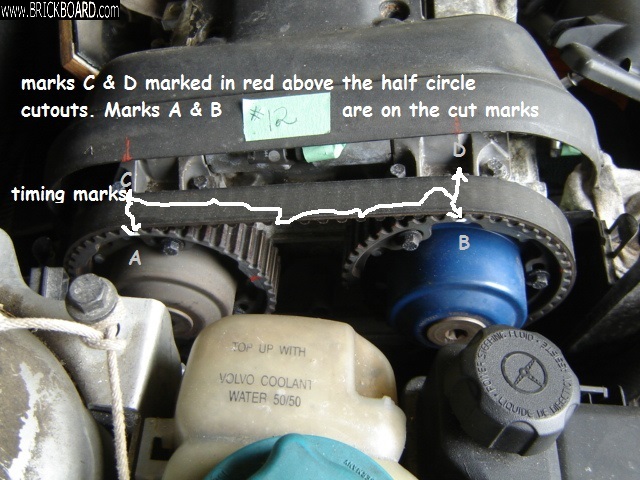
I finally have reached the point in the head gasket replacement where I am trying to line up the marks on the camshaft gears with the fan belt cover gouge outs.
In the picture I have marked the placement of the gougeouts with a red grease pencil on the top of the fan belt cover. This can be clearly seen for the LH gougeout but the RH side is obscured so I have indicated where it is by the yellow arrow. You can see the original white marks made by a previous mechanic on the camshaft gears and you can see that the RH gear mark is not directly beneath the gougeout when the LH mark is correctly beneath the gougeout. I use LH and RH in the port and starboard terminology where there is only one port and one starboard on a vessel/vehicle.
I am following the procedure laid out in the Volvo Owners Club Forum for a cylinder head transplant on a B4204S engine because I am able to print out the pictures and use them when I am out in the garage. There are differences between my engine and this older version but I am hoping the procedure will be fundamentally the same.
We have 'spun' the motor about three times so far using a 30mm socket on the crankshaft and this anomaly remains. Before starting all of this the engine ran fine.
|
|
|
|
|
This is pre gasket replacement I assume. The only thing that matters is AFTER head gasket installation. I would only be concerned about crank alignment.
When you pull off the cam cover, the cams will be loose and may move a little - there are a few valve springs under pressure! Make sure the intake and exhaust cams are put back in the same position?? That's when the cam locking tool is needed.
The tool may also include brackets to carefully squeeze down the cam cover using spark plug holes.
--
Keeping it running is better than buying new
|
|
|
|
|
Morning Klaus,
I managed to find the timing mark on the front [blue] camshaft gear and I marked it with red paint. From what I can see the original white marks do not conform to any marks on the gears. I am taking it that the mechanic just marked the two gears wherever they were at and used those marks to keep everything kosher.
I am thinking that if I line up the mark on the front blue gear with the gougeout above it on the plastic cover I will then mark the other gear with red paint that will be aligned beneath its gougeout. This will provide the relationship between the two gears at the pre-disassembly stage of the job. Would this be useful?
I have not been able to find a timing mark on the aft gear. I have found both gears marked with an 'M' but only the front has a clear timing mark that I have so far found. I will keep looking today.
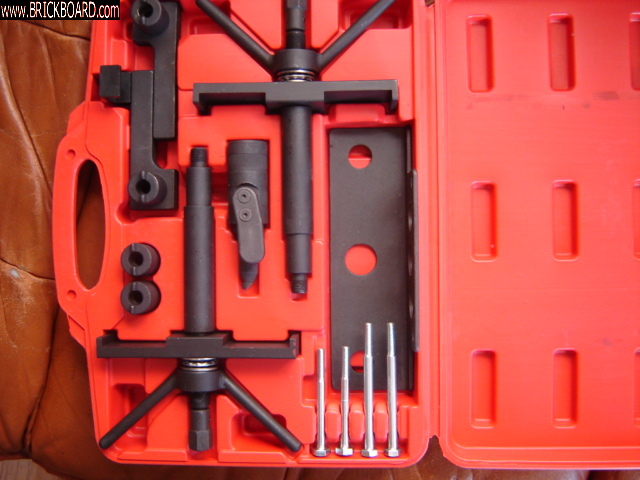
I uploaded the picture of the cam locking tool I bought at your recommendation. Does it contain all the bells and whistles you mentioned in your last post?
|
|
|
|
|
That is THE lock down tool. The 2 funny looking ones go into spark plug holes and hold down cam cover. No need for the crankshaft lock down thing.
When you spin the engine looking for cam timing marks, you might want to go past TDC by 90 degrees and then come back to TDC. That removes pressure on the VVT and you should see the cam timing marks.
If the white marks mean nothing, I suggest getting rid of them. It will only confuse you later.
--
Keeping it running is better than buying new
|
|
|
|
|
Morning Klaus,
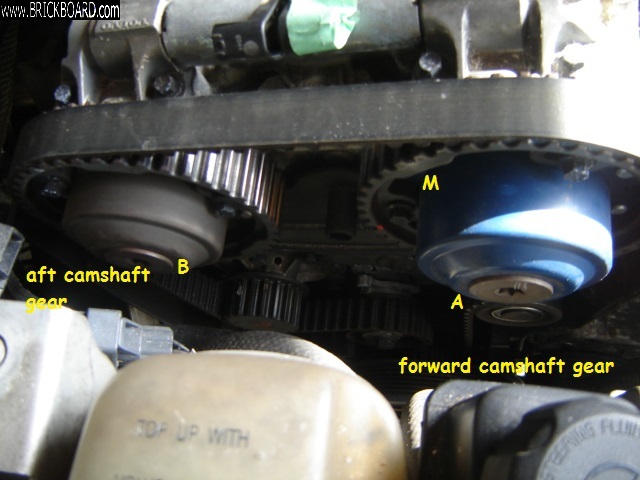
I will try to attach a picture of the cam sprockets. If I am successful you will see where I have put some marks [A&B]on the image. My foremost gear [the intake cam?] is blue. My aft gear [exhaust cam?] is unpainted grey.
If I put some paint splotches at A and B would they be useful when it comes time to reassemble? I can't seem to get behind these sprockets to make marks that cover the sprocket and its shaft.
I had another go at the turbo-to-manifold nuts but cannot get to the fourth nut from on top. I will try from underneath next.
Strange but the wrench that fits the nuts best is a half inch. The thirteen mm fits but is a little loose. Twelve is too small. The half is perfect.
I also wanted to note that there is an "M" stamped on both gears. Don't know what that means. I have been using the single 'cut' on the aft gear as a marker.
|
|
|
|
|
Paint splotches don't really matter. The crank sprocket is the most important thing. Once the belts are off, I would paint the mark on the block and the crank so it is easily visible.
The cam hold down tool only works when the cams are in the correct position. They will be very close to perfect once the cam cover is glued back on. Then you might have to follow the procedure to dial in both VVT hubs. That will require farther investigation and a new thread/post. There are videos for that also.
Good luck, have fun, take your time.
--
Keeping it running is better than buying new
|
|
|
|
|
Morning Klaus,
I have been assuming that I should be able to find an arrangement of cam sprockets and the crankshaft sprocket that would align the three and that I would then 'freeze' this arrangement with the use of the cam locking device so that I could put everything back together as it came off. I have turned the engine over manually several times trying to find this kind of a setting. This would seem to be an incorrect idea.
I have so far been unable to find only one mark and that is on the exhaust cam sprocket. I put a red paint mark on that and I also put a red mark on the intake cam sprocket using the plastic cam cover indicator as the place for the mark.
I take it the M marks are irrelevant.
Thanks for your encouragement. Will keep trying.
Bob
|
|
|
|
|
Once the cam cover comes off, the cams are loose and can be picked up by hand. The cam locking tool, holds the rear of the cams in position when the cover is tightened back down. At that time, the important thing is the timing mark of the crank shaft.
The cam locking tool can hold the cams in only ONE position. You will see that clearly when the cam cover comes off. Oh, pry the cam cover off gently - if the cover breaks you will need a new engine.
--
Keeping it running is better than buying new
|
|
|
|
|
Hi Klaus,
This was from the Volvoxc.com website
Howard64 wrote:
I will say Volvo's timing marks are hard to eye ball correctly. Seems like 1/2 tooth off all the time. I did learned this trick from a post by JRL years ago. Haven't tried it but sounds helpful : Put a little whiteout on the old belt where it overlaps with the cam gear alignment mark and find a good spot on the crankshaft pulley to mark the pulley+belt. Transfer the marks to the new belt in all the same places and count the number of teeth in between. No more "am I 1 tooth off" worries.
This was from Xfingers
I've replaced my TB twice so not an expert. No way could I find with any certainty the timing marks on the crankshaft pulley so I made my own: Once I had the timing marks lined up on the cams and the TB cover, I took a heavy black sharpie marker and drew a line on the top of the crankshaft pulley over to the engine block. Keep in mind, after you replace the TB and start the engine, that mark will wear off instantly so make sure you fully rotate the crankshaft by hand 2x (720 degrees) and all the timing marks are still lined up before ignition.
I lined up the timing marks on the cams (not the actual teeth) with the TB cover marks. For me the marks didn't line up exactly but I got them as close as possible. Before removing the old belt, I counted the number of teeth between the marks. After installing new belt, I counted to make sure the number of teeth between the marks was the same.
Not sure if any of these make sense to you. And since I cannot find the mark on the intake cam sprocket it probably won't help me.
Bob
20
|
|
|
|
|
https://www.matthewsvolvosite.com/forums/viewtopic.php?t=83534
The above is for a 2004 XC70 and 'should' look like your engine. The writer of the original post and the commentators are all 'experts'. Great pictures!
--
Keeping it running is better than buying new
|
|
|
|
|
Good afternoon, Klaus,
So I went out armed with a light and a magnifying glass and I found two slash marks about a sixteenth of an inch in length that are not centred on the bottom of the U in the two camshaft sprocket gears but which I seem to be able to line up with the marker cutouts on the timing gear cover. I will try to take a picture in my next post.
My original slash mark on the aft sprocket turned out to be a number one and it does not seem to line up with anything else.
I also found a circular punch mark on the foremost sprocket that I am disregarding. I am certain that somebody has done work before me on this engine and the punch mark could have been done at that time.
Now I just have to find a way to check out the crankshaft sprocket.
Bob
|
|
|
|
|
Did you go to the link I showed you? The hole on the sprocket at 1:00 and the alignment if the bolts?? That will get you real close!! Then you should be able to see the notches on the teeth to make it even closer. After the belt is off and there is some room, use white paint that is visible from above as well as the wheel well.
Your car should be on 2 jack stands already.
--
Keeping it running is better than buying new
|
|
|
|
|
Morning Klaus,
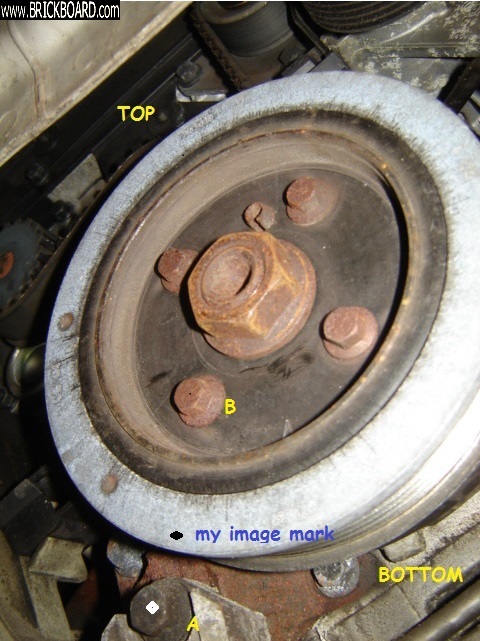
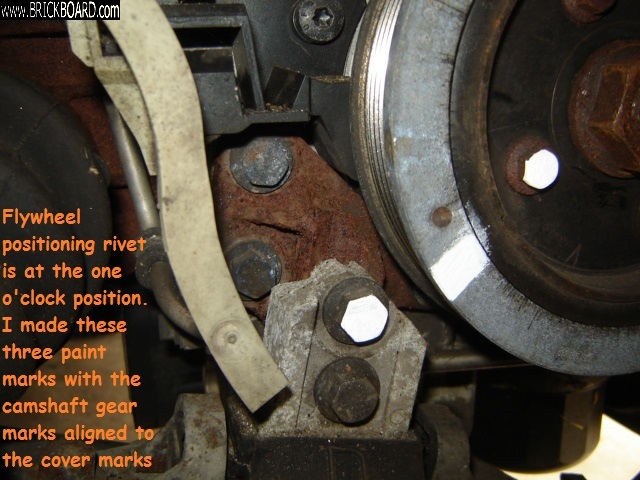
I had already seen the images you sent me and I have printed them out. I have taken a couple of pictures of my crankshaft sprocket and my locating pin is at the approximate one o'clock position when the two timing marks I found on the camshaft sprockets are in alignment with the timing cover mark. A little hard to orient them because of the camera angle.
It would seem that I should mark the crankshaft pulley at the point where I have placed a black hexagon and the bolt [A] where I have placed a white hexagon marker.
In the diagram from the image he has marked one of the crankshaft bolt heads as well I see. So he has a mark on the edge of the pulley, a mark on the pulley bolt and a mark on the freestanding bolt at the edge of the pulley, three marks in all. I have now added the mark B for the freestanding bolt in my image.
All of the images were taken with the camshaft sprockets lined up with the timing cover.
I will try to mark the image I am trying to send as per the picture I am seeing.
Ignore the metal piece at the top left. I have not been able to get one of the exhaust manifold shields loose yet.
Bob
|
|
|
|
|
I now think I have the timing marks all lined up so I can proceed to remove the camshaft cover. I will not be turning the engine once I have the camshaft cover loose. Or do you have advice to the contrary.
|
|
|
|
|
If you happen to accidentally move the crank, doubt it, then line it up before you try to put the cams back on. Part of the 'kit' for the cam locking tool is a crank case lock that goes into the flywheel access. Don't think you will need it.
--
Keeping it running is better than buying new
|
|
|
|
|
These marks were painted when the camshaft pulley marks were aligned with the pulley cover markers.
The crankshaft pulley position rivet was in the approximate one o'clock position when these marks were painted.
So theoretically everything is aligned.
|
|
|
|
|
Hello Klaus,
Well, I am finally back on the job. I have been going through a carpal tunnel problem with my left hand but it is now working sufficiently to allow me to resume operations on the xc70.
I will try to attach a couple of pictures to show my various marks on the flywheel and the camshaft gears.
My thinking is that now I should try to remove the units at the LH side of the camshafts. Are they the VVT units? And then I will try to lock the camshafts in place using the locking tool.
Then I will undo the bolts holding down the camshaft cover.
Then I will carefully break the gasket seal.
Then I will lift the gasket cover. Here is where I am worried I will lose the settings.
Any faulty steps here? I will try to take pictures of everything.
|
|
|
|
|
Once again, the timing marks don't matter at disassembly, only when reassembling!
Yes, you have VVT on both cams. Do not remove them from the cam, that is not needed! The only reason to remove a VVT is if the cam seal leaks a lot.
Take the timing belt and S belt off, along with the tensioner and any pulleys you plan to replace. Take off the manifolds, and start removing the head.
Do NOT over think the operation.
--
Keeping it running is better than buying new
|
|
|
|
|
Good afternoon Klaus,
Okay. I am trying to follow your advice to keep it simple and to follow the written instructions from my brickboard soource.
His engine is a B4194T so there are differences between his engine and my B5254T.
Step 53 tells me to cut off the timing belt and to leave pulling it off till later.
Step 54 tells me to undo and remove the camshaft sprockets, marking which is the intake and which is the exhaust.
Step 55: undo the cover for the camshaft position sensor--two T30 torx bolts
Step 56: Under the cover is the rotor itself whose rotations the sensor detects. It is held on by a single 10mm bolt. Undo it and remove.
Step 57. Undo and remove the 34 ten mm bolts that hold the cam cover on. Work in a diagonal sequence from the outside towards the centre.
Should I actually do steps 55 and 56? Or should I just cut off the belt [I do have a replacement] and jump to step 57
Bob
p.s. don't hesitate to tell me to take off if I am becoming a nuisance.
|
|
|
|
|
Why are you trying to hurt yourself? Ignore step 54! That will make timing impossible when you attempt to put the sprockets back on! They stay with the cams, intact.
Go ahead and remove the CPS, just to get it out of the way.
BTW, I don't understand the haste needed to cut the timing belt. I would just remove the tensioner and pull the belt off. Remember, the belt has metal strands, a razor will not work.
--
Keeping it running is better than buying new
|
|
|
|
|
Morning Klaus,
So . . my next step is to remove the timing belt instead of cutting it off and then I will remove the bolts holding the cam cover on and proceed to the next step.
When I get the cam cover off the cams will still have their sprockets affixed, I take it. Do I have that right?
Bob
|
|
|
|
|
Correct. Also helps you to know which is exhaust and which is intake :)
--
Keeping it running is better than buying new
|
|
|
|
|
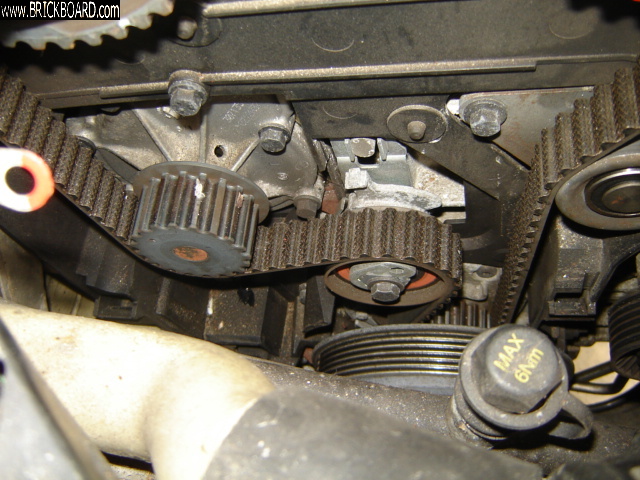
Just a picture of the tensioner arrangement. I take it I have to loosen the bolt and move the tensioner with a hex tool, moving it in a counterclockwise direction once the bolt is loose.
|
|
|
|
|
You needed a new tensioner anyway. That belt looks pretty good. Give the water pump a good external exam, it should still be good.
--
Keeping it running is better than buying new
|
|
|
|
|
Afternoon Klaus,
So I managed to take off the 'cover' that lives behind the flywheel pulley. No problem. Just came off as easily as shown on the 1A video.
Then I slackened off the tensioner bolt and tried to pull the fiming belt. No luck until I removed the tensioner. Once that was off I was able to get the belt off the top sprockets, etc. but was unable to get it off the crankshaft pulley. I was doing everything from the top so I will have a go at it from the bottom tomorrow.
The tensioner has what I think is a date number on it. 12.02.16. The part number is F-556593. Other markings are INA-Germany. So I think it is a little over six years old and I know this car was sitting for a few years with the previous owner. Might not be a lot of miles on this tensioner or the belt for that matter.
Maybe I should just leave the belt on it. I will see how difficult it is to get it off around the crankshaft pulley before making that decision. I do have another belt that came with the kit I bought a while ago.
Thanks for reading. And for your valuable advice.
Bob
|
|
|
|
|
Belts are inexpensive even from Volvo so best to change it. In the dozens of belt change videos on YT I've never seen any real problems with belt removal. There are lots of head change videos too and it looks as if you are patient, have the right tools and keep everything clean all should be well. Best to use the Volvo sealant and that is expensive. There are equivalents around a bit cheaper but beware of compromise for this part of the job.
|
|
|
|
|
I guess so. The mechanic at A1 auto cut the belt at the bottom to remove it. And it looked like a bit of a struggle to get the new one on, working from the bottom up.
I have not yet bought a tensioner.
|
|
|
|
|
On my 1998, there was a large piece of metal (part of the block) that made the belt hard to get off/on the crank sprocket. A little twist to one side and off it came. Then I had to remember how to do that when installing the belt. !!
I would replace the tensioner. It just looks bad with all of the salt corrosion on it. It will probably still work.
--
Keeping it running is better than buying new
|
|
|
|
|
Good afternoon, Klaus.
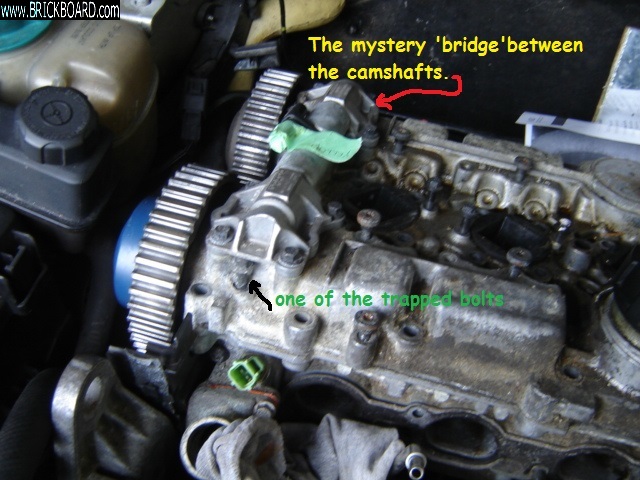
I now have removed 42 bolts from the camshaft cover. There are two more that are trapped beneath a unit that bridges the two camshafts on the RH side of the engine. They are both loose from the head but I cannot get them out because of the bridge aarrangement
Stupid question: is this bridge part of the VVT setup? Will removing it to retrieve the bolts create more problems? I started to remove it and then noticed the gasket between it and the head cover. I would only be taking it off so that I could put the two bolts in the bag with the other 42.
I will try to supply a picture.
Bob
|
|
|
|
|
That's the cover for the VVT sonenoids. Just remove the cap
--
Keeping it running is better than buying new
|
|
|
|
|
Hi Klaus,
Trying to decide whether to buy Volvo pliers to pop the clamshell. Worked very nicely for Robert.
Would take a while for them to get here unfortunately.
Bob
|
|
|
|
|
Good Morning Klaus,
So yesterday I removed the VVT solenoids and I made a first attempt to remove the camshaft clamshell. I of course do not have the special pliers so I tried various prying/large screwdriver tools mainly on the front side of the cover [because of easy access] without success.
I will try again today. I am a little afraid to get brutal with the cover because it is aluminum. And I know enough to not push any tools between the clamshell and the head surface.
You probably cannot really help with this process but I thought I would keep you in the loop as to what I am currently doing. If you have any advice on tool preference, etc., I would appreciate your input. Right now I have various sized pry bars and a large screwdriver at my disposal. But am always willing to supplement my tools if necessary.
Bob
|
|
|
|
|
Hmmm. I wonder if a single bladed razor could cut into the glue with out touching the metal? Never tried that. I wouldn't cut all the way through, just a start close to the pry marks?? When the glue gives, it comes apart easily, so be careful.
Alcohol should also cut the glue. But slowly.
--
Keeping it running is better than buying new
|
|
|
|
|
Morning Klaus,
I was able to crack open the camshaft clamshell about an eighth of an inch on the front intake side yesterday. Using a soft faced mallet and some prying with prybars and screwdriver. Trying to figure out how to get at the rear exhaust side using these tools.
Bob
|
|
|
|
|
If you can get fingers under the cover, it is OK to apply even pressure across the front and pry upwards. Slowly. Remember alcohol. You will need it to get the glue off anyway.
--
Keeping it running is better than buying new
|
|
|
|
|
Good morning Klaus,
I finally resorted to getting under the car, armed with a mallet and a shortened broomstick handle and with my pal's help to locate the end of the stick I was able to break loose the aft side of the camshaft cover. Took a few hits here and there and the handle lost a bit of wood but it finally let go.
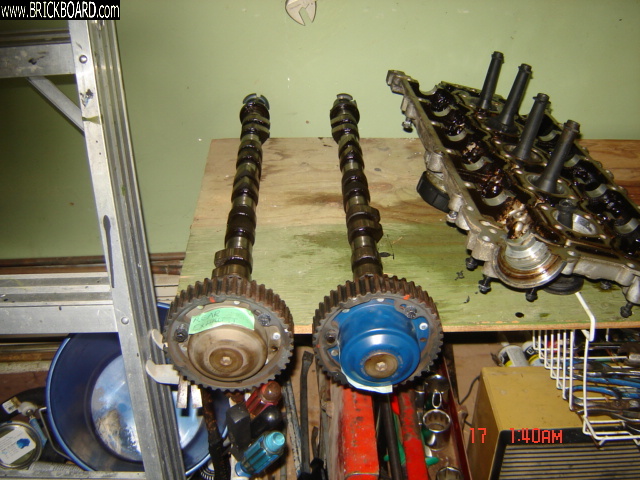
If I can get the picture up it shows the two camshafts [with red dots showing original position] and the camshaft cover. We had a time with those spark plug boots holding everything down when we were trying to wrestle the cover away from the head. Should have removed them first.
Another small snag was one of the three bolts holding the gear onto the camshaft had to be partially screwed out to allow more space while extracting the camshaft from the head.
Any recommendations for cleaning the surfaces of the head and the camshaft cover?
Bob
|
|
|
|
|
Hi Bob,
Suggest you watch this entire video.
https://www.youtube.com/watch?v=gE4TBzlDMws
Cleaning with acetone is recommended, do not get anything into the oil channels.
A machine shop can help a lot.
Valve stem seal replacement will reduce oil consumption on an older engine.
--
Keeping it running is better than buying new
|
|
|
|
|
Afternoon Klaus,
I took the head to my local trusted machinist yesterday. He asked for the valve stem seals [which I had not brought with me] so I made a double trip to get them and deliver them. He is charging me six hundred Canadian for the work [about $460US] and that seems fair to me.
I need to get some acetone to clean off the top of the engine block as per your instructions.
Trying to think how I can keep the exhaust manifold gaskets in place when I am lowering the head onto the block. Also concerned about getting the exhaust manifold studs in place after the head is lowered and in place. Any mechanic's tips on that procedure? I am thinking of gasket goo or thin wire to hold the gaskets onto the exhaust manifold and trying to spin the studs in once the head is in place. Probably use some thread grease before I start.
Maybe I should install the studs in the head before lowering and then lower and shift aftward at the same time.
The coolant pipe connector is also a small issue.
Bob
|
|
|
|
|
I like your machinist!
I am going to Canada for 10-12 days, Thunder Bay. When putting things back together, use common sense. Don't force anything and if you think it needs a torque wrench, use one. Do not prelube bolts unless there is no need for torque wrench.
Have fun, I will.
--
Keeping it running is better than buying new
|
|
|
|
|
Good morning Klaus,
Hope you had a nice time in Thunder Bay!
I have been down with a nasty gout attack over the last three weeks so little or no progress to report. But I did run over the top of the engine with a sanding tool with paper the machinist supplied me and I am now ready to clean the head off with a cloth and brake cleaner and then get on to installing the oil trap and its various fixings.
Friend of mine has a 2010 S80 and it runs rough. I will quote his email to me:
"I got the car up to Chapmans yesterday where they confirmed the vacuum pump and check valve are fine. They did a smoke test looking for vacuum hose leaks and found none. The current diagnosis is a faulty booster so they ordered a replacement from Volvo Victoria (only a cool $1,000 for the part). Add another $754 for the install and (hopefully) problem solved.
When I mentioned to him it still ran like a pile of crap he was surprised - although they create 10 lbs of paper every time I take the car to them apparently they do not keep records on their customers cars. He thinks fixing the booster may solve the rough running issue - I remain unconvinced."
Chapmans is a respected local auto wrecker specializing in Volvo and Subaru. They have a number of service outlets separate from their wrecking yard and they are one of my gotos when I need a part. It is obvious my friend is frustrated with this recurring problem of rough running. He has had the car for more than five years now.
Do you have any thoughts you could share?
Bob
|
|
|
|
|
Rough running could mean anything. Just idle speed? worse at 3000 rpm? really bad when coasting?
If there. is no check engine light, a really good Volvo diagnostic tool might make a difference. Like fuel air ratio, front O2 sensors being in good order, a clean PCV.
--
Keeping it running is better than buying new
|
|
|
|
|
Friends S80. Yes vac leaks likely to cause running problems but I'd like to hear their reasons for saying it is the brake booster. They have a Volvo scrap yard so why not fit a used one? What faults are showing when the scanner is used? Spend no money until that has been used, faults cleared and checked again.
|
|
|
|
|
Good morning Klaus,
Should have said PCV valve instead of EGR valve.
Bob
|
|
|
|
|
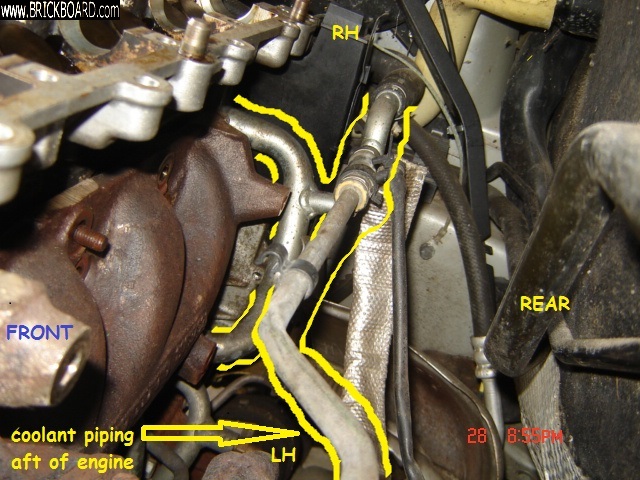
Morning Klaus,
I took few pictures of the space and the piping, etc., between the rear of the engine and the firewall of the car. Still trying to figure a way to separate the piping from the head.
Couple of thoughts. Not sure how much is involved in removing that plastic plate that is affixed to the RH face of the engine and that is in my way to getting at the lower bolt connecting the coolant pipe to the head.
Should I attempt to disconnect at the rubber hose fitting instead of the pipe to head connection?
Should I try to remove the exhaust manifold stud showing in the picture with a couple of jammed nuts. Could break it but when I get the head out I could have it removed. Just thinking of trying to lift the head straight up.
Again, always appreciative of your input.
Bob
|
|
|
|
|
You should be able to get a 10mm socket on the bolt with a long extension.
As for the manifold bolt, if that is the only one stuck, give it a lot of PB Blaster and try with 2 nuts. But only if it will make your life easier.
--
Keeping it running is better than buying new
|
|
|
|
|
Good afternoon, Klaus,
Good couple of days. Once I managed to get the remaining four studs out of the exhaust manifold side of the engine, the head became loose on the aft side.
Thus, it was loose on both front and rear sides. but not on the RH side. Turned out there was one bolt holding the front plastic cover to the head. Once removed, we were able to lift the head off the block with comparative ease.
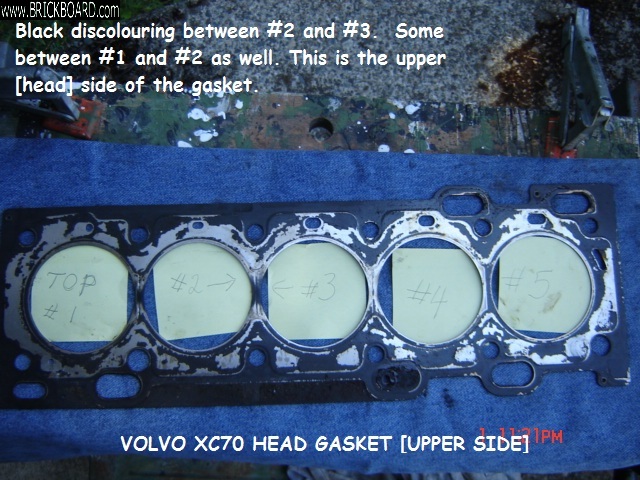
The head gasket is discoloured black between number two and number three cylinders.
Some lesser discolouration between number one and number two.
This is on the upper [head] side of the gasket. Lower side looks clean.
I will try to upload some pictures.
Bob
|
|
|
|
|
Failure between 2&3 is "normal failure", most often seen.
It's all off!! Now, get the head cleaned/trued. The finicky part comes next, assembly with new bolts and gasket. While the head is off, clean some of the other bits you removed just to keep the oil/grease from spreading to the nice parts like exhaust and intake manifold.
Are you going to replace the valve guides? There are 20 of them, but this is the only time it can be done. A lot of work, but it is on the work bench, not leaning over the engine bay!
--
Keeping it running is better than buying new
|
|
|
|
|
Afternoon, Klaus,
With your encouragement I tackled the lower coolant pipe bolt again and this time I successfully extracted it.
Still can't get any motion on the head at the back but I can raise the front about an eighth of an inch.
I did disconnect the aft coolant pipe at the rubber hose but that did not bring me anything. The metal pipe is entering both the head and the engine so I cannot pull it away.
I did not give the exhaust studs a try yet because I do not seem to have any extra metric nuts around to create the jam nut. I would like to use fresh nuts rather than the original bolts.
Happy to make a little progress today.
Bob
|
|
|
|
|
Good morning Klaus
Discouraging day yesterday. I tried to get the coolant pipe off from the aft RH side of the head but failed. I got one 10mm bolt off but could not find a way to get a socket wrench on the lower one. Maybe I will try to disconnect the coolant hose from the metal intake pipe and see where that leads me.
I have had a look at the RH connectors and I think I see a banjo fitting. Maybe I should get a couple of pictures up.
Bob
|
|
|
|
|
Good morning Klaus,
I watched the video and from what I could see most of this work would be done at a machine shop. I do have a local machinist who did work for me in the past. I will be contacting him once I have the head out of the engine.
I take it I should remove the cam followers [I am calling them that] and mark where they belong in the engine first.
Then I think I will have to move the head towards the front of the car in order to lift it away from the studs still projecting from its aft side. some of the studs stayed in place and others came with the nuts when i removed them.
I haven't really had a good look at the turbo but if it is connected only to the exhaust manifold I am hoping I can leave all of that in place when I pull the head.
Getting myself revved up for the next step!
Bob
|
|
|
|
|
I will try spraying some alcohol around the crack and pulling with fingertips today. I will also spray alcohol on the back side of the engine in case there is some loosening there that I cannot see.
|
|
|
|
|
Robert DIY (YouTube) is currently in Riverside CA. See his latest video. If you happen to be close by, he says about an hours drive, you could consider getting in touch with him if you are in range. Maybe talk to him anyway, he might divert from his route. He doesn't work for free but I would expect his charges to be reasonable. It would speed up the job even if he only does part of the work.
|
|
|
|
|
Afternoon, Klaus
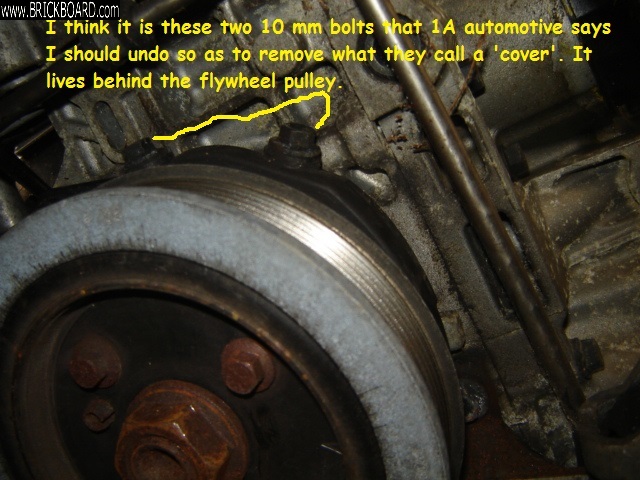
I have started to remove the timing belt using the 1A Automotive video. The mechanic takes two ten mm bolts from behind the flywheel sprocket and removes what he calls a 'panel'.
His engine differs from mine. I can see a couple of bolts, which I have marked in the picture, but am not sure if they are both implicated in retaining the 'panel' that lives behind the flywheel sprocket.
Is this necessary to remove? Or should I try to keep it simple again and go ahead with the removal of the camshaft panel bolts.
I will also try to put up the picture of the tensioner for your consideration. It looks like a hexagonal tool will be required to release the tension once the bolt is loosened.
Bob
|
|
|
|
|
Do not know if your engine has this cover.
--
Keeping it running is better than buying new
|
|
|
|
|
Hello Klaus,
Okay. That means I can remove the cam sprockets and cover without any worry once I find the marker on the crankshaft sprocket and what it aligns to. I will align the two and then begin to remove the upper story of the engine.
Can you give me some idea of what the mark on the crankshaft pulley looks like and what it aligns to? i have tried entering the question into the Google search engine but so far have not found anything definitive. I will try again after I finish this message.
No luck with the turbo. I had a look underneath and can't get a real bead on the offending nut---can't even reach it with fingers to get a feel of it. Hate the idea of having to lift the head up with the turbo attached.
I have heard the VIDA software might help. Probably expensive but if it gives me some guidance it will be worth the money. What do you think?
Bob
|
|
|
|
|
Sorry, forgot about the turbo. Here is a sad link to read about the third bolt, but may be helpful in other areas like the banjo bolts and copper washers.
https://www.matthewsvolvosite.com/forums/viewtopic.php?t=71167
If the exhaust from the turbo can be removed at the flex pipe, do that. Those 3 bolts can be heated if need be. The fact that rust may have played a part in the lower bolt is a bear.
The procedures in VIDA 'sound' good, are quite lengthy, and suppose a clean, rust free engine. I think it is over priced, unless you get a Chinese copy and a laptop running Windows 07. And then, it may not work...
--
Keeping it running is better than buying new
|
|
|
|
|
Good morning Klaus,
Derek sent me to a good video from Robert when he used special pliers to separate the cam cover from the head. I am considering buying a set of these but they are pretty expensive.
Do you recommend their purchase or is there an alternative?
Bob
|
|
|
|
|
Not only expensive, but not in stock.
Most of us have used a wide screwdriver and a rubber mallet. Just tap a few times in each slot along the front or rear until the side pops off. Don't try to pop the cover off with one bang, or using just one slot. Just like the video, you should hear a 'crack' and then move to the next slot. Once the front or the back is loose, work on the other side of the engine.
Make sure you have cleaner to get the old glue off. And, spend money for Volvo gasket glue and a small foam roller to apply it.
Remember, once you start, you are on your own. We may not be around or taking naps.
--
Keeping it running is better than buying new
|
|
|
|
|
All engines since 1999 have Variable Valve Timing. Your engine has VVT on both the intake and exhaust. VVT complicates things when removing the cam cover. Yes, you can paint the sprocket end and hope you can get the cams to line up properly. I would get a hold down tool which keeps the cams in the proper position throughout the reassembly process - don't want to bend valves and have a do over!!
You could pull the spark plugs and examine each piston. The leaky piston will be clean as a whistle, compared to a normal carboned up cylinder. Bore scopes are getting cheaper and a lot more fun to use, especially when you drop a nut/bolt in a hidden part of the engine bay!
--
Keeping it running is better than buying new
|
|
|
|
|
Check out Robert DIY on YouTube for this job. It's not for the faint of heart, but can be done. Robert might even be able to help if you are East coast sort of. You might have to wait for him to come to your area. Winter isn't a good time unless you have a heated garage. As you say, not a cheap job at most garages.
|
|
|
|
|
I am west coast Canada near to Vancouver so I won't be seeing him out this way I expect, especially during Covid time. And the garage is not heated.
I saw a pretty good rundown on the job on the VOC website by DWM but it was for a B4204S engine and I don't really know what engine is installed on my car. I Will check that out later today.
I might try to run it locally through the winter by topping up the coolant on a regular basis but I do wonder if I will do more damage to the engine before the spring arrives.
I will try to find Robert's post.
Thanks for your suggestion.
|
|
|
|
|
Bob,
If you're considering driving through the winter, you might look into a bottle of Blue Devil Head Gasket Sealer. Sealed my car's leak and allowed me another 1000 miles driving (including a 370mile drive home). Probably could have gotten more out of it but I sold it after the water pump started leaking (presumably due to the sealer).
Pretty sure your engine's designation is B5254T2. I would assume that the procedure is the basically the same for any of Volvo's turbocharged 5-cylinder engines.
Regards,
Will
--
XC60 / Odyssey
|
|
|
|
|
Hello Will,
I read B5452T2 off the sticker this morning. I can go from there with instructional videos.
The coolant bottle on this car is already pretty goopy with head gasket sealer so I think I will desist on that---try to prevent radiator plugging, etc., not to mention water pump failure.
Thanks for your recommendations and advice.
Bob
|
|
|
|
|
Just a correction. I looked again and the number reads as you presented it. B5254T2. Memo to myself--don't trust your memory.
|
|
|
|
|
Swapping in another engine might be cheaper than doing the head. An engine with good history from an accident scrapped car would be the best choice.
|
|
|
|
|


