|
|
|
Got the block, crank, and pistons loaded Sunday night up and hauled into the machine shop yesterday. A scrap of 3/4" ply worked pretty well to spread out the load. Screwing through the oil pan holes with drywall screws to secure it, a tip I got on here, worked great as well. The guy at the machine shop was pretty impressed when I whipped out the little Bosch 12v litheon dril/driver to get the block off the plywood. The crank is just trapped by some 2x4 scraps to keep it stationary.
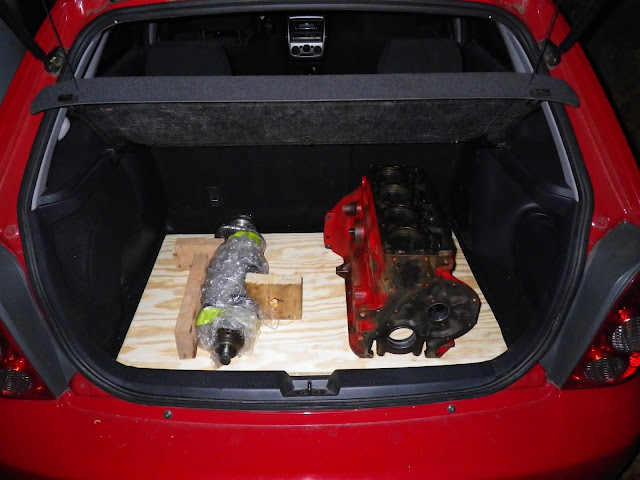
Had them check the block for cracks, and measure everything up and check it against the specs from the green book.
Got a call this afternoon with some good news:
- No cracks in the block
- Cylinder bores are well within specs for +.040" and can just be honed
- No scoring on the crank journals and just need light polishing
- Dropped/dinged #3 piston can likely be reused with some light clean up work
It's nice to know the old bones are still good. Still undecided about trying to use that piston or replacing it. Mike at iRoll can provide a single matching Mahle piston, which is likely much cheaper than replacing all 4, provided they can be weight matched.
Guess I need to do the same for the head now (get it checked out, see if it's worth putting dollars into) then start formulating a plan forward. I'd like to stay on SU's for fuel and a stock dual-outlet manifold for exhaust, which I'm hoping will prevent me from getting too aggressive on the rebuild.
Haven't been able to locate a local head shop willing to do even light porting work. They seem to be hesitant to touch anything but common V8 applications. Is there any alternatives out there to VPD that have experience with these?
|
|
-
|
|
|
This is SPOOKY! Just did the exact same thing over the last couple of weeks, with the same results (except that dropped piston). Great news when your rebuild suddenly does not include big bucks for new pistons, ground crank, etc, etc...
--
Kent - too much iron, too little time
|
|
-

|
|
If you're just planning on punching out those exhaust port 'rings', you could try doing it yourself. If you have a router it might be more stable, otherwise maybe get a cheap die grinder from Harbor Freight. And get a couple of carbide burrs.
Pop the exhaust valves out. Then, with a very steady hand (which is why the router might be a better choice for such a simple operation - a hand held die grander can chatter and/or spin around in the port if you don't have a firm grip on it), just sort of grind that restriction out of existence. You'd be surprised how easily cast iron carves with a high speed carbide burr. Keep a can of WD40 around and keep it all nice and lubed, helps keep the burr cool. Do it in small bits, stop, use your fingers to feel, maybe make a cardboard template that slides onto a valve stem to make sure it's the same size and shape on all 4 ports.
All in all, maybe an hour's work or less to do a simple, single plane bit of gridning. Finish up with a drill and some flapper wheels to make it smooth and shiny. Hopefully you didn't touch the valve seats inadvertently. If so, just take it to a machine shop for a valve job.
--
'63 PV544 rat rod, '93 Classic #1141 245 (now w/16V turbo)
|
|
-
|
|
|
Yeah the head work has been the major thing I've been going back and forth doing myself versus farming out versus not doing at all. Common mantra seems to be if you are going to put any time and money into these engines, that the head and cam should be the first places to put it. Like I mentioned I'd like to stay on SU's, stock valve springs, and a dual-outlet manifold, so I'm not sure how much time (money) and worry I should invest in headwork.
I've got a quote of around $400 from a pretty reputable (but not local) shop which would include the following, with ~ 3 week turnaround:
- Disassemble
- Inspect
- Clean
- Skim gasket surface (if required)
- Open up exhaust ports a bit
- Valve job
- Reassemble
- Flow test one port before/after porting
Installation of hardened seats and new guides is not included in the number above. I know VPD offers a basic head package that would be in the same ballpark, but with significant additional lead time.
The real sticking point is that I need to have an accurate combustion chamber volume number before I can have the block milled for compression. I guess in order to have the block milled, I need to figure out my piston situation and good a good reading on how far down the pistons sit.
I suppose a simpler and cheaper route to bumping the compression would be just to find a higher compression head instead of paying machine shop labor rates to recreate the same effect.
|
|
-
|
|
|
Sorry for the late response here but 1) glad everything looks OK and 2) time to be honest about how you are going to use her and if the pride of the cool stuff is good trade off against the cost and actual results. It is the old speed costs money thing...
|
|
-
|
|
|
I am fairly sure you are not going to be racing this, so porting the heads, think of it more of a clean up. It can be done quickly and easily at home. Electric is best, air is a pain in the ass with metal flying all over the place. It's best to have every known shape grinding, sanding roll and carbide cutters at your disposal. The kits they sell, blow. The tapers they sell at eastwood are good quality, the kit they sell is Mr Gasket chinese junk. I like morse grinding stones, they used to sell them at ace.
You rough out the shape with carbide, then stones then the tapers. I've done a pair of v8's in 2 lunch times.
You mainly are looking to make the valve end as round as possible, and the exhausts smooth and match your manifold or headers. The intake doesn't need to be smooth, pay more attention on the roof than floor and again, gasket match and you will be fine. Smokey Yunick covers ports in his book very well. Matching gaskets isn't important if the flow is not slamming in to an edge. Like the exhaust manifold is bigger than the port, it won't interfere.
If they put in seats, make sure they will blend them into the port. And of course the "3 angle" valve job is totally worth it. You will feel more power and response with good breathing.
|
|
-
|
|
|
For a cheap polishing kit take a 12" length of 1/4" steel rod and cut into 4"/8".
Cut a slot into the end of each about 1 1/8" long using a pair of blades fitted together in your hacksaw. Buy a couple of small rolls of 1" abrasive cloth tape, 3 if you want to go coarse/medium/fine. Put a 6-8" length of tape in the slot, wrap it round and polish away. Problem with burrs and stones is, unless you have an adaptor they are invariably too short. Good burrs are expensive but worth it. Cheap ones go blunt in a few minutes and make you very frustrated.
We are in dire need of a comprehensive article on what to remove and where on the B18/20 heads. There are a few photos around of DIY work but they aren't backed up by flow data. Someone who knows their way around these heads can go straight in and quickly buzz away at the key areas and make big improvements that a novice will never match. I believe the exhaust port is compromised by the lower floor being too low already (apparently fixed in the very last year of B20 production for reasons known only to Volvo)and that work here can make the flow worse. If there are articles on the net with instructions and port drawings showing where to radius/remove metal, please post links.
I think I remember reading (from Phil?) that it was good to have the inlet port slightly bigger than the inlet manifold exit, an abrupt transition being useful, as this helped control the pulse and keep more fuel mixture close to the valve head. Right or wrong?
A set of basic instructions which give useful, consistent, predictible improvements is needed, without having to resort to the flow bench and big $$.
|
|
-
|
|
|
When I was modifying the combustion chambers on my R-sport head, I used a combination of cardboard patterns (aligned via the valve stems, it was easy to flip-flip for the reversed chambers) as well as a direct measurement of the chamber volume. I've seen it done with a simple piece of glass with a hole in the middle, but I was able to do it reliably and repeatably with an even simpler piece of glas without a hole in it. I just tilted the head somewhat, took the valves out and grease the seats (just to prevent any seeps), lightly grease the head around the chamber, then slid the glass on, leaving a tiny gap at the top. Then filled it up with water using a syringe. I'm assuming the syringes are fairly accurate since they dose out meds with them. And I experimented with setting up on a chamber, measuring, taking apart and redoing it, the results were spot on each time.
Probably don't need to be so rpecise on a head milling operation. I don't know the numbers, but I've seen them floating around here - the rough CR of a head based on the thickness of the head (between the top milled surface that never changes, and the bottom side that is shaved to various heights by the factory and by subsequent machine shop work).
--
'63 PV544 rat rod, '93 Classic #1141 245 (now w/16V turbo)
|
|
|
|
|
