|
Greetings cool cats,
Your help has been priceless so far, and to seek it again as I slowly but surly get things back into (somewhat) working order on my 83' 245 DL Wagon!
The pictures should provide nuff reff. yet let me further details...
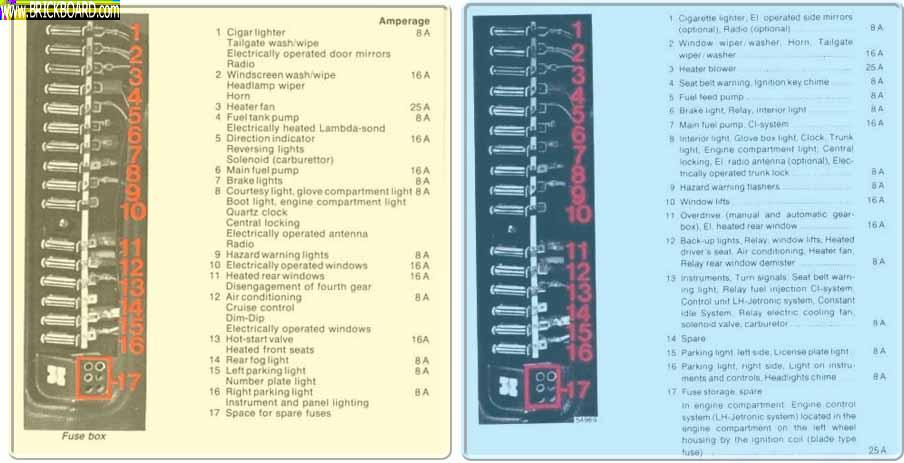
-First for all you cartography lovers out there! The two fuse map images were
borrowed from the brick gallery, and Im only seeking an acurate map of the
fuses in my car. As noted above the model of my car, its a B23f I believe...
and the timing belt cover has a nice big '803' in red if that helps. I
was unsure if it was one of these, or maybe not even that; so ya'lls insight
cures my ailment of a lacking intereior fuse door (with map).
- http://www.brickboard.com/GALLERY/images/8302.jpg
Second, (link provided) The ignition picture was also borrow, for refrence
pur. only; and its almost identical to the view from the same angle under my
hood. Aside from a white dist. cap. Anyway, from the bottom the highlighted
throttle pully blue plastic 'go-thru' is snapped on the larger side. It
seemingly doesnt effect performance from what I remeber, but a broken part is
a broken part, and Im just interested where one should seek a replacment?
(Hardware store maybe?) ... The top highlighted area of the ignition photo
is the connection at the end of the fuel rail closest to the cabin. The foam
hose is quite loose (about 2 cm's pulled from where it should be) as well
having a 2 cm crack started. Is this also a major issue? It seems as though
its associates being the fuel makes it a major priority to repair.
Alright, as usual thanks in advance.
Im on my way out into the cold to completly remove all the A/C componets. From the previous owners words, he never got it to work for the 2 years beofre my ownership. Further, numerous cables and hoses were left dangling. And in the words of the great Tosh, much to 'DANGEROUS' for my tastes.
So im planing on stepping like a rasor and attempting to take on the A/C by-pass
mentioned in numberous brickboard posts prior.
-I plan on removing all unused componets
-Including the compressor
-patching/repairing electrical to compensate for unnessarily routed power
On this undertaking, if anyone has any detail they could share, they too would be invaluable. Thanks so much....!
|