|
Here is my fix for my wiper switch. Removing the switch is fairly easy. You need to remove the two plastic pieces surrounding the steering wheel. Then the switch is secured with 2 screws. Remove them. The large plug pulls right off and you may have another set of wires for the rear window controls. These wires go under the speedometer area. You will need to reach up from below and search for the connector behind the dash to disconnect it. Here is the wiper switch having been removed (this is a picture I took after the fix):
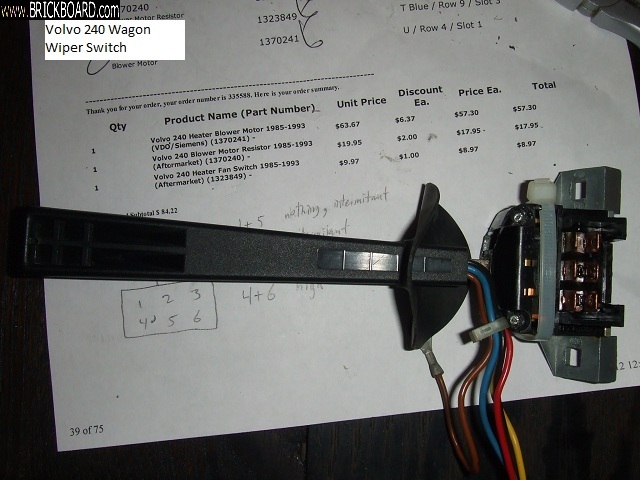
Next, I used a multi-meter set to measure resistance of the 6 contacts on the switch. I labeled the contacts as shown in the next picture.
In the off position: 1+5 are shorted.
In the intermittant position: 1+5 and 2+4 are shorted.
In the low position: 4+5 are shorted.
In the high position: 4+6 are shorted.
The 1+5 contacts shorted in the off and intermittant positions confused me. My wife told me the wiper switch is supposed to have a "tap down and release" feature to do a single swipe of the wipers. This never worked since I had the car but after the fix I found that this feature now works! After cleaning the switch I found that a tap down of the wiper switch makes 1+5 go from short to open. Having measured everything, I now felt comfortable to open the switch... if I broke it, I would still be able to use aligator clips to make my wipers work without the switch if needed.
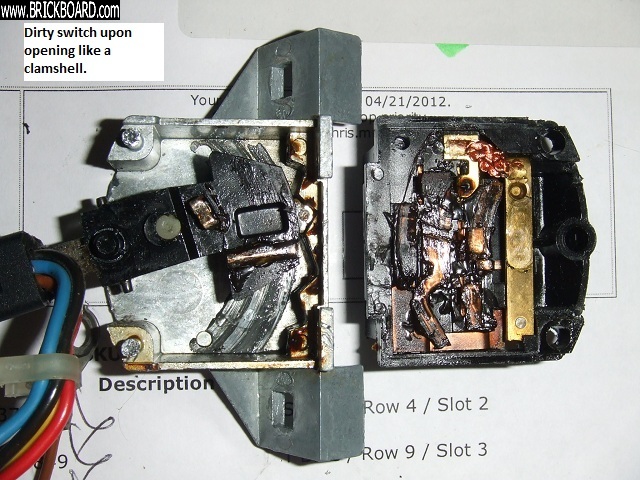
Next, to open the switch there are 2 small rivets that I simply went at with a pair of needle nose pliers as seen in the picture. After scraping some metal off them, I used the pliers again to push up on the plastic and down on the metal housing to seperate the two a bit. It can be pried off the rest of the way with a flathead screwdriver. This picture also shows how to secure the housing back together by cutting out notches in the plastic and adding a zip tie.

Here is a picture of the dirty switch opened like a clamshell. There are only a couple pieces that can fall out but still be careful. I cleaned everything up from here with Q-tips and alcohol.
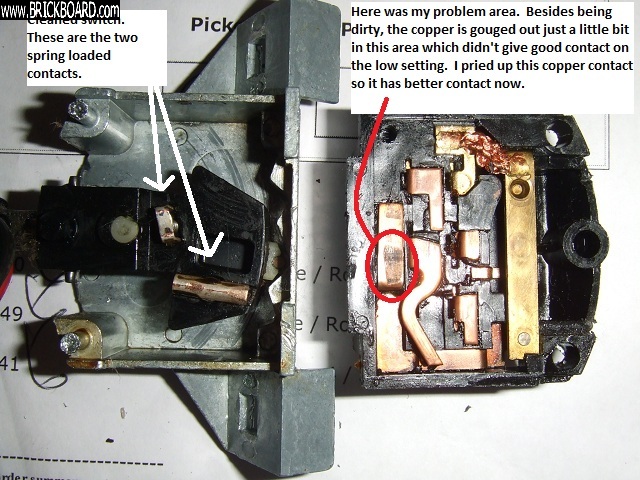
Finally, here is the cleaned switch. There are two spring loaded contacts on the switch side and a bunch of contacts on the right. I found a depressed section where some copper was worn down causing my low wiper setting to not work well. I used a pick to pry up this section and change the shape slightly to make good contact again. Putting everything back together was very easy. Don't forget to connect the brown ground wire back on the screw when you put it back in the car. I now have good working wipers again and the single wipe feature that I had no idea existed.
|