|
This thread was originally part of another one, but it was drifting too far off topic, so I moved it here:
[To improve performance...] Three, make a better air filter. The stock Volvo SU air filters do a good job cleaning the air, but, being oiled paper, they are pretty restrictive about air flow. Plus they're still using 1950's technology! If you have an old, dirty set of stock SU air filters, it's simple (but tedious) to convert them to accept drop-in filters. Seeing as how the stock filter set runs $35+, you'll be saving a lot of money on filters as well as improving your performance.
Here's how I did it:
Remove both air filters, and using a sharp knife, cut through the paper filter element as close to the metal plates as you can. Keep cutting around and around until you feel the knife blade rubbing against the metal screen inside the filter all the way around. When you have made two cuts in each filter, grab the paper and pull it out and throw it away.
You now have a set of filter housings that consist of front and back plates, wire screening, and a few metal tubes that connect the plates together.
Using a sharp-edged grinding wheel or metal shears, cut through the wire screening at its middle (or close to it), then go on and cut or break off the metal tubes inside the housings.
The tubes are designed to prevent over-tightening the filter mounting bolts, which could crush the housing. You'll be making up new mounts, so the tubes are trash, too.
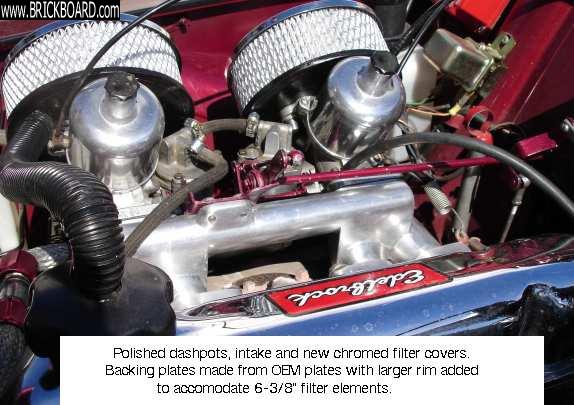
What you need to end up with is the front and back metal plates. These will be the housings for your new filters.
On the inside of the plates you'll see what looks like rusty pond sludge. This is the adhesive (glue) that held the paper elements in place. I used a wire brush chucked into a fast electric drill to clean all this glop off. It's imperative that the insides of the plates be clean so the new air filter elements will seal correctly.
Once the glue is gone and the metal plates pass your inspection, you need to decide how 'tall' your filter elements are going to be. I've been using FRAM CA3924 filters - which are 6" tall, and don't fit between the carbs and the fender. I'm in the process of looking for a shorter filter element, but so far no manufacturer seems to list their products by measurements, so it's use-what-you-can-find time until someone comes up with the element we need. [NOTE: see below]
ANYWAY...I cut my FRAM CA3924 element in half, which gives me TWO elements for $3.50. Cutting the FRAM element is probably the trickiest part of the whole operation, but if you're patient it isn't hard, it just takes care.
The FRAM element has a paper filter between two wire screens. First, I measured to find the middle of the filter, and marked it all the way around with a Sharpie. Then I used a thin, sharp knife (a fish filet knife) to slide through and under the outer screen, then turned the blade so the sharp edge was UP and levered it around the filter - kind of like an old-fashioned can opener - until I had a clean cut all the way around.
I then turned the knife over and sawed rather gently through the paper filter until it also was cut through all the way around. You'll want to be gentle here since the paper can snag and pull bits off its edge if you go too fast, or your knife is dull.
The next step is to cut through the inside screen, separating the filter into two halves. Take your time and do your best not to tear the screen.
Once you have your housing plates and new filter elements, you'll need to make a trip to the hardware store to buy some threaded rod and some nuts and washers. I took my original mounting bolts with me to make sure I bought the right diameter rod.
If your hardware store doesn't sell all-thread rod, you'll want to buy some long bolts with 4+ inches of thread, then cut them off to use just the threaded part. Get eight lock washers, four flat washers, and 20 nuts.
If you want to use fancy chromed nuts or wing nuts on the top of the filter, get 16 standard nuts and 4 fancy ones.
Start assembly of your filter setup by placing the bottom plate and its gasket on the carb. Hold it there and put a length of rod through each mounting hole, with a lock washer and nut on the back side of the carb.
Put another lock washer and nut onto the rod and run it down tight against the plate. When you're done, you'll have a flat backing plate on each carb, with two threaded rods sticking up from each one.
Next, set a filter element in place on each carb. I put the rubber end down, with the cut edge up to be hidden by the top plate. I tried them both ways, and although it makes no difference in performance, I thought the orange rubber edge looked best on the bottom, where it can be seen. The FRAM CA3924 is a little thick, and I had to make a small notch in the rubber edge to accomodate the rod. Be careful not to notch too deeply, otherwise you may cut through the paper element and end up with a leak.
Once your elements are in place, use two nuts on each rod to set the height of the top plate. Screw them up and down until the top plates fit snugly, but doesn't bow down when under pressure. When you have the nuts at the right level, use two wrenches and jam them against each other, which will lock them in place.
Now, drop on your top plate (painted to match my car in my case!) and secure with your last set of nuts.
I know this seems like a big job for a simple air filter change, but the FRAM element passes more air and costs considerably less than the stock one. Also, I don't expect to be cutting an air filter in two the next time I change them!
A little diligent research will turn up a good drop-right-in element, and I might even find a K&N filter that will fit!
==========================================
If you managed to get through my above post without falling asleep; here's the reply from K&N about the correct filter insert to use.
"Thank you for your interest in K&N products. The closest filter K&N offers is part number E-3220. The size is 5.625� (5-5/8�) OD X 4.500� (4-1/2�) ID X 2.00� tall."
No more cutting FRAM filters in two for me! Besides, K&N are washable oil-impregnated filters, so one set is all I'll ever need.
Pictures to follow...
==========================================
Soren Johansen sent me a note about the K&N filter housings he has listed on eBay. He says the inserts (washable) carry the number 'A059B9.'
I've also found some 'cone type' filters and mounting hardware for the SU carbs listed on eBay as fitting early MG's.
While I like Soren's setup, I'm not all that hot to have a big K&N logo on my filter housings. My stock housings - now painted to match the car - look fine, but I might make myself a set from billet aluminum.
It's also easy to make one big mount that would cover both carb inlets and use a big oval filter.
I'll reserve that thought until I see if I can find a supercharger. A Rootes ought to work fine, as the MG's that had them also were about the same displacement as the PV544.
|