|
|
|
I've now got two covers with enough slop in the slots where the shifter ball/pins resides that I've got to figure out a way to fix them or get rid of them. There's nothing like a nice tight shifter setup, and a sloppy one is just plain disappointing.
I'd be interested in finding out how any of you have rebuilt these for further service.
Is it possible to remove and rotate the brass/bronze insert, and cut new slots?
How is the insert fastened to the aluminum cover?
I'm not interested in making larger slots and sleeving the pins on the shift lever.
|
|
|
|
|
Well, I had this worn tranny/gearbox cover that was of no use to me so, what the hell, I decided to do some experiments.
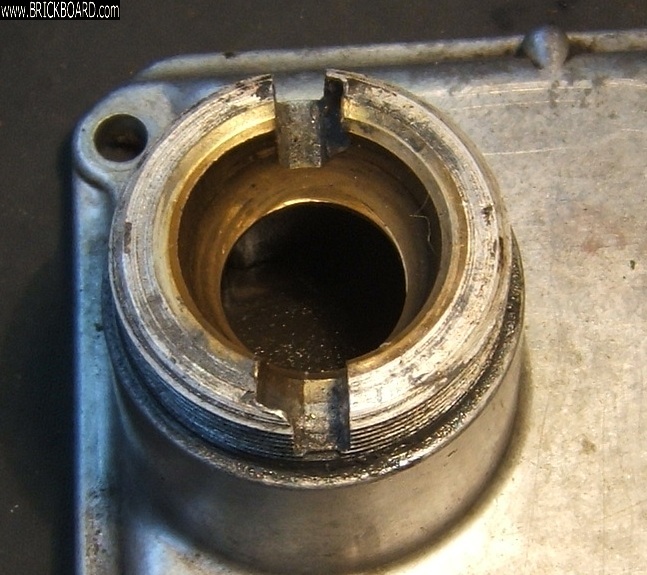
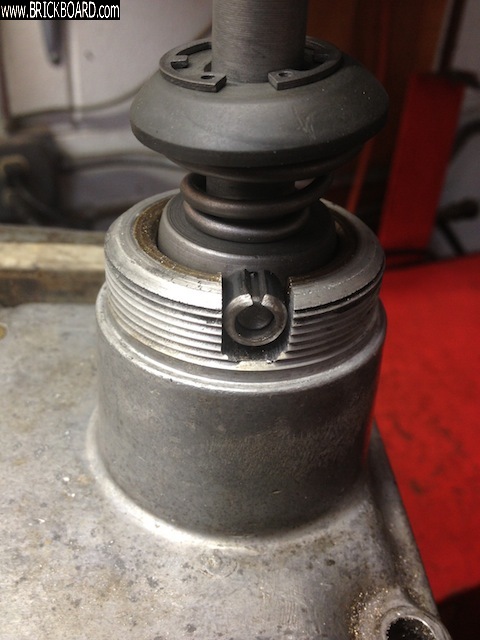
To recap, this is what the slots looked like before I started (pic 1):
First, I heated the threaded boss region of the cover (using a butane/propane torch) to a temperature at which solder would melt, and ascertained that this did not buckle the cover, let alone melt the die-cast part of it. Also no sign of the heat causing separation of the brass insert from the die-cast part. So far so good.
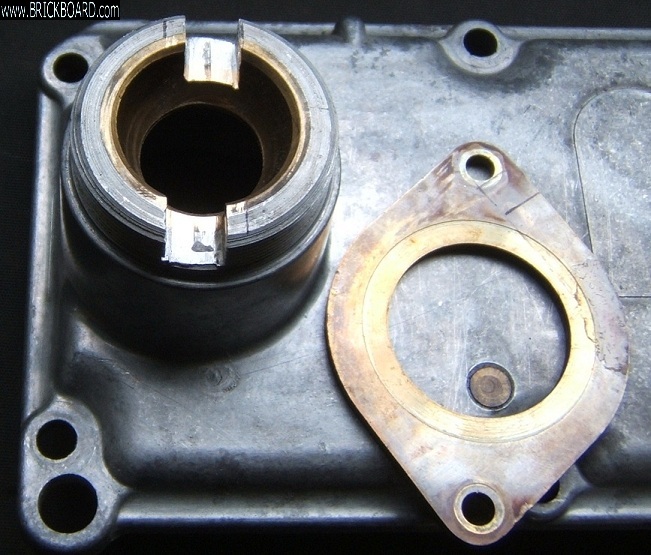
I found some 4 mm brass plate. I then cut away 4 mm of the worn flank of each of the slots (the clockwise flank - the other flank showed virtually no sign of wear). In other words, I widened and squared each slot, but on one side only. I used an ordinary hacksaw blade for this. See pic 2, which shows the widened slots and the brass plate – no prizes for recognizing where this came from:
I cut two repair pieces from the brass plate. I then held each of the repair pieces in position and drilled a hole from the side through the threaded boss and the repair piece, to receive a 2 mm diameter brazing rod. See pic 3:
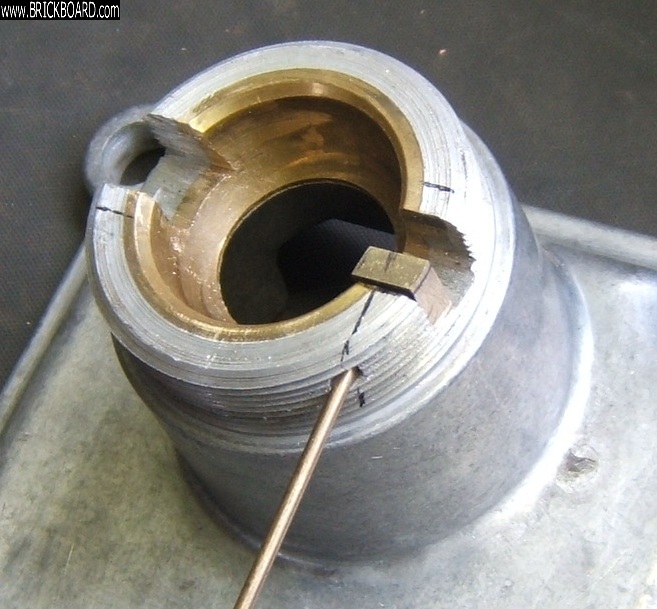
I then filed the repair pieces roughly into shape and cut two locating pins from the brazing rod. See pic 3a:

I then tinned the various surfaces that are to be joined (including those between the repair pieces and the locating pins). This is important because otherwise it is difficult to form a proper soldered joint. I then held the repair pieces tightly in place by pushing a few small steel plates into those parts of the slots not occupied by the repair pieces, and knocked the locating pins into place.
I then heated up the whole lot again and, when the right temperature was reached, flowed solder into the joints. After everything had cooled down again I tidied up with a file, removing excess solder and protruding parts of the repair pieces. See pic 4:
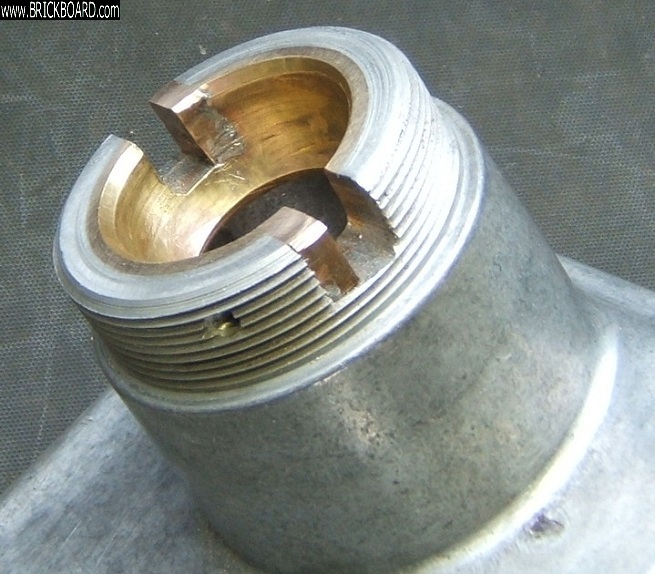
I am very happy with the end result. I must add, of course, that I haven’t tried the cover out in practice, but it looks pretty solid to me. The majority of the forces during use act in a direction perpendicular to the flanks of the slot and are not borne by the solder or locating pins. The solder and locating pins will, I believe, have more than adequate strength to bear any forces that might be acting in a direction parallel to the flanks of the slots.
My only problem: I don’t need the cover, but at least I now have a good spare. Moreover, the procedure has been an interesting exercise for me.
Incidentally, I have discovered another part of the cover that is subject to wear: One of the steel pins on the underside of the cover. See pic 5 (the flat indicated by the red arrow):
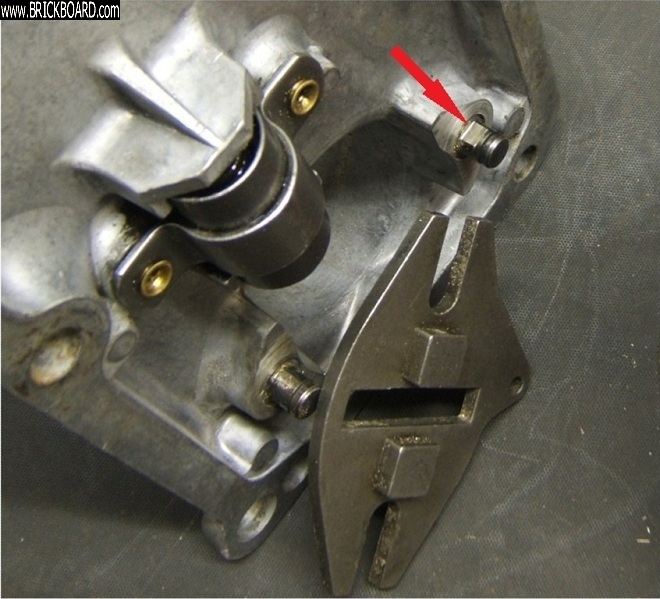
The cause of all this wear (the slots and the steel pin) seems to be the VERY strong spring force that has to be overcome when selecting reverse. One wonders why Volvo made this spring so strong, if the only purpose is to avoid accidentally selecting reverse when you want to select 1st. Or is there another reason for the strong spring?
|
|
|
|
|
here is the photo of the modded cover
|
|
|
|
|
Nice work on fit up and soldering.
not great at this photo thing.
I never did post a picture of finished mod. I like the roll pin solution, as there is more surface area working, so presumably less wear. We shall see.

|
|
|
|
|
Simon;
That shifter must have been about as sloppy as they get, before...but your fix looks clean (rigger compliments!) and like it should work nicely again for a long time.
You should figure out an equally slick repair for the worn locator pin...maybe they are simply replaceable, but if cast into the cover, you'll have to get creative there too...and show it here, please!
Cheers
|
|
|
|
|
Not sure what you mean by “rigger compliments”, but it sounds good – thank you. I must be doing something right then because I had another thumbs-up from you recently - on the UK forum where I post as “simonvolvo”. Something about fixing an oil leak on a Pierburg fuel pump.
|
|
|
|
|
A "Rigger" is someone who you want to be shipwrecked with (like the professor character on the old Gilligan's Island show, who could make ANYTHING of bamboo, except get them off the island!)...someone who uses smarts, abilities, and experience to make it work with resources on hand, or one who develops a creative solution using alternative thinking and available materials...anyone can plunk down money, and replace a failed/worn component...but it is a rigger who figures out how to do the functionally equivalent when that part in no longer available, and "rigs it" (instead of taking the easy way out and trashing the part etc.)...so when I saw your solution, especially soldering the brass to brass where any other securing of the repair piece would have been difficult at least, I had to give "Rigger Compliments"...perhaps "Bodger Compliments" would have needed no explanation...
Rig On!
|
|
|
|
|
I've got a couple of covers that have been machined out and new brass insert installed and the slot recut. They work great...
Drop me a note off list and I can send photos to anyone interested. I have both M40 and ones tapped for the M41 switch.
Chris
agent_strangelove@Hotmail.com
|
|
|
|
|
What is the exact width of the slots (before they have started to wear)? And diameter of the pins?
|
|
|
|
|
I did the roll pin fix in 1981, which was 170,000 miles ago. The shifter in my M40, 222S wagon, had been quite sloppy (not much filing required), but it is still good 32 years later.
Surprised to see others have done the same thing. It works!
Larry - Pasadena, CA
|
|
|
|
|
An interesting topic, but I was hoping for a better answer.
When I faced this problem a few years ago I didn’t have time to faff around, so dealt with it by buying another lid with almost virgin slots.
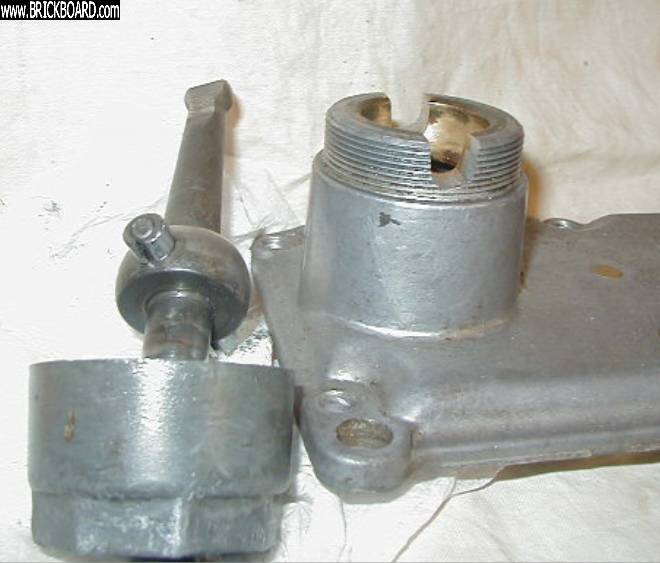
Ever since, however, I have been thinking about how the worn one could be repaired. Like Danny, I don’t like the idea of ‘squaring’ the slots and fitting sleeves on the pins. My slots are probably too far gone for that anyway (see pic).

What has crossed my mind (although I haven’t tried it):
1. Making a fillet of brass to fill the worn-out part of the slot (perhaps after first ‘squaring’ the slot), and then fixing the fillet in place by soldering it to the existing brass insert. I don’t know if one would be able to get enough heat there without melting the die-cast part of the lid.
2. If soldering doesn’t work, to fix the fillet in place with an epoxy adhesive.
Any chance of that working?
|
|

|
|
I don't understand what the problem with the shims is.
Granted, y cover was worn a lot less than that.
But I did that a while ago on mine, and it's worked perfectly fine ever since, and the stick is still nice and tight and not floppy.
Is it grinding away the slot to square it up again (which can certainly be done with the trans in the car - at least on a 544 - where it protrudes above the tunnel)> Or using sheetmetal for shims?
--
'63 PV544 rat rod, '93 Classic #1141 245 (now w/16V turbo)
|
|
|
|
|
Mine's not quite as bad as Simon's. I went and bought a 3/8" roll pin. I'm going to try it.
My only concern is that, as the wear is above 9 o'clock and below 3 o'clock, by the time I file out the slot enough to recenter the roll pin on the original axis, either the slot will be canted or I'll need a larger diameter roll pin. I'll take some photos as I do it and see how it goes. I like filing.
|
|

|
|
Take your time and file carefully.
Make sure that you file deep enough that the ball still rides in the socket. You can even use a round file for the bottom of the slot.
You may have to file the sharp edges of the roll pin too after you trim it to size.
I actually think the larger diameter of the roll pin helps spread the force around and will likely last longer than the original.
A reminder... don't use the shift lever as an armrest. The only time your hand should be on the lever is when you're moving it from one gear to the next.
--
"Differences of opinions should be tolerated, but not if they're too different" - Sharon Craig
|
|
|
|
|
I haven't swapped the cover into the car, but with the cap screwed down, it's got full mobility and a nice smooth action. Because of the most slot wear below 3 o'clock and less above 9 o'clock, enlarging & squaring up the slot parallel to it's original orientation, tended to move the whole slot back. When it fit in the slot with the roll pins in place, I was able to establish a shiny wear mark on the rear surface of the brass cup that the ball sits in. I'm going to file a bit more off the front of the slot and it'll be better than new.
Just FYI, the roll pins I found were 3/8" OD, and the ID is almost a perfect match with the pin on the shifter, so it tapped on snug. I put the slot in the roll pin up, but you knew that.
If anybody wants me to cut them up pairs of these roll pin parts, let me know. You'll still have to file out your own cover.
|
|
|
|
|
Sounds good.
I should have added that I grease the whole assembly when I put it back together.
Maybe there is some splash from the gearbox, but I don't want to take the chance.
--
"Differences of opinions should be tolerated, but not if they're too different" - Sharon Craig
|
|
|
|
|
Yeah, I did that too. I first assembled it dry and move the parts around to see the wear pattern - that the ball is actually centered in the cup - not being located by the pins in the slots. I guess that originally there was a perfect fit - cup to ball with a little bit of play btw the pins and the slots.
|
|
|
|
|
"I'm not interested in making larger slots and sleeving the pins on the shift lever"
Danny, you may not be interested in sleeving the pins but aside from replacing the cover with one in better shape that may be the only practical fix---and a perfectly legitimate one at that. -- Dave
|
|
|
|
|
I thought I heard tell of somebody removing the bronze insert and rotating it 90º, and reinstalling it - then machining or filing new slots.
Okay, in the meantime tell me about bigger slots and sleeving the pins. Have you done it? What did you use for sleeve stock? Did you machine the slots wider/deeper or handwork? I guess it depends on how enlarged the slots are to begin with.
|
|
|
|
|
That's the first time I've heard that you can just turn the brass. Frankly, I don't think that would work since the pins overlap the soft brass and wear into the aluminum cover anyway. Can't even imagine how you'd get it out of there without damaging it.
Not sure what your concern is regarding the oversized pins.
Here's a lousy photo of what I've done to three M41s and one M4 gearbox tops.
It is simply a roll pin driven over the shift lever pin and then the gearbox top filed out accordingly to mate with the new roll pins.
Maybe it'll at least give you some other ideas.
It has worked flawlessly for many years. But I don't use the gear lever as an armrest like many people do.
--
"Differences of opinions should be tolerated, but not if they're too different' - Sharon Craig
|
|
|
|
|
I've done the same on mine. The cover was worn out more at the bottom of the slot than at the top, so I took a file and squared off the slot again. Then I took some modestly thick sheet metal (a little thinner than pictured above, perhaps a little less wear on my cover?) and cut it into long rectangles. As wide as the pins are long. Then I wrapped that around the pins, and cut to length. The stick fits in snugly now, and there's practically no slop at all. Good for another couple of decades of use. After which I'll probably just need to file the slot square again and make a thicker shim.
--
'63 PV544 rat rod, '93 Classic #1141 245 (now w/16V turbo)
|
|
|
|
|
Neato!!
Thanks alschnertz, JohnMc
Wish that I had seen these posts before I re-installed my M-41.
What a great idea...
|
|
|
|
|